Your garage feels like a sauna in summer and a swamp in winter. Condensation drips from the ceiling, your tools are rusting, and that musty smell won’t go away. The problem isn’t your garage door or insulation. It’s probably terrible ventilation in your garage attic.
Installing proper roof vents can drop your garage temperature by 20-30 degrees and eliminate moisture problems for good. I’ll walk you through choosing the right vent type, calculating how much ventilation you need, and getting everything installed correctly.
Understanding Your Garage Ventilation Needs
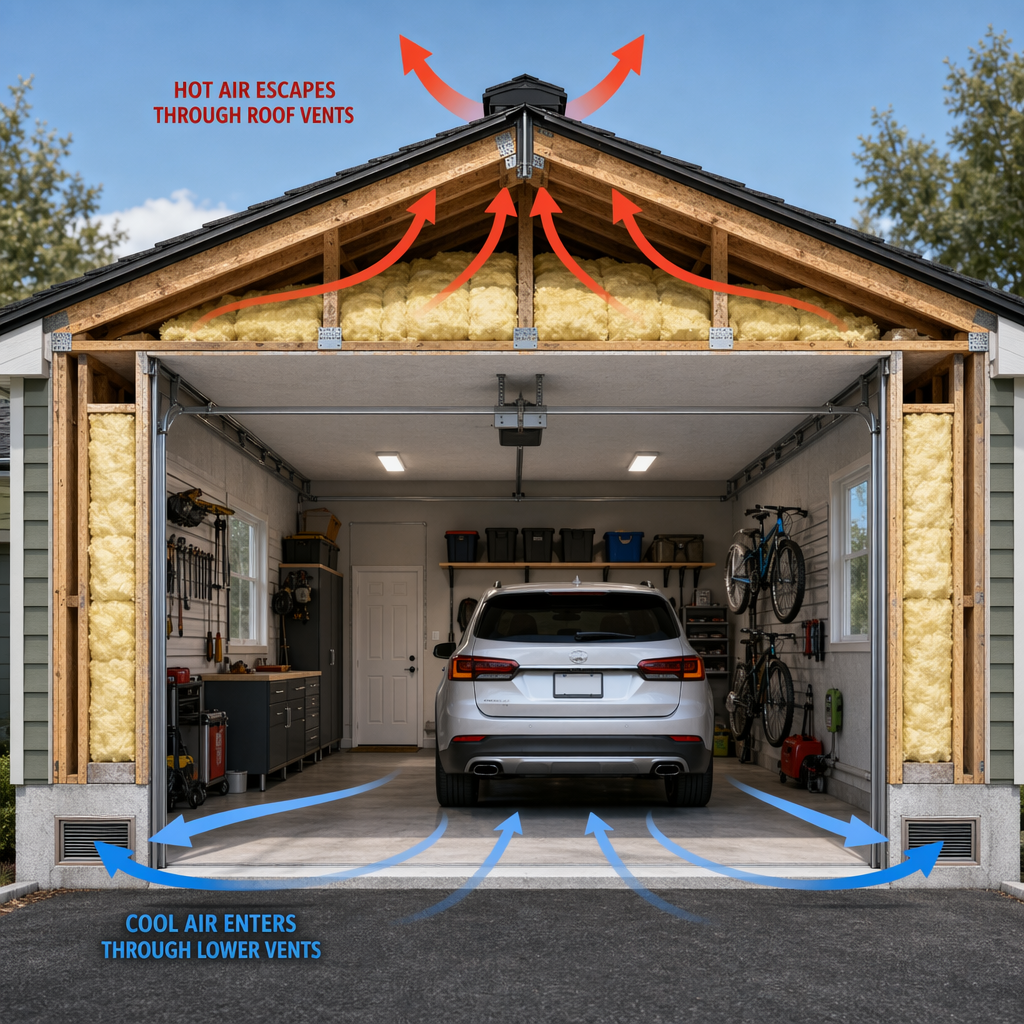
Before you climb on the roof with a circular saw, you need to figure out how much ventilation your garage actually needs. The standard building code requirement is 1 square foot of ventilation for every 300 square feet of attic space, split evenly between intake and exhaust vents.
For a typical two-car garage (24×24 feet), that’s 576 square feet of attic space. Divide by 300, and you need about 2 square feet of total ventilation. That means 1 square foot of intake vents (usually soffit vents) and 1 square foot of exhaust vents at the roof peak.
Most people underestimate how much ventilation they need. I’ve seen countless garages with a single turbine vent trying to do the work of three. The result is stagnant air, trapped heat, and moisture damage to your roof sheathing.
Ridge Vents: The Best Overall Choice
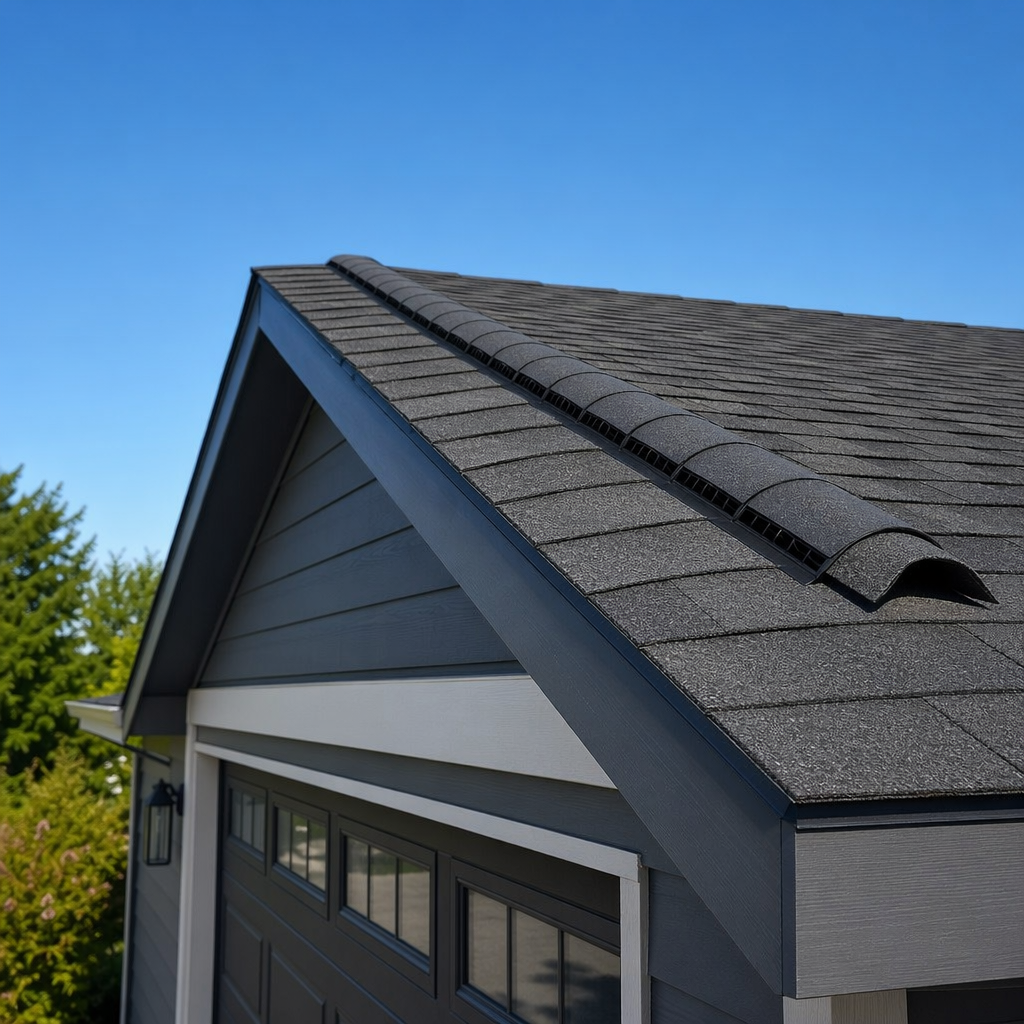
Ridge vents run along the entire peak of your roof and provide continuous exhaust ventilation. They’re nearly invisible from the ground, require no electricity, and work with natural convection. Hot air rises and exits through the ridge while cooler air pulls in through soffit vents.
Installation involves cutting a slot along your roof ridge (usually 1-2 inches on each side of the peak), then covering it with a specially designed ridge vent product. You’ll need a circular saw, a chalk line, and replacement ridge cap shingles.

Shingle-Over Ridge Vent
The most popular style that blends seamlessly with your existing roof shingles
The key is making sure you have adequate soffit vents installed first. Without proper intake ventilation, ridge vents can’t pull air through the attic space effectively. You want a continuous soffit vent or individual vents spaced every 4-6 feet along your eaves.
One downside: ridge vents won’t work well on low-slope roofs (under 3:12 pitch). They rely on the stack effect, which needs decent roof height to function properly.
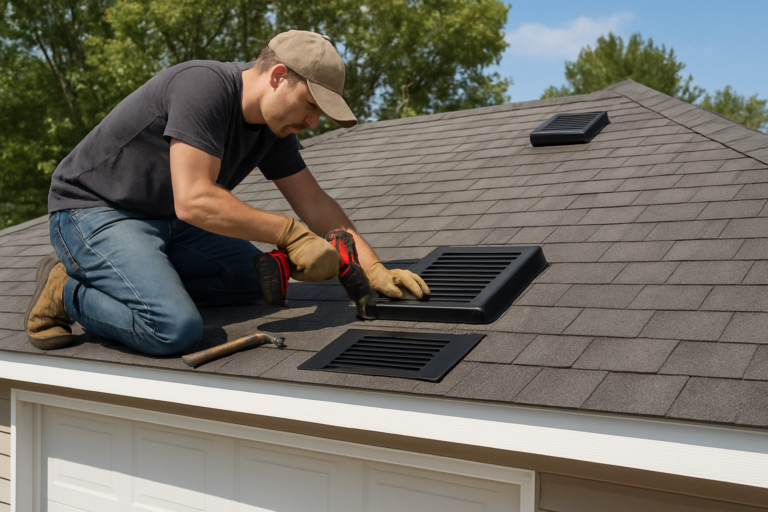
Turbine Vents: Old School But Effective
Those spinning metal mushrooms you see on garage roofs are turbine vents (also called whirlybirds). Wind spins the turbine, which actively pulls air out of your attic space. They move more air than static vents of the same size and cost nothing to operate.
Each 12-inch turbine vent moves about 600-800 cubic feet per minute in a decent breeze. For most garages, you’ll want 2-3 turbines properly spaced along the roof ridge. Install them within 3 feet of the peak for maximum efficiency.
The installation process is simpler than ridge vents. Cut a hole using the template provided, slide the base flashing under your upper shingles, seal everything with roofing cement, and bolt the turbine head to the base. Takes about 30 minutes per vent once you’ve got the process down.
Just make sure you get quality turbine roof vents with sealed bearings. Cheap models will squeak and bind up after a year or two of UV exposure and weather.
Powered Attic Vents: For Extreme Heat Problems
When passive ventilation isn’t enough, powered attic fans force hot air out mechanically. They’re the nuclear option for garages in hot climates or those with serious heat buildup issues. A quality attic fan can exchange your entire attic volume 10-15 times per hour.
Most powered vents come with adjustable thermostats that kick on when attic temperatures hit 90-100 degrees. Some include humidistats to run when moisture levels get too high. You’ll need to run electrical to the roof, which adds complexity to the installation.

Solar Powered Attic Fan
Runs without electrical work and pays for itself in cooling costs within a couple years
The catch with powered vents is they can create negative pressure if you don’t have enough intake ventilation. This pulls conditioned air from your house (if the garage is attached) or sucks in dust and moisture from below. Always double your soffit vent area when adding powered exhaust.
Installation is similar to turbine vents, but you’ll need to mount the fan securely and either wire it to your garage electrical panel or install a solar-powered model. I prefer solar units for detached garages since they eliminate the wiring hassle completely.
Preventing Moisture Problems
Proper ventilation isn’t just about temperature control. Moisture buildup causes mold, wood rot, and rust damage worth thousands in repairs. Every gallon of gas you store in your garage releases water vapor. Wet cars tracking in snow and rain add even more humidity.
Your ventilation system needs to move this moisture out before it condenses on cold surfaces. This means running your vents year-round, not just in summer. Winter condensation actually causes more damage than summer heat in most climates.
Always pair roof vents with proper soffit ventilation. The intake-to-exhaust ratio matters more than total vent area. Blocking soffit vents with insulation is one of the most common mistakes I see. Use soffit vent baffles to maintain an air channel between the insulation and roof deck.
Frequently Asked Questions
How many roof vents does my garage need?
Calculate your garage attic square footage and divide by 300. That’s your total net free ventilation area in square feet. Split this evenly between intake (soffit) and exhaust (roof) vents. A 500 square foot garage needs about 1.67 square feet of ventilation total, so roughly 0.83 square feet each of intake and exhaust. Check the net free area rating on your chosen vents to determine how many you need.
Can I install roof vents myself or do I need a professional?
Most homeowners can install basic roof vents with standard tools and careful attention to flashing details. You’ll need to be comfortable working on a roof and cutting through shingles and sheathing. Ridge vents and turbine vents are very manageable DIY projects. Powered vents requiring electrical work might warrant hiring an electrician, especially if you’re running new circuits. The physical vent installation is still DIY-friendly even with powered units.
This article contains affiliate links. We may earn a small commission at no extra cost to you.