


Dealing with a garage that floods after rain is one of those frustrations that catches you off guard. Everything seemed fine until one day you notice something isn’t right. The reassuring truth is that these issues almost always trace back to identifiable causes with practical solutions.
This guide covers the most common culprits in diagnostic order, starting with the simplest checks. Most readers find their answer within the first few sections without needing a service call. The approach here moves from quick fixes you can handle in an afternoon to more involved solutions that might require professional help.
Check Your Gutters and Downspouts First
Start with the easiest explanation. Clogged gutters dump thousands of gallons right at your foundation during heavy rain. If your garage shares a wall with the house or has its own gutters, this is the first thing to rule out.
Pull the ladder out and check for leaves, shingle grit, and debris packed in the channels. Even a partial clog redirects water over the edge instead of through the downspouts. While you’re up there, look for standing water in the gutters after the rain stops. That’s a clear sign of poor slope or sagging sections.
Follow the downspouts to the ground. Many garages flood because downspouts dump water within two feet of the foundation. The soil can’t absorb it fast enough, so it pools and finds its way under the door or through foundation cracks. Add downspout extensions that carry water at least six feet away from the building. The corrugated plastic extensions are budget-friendly and snap on in minutes.
If your downspouts drain into underground pipes, check those outlets. Tree roots, sediment, and ice damage can block buried drains. Run a hose down the inlet while someone watches the outlet. No water coming through means you’ve got a clog that needs clearing.
Inspect Your Door Bottom Seal
The rubber seal along the bottom of your garage door takes constant abuse from tires, temperature swings, and UV exposure. A compromised seal lets water flow right under the door during rain.
Close the door and look for daylight underneath. Any visible light means gaps large enough for water. Check the entire width, not just the center. Seals often fail at the corners first where the door flexes most during operation.
Press the seal with your hand. It should compress and spring back. If it stays flat, cracks, or feels brittle, it’s done. Replacement seals vary in price depending on door width and material quality.

Garage Door Bottom Seal
Essential barrier against water intrusion under garage doors
EPDM rubber is the most durable material. It resists UV, stays flexible below freezing (unlike vinyl, which cracks), and bounces back after compression. PVC seals cost less but need more frequent replacement in extreme climates.
Bottom seals come in T-shaped, bulb, beaded, and J-type profiles. Match the profile to your existing retainer channel (usually 3 or 4 inches wide). Measure channel width and height before ordering to avoid modification headaches.
Installation takes about 30 minutes. Slide the old seal out of the retainer channel, clean the channel with a rag, then push the new seal in from one end. Some installers use dish soap as lubricant to make the seal slide easier. Trim excess length with a utility knife.
Garage doors use three seal types: bottom, side (jamb), and header (top). Replacing all three gives the best results. If budgeting, start with the bottom seal, which takes the most abuse and makes the biggest difference. You can find more details about proper seal installation in our garage door weather stripping replacement guide.
Evaluate Your Driveway and Apron Slope
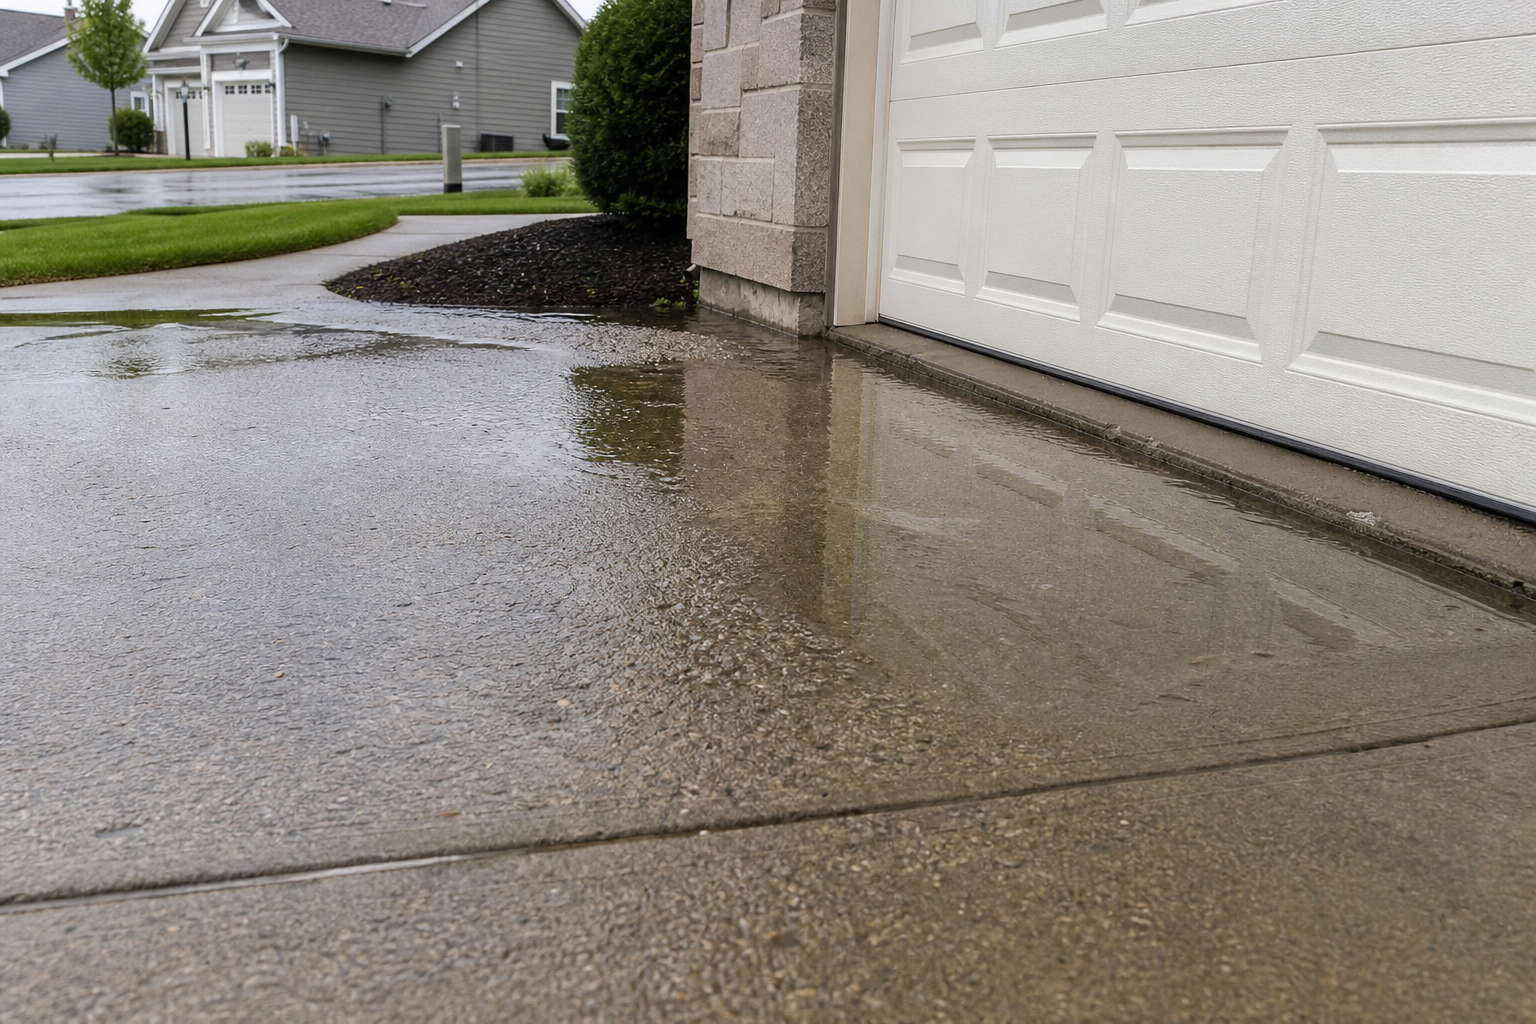
Water follows gravity. If your driveway slopes toward the garage instead of away from it, you’re fighting physics every time it rains.
Stand at the street and eyeball the slope. The driveway should pitch away from the garage at a minimum of one-quarter inch per foot. For a 20-foot driveway, that’s five inches of drop. Anything less and water will pool near the door.
Use a four-foot level and a tape measure to get exact numbers. Place the level on the driveway with one end toward the garage. Lift the garage end until the bubble centers, then measure the gap under that end. Divide that measurement by four to get your slope per foot.
If the slope is wrong, you have three options. Mudjacking (also called slabjacking) pumps a slurry under the concrete to lift and reposition it. Results are immediate and the driveway is usable the same day.
Resurfacing adds a thin overlay to build up the low areas and create proper slope. This works if the existing concrete is in decent shape without major cracks. Quality polyurethane or epoxy resurfacing products provide excellent results.
Full replacement is the nuclear option. This makes sense when the driveway is already cracked, settled, or nearing the end of its life anyway.
Look for Foundation and Floor Cracks
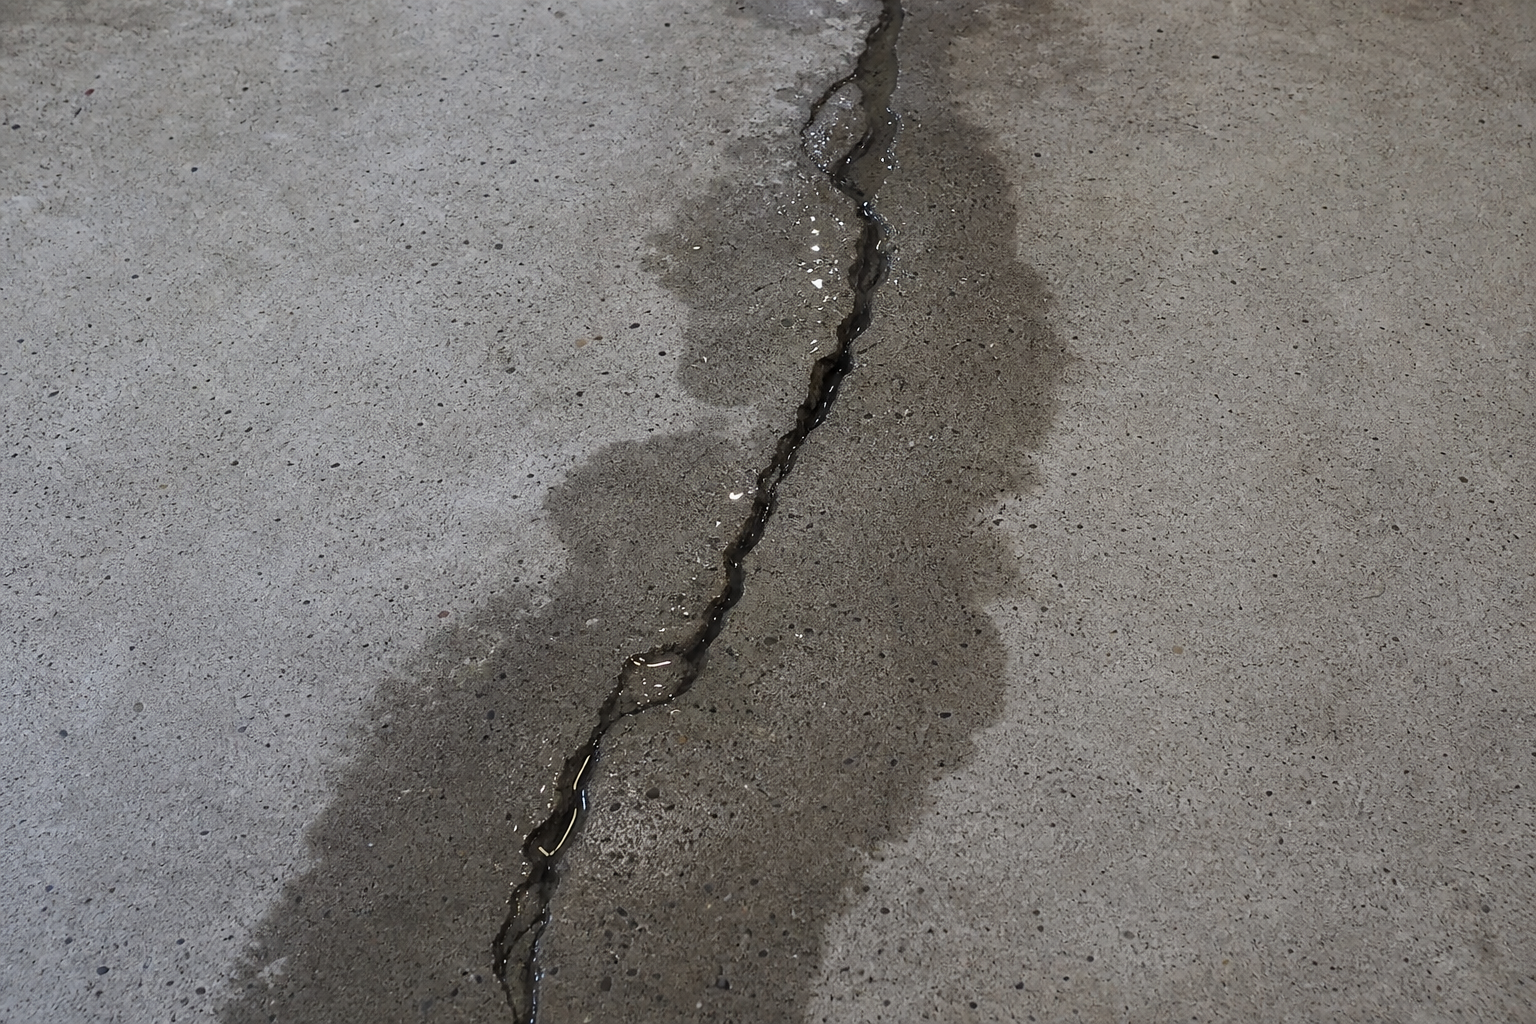
Concrete cracks. Thermal cycling, settling, and shrinkage all create fractures over time. Small hairline cracks are cosmetic. Cracks wide enough to fit a credit card become water highways during heavy rain.
Walk the perimeter of your garage looking at the foundation wall from outside. Check especially where the slab meets the wall. Any gap wider than one-eighth inch needs sealing. Mark problem spots with chalk so you don’t lose track of them.
Inside the garage, check the floor for cracks running from the door toward the back wall. Water flowing under the door will follow these cracks and spread across the slab. Press a paper towel into suspect cracks after a rain. If it comes up wet, you’ve found a route.
Seal small cracks (under one-quarter inch) with polyurethane or epoxy crack filler. Clean the crack first with a wire brush and vacuum out dust. Apply filler slightly proud of the surface, then smooth it flush after it sets up. A standard tube covers about 24 linear feet of one-eighth inch crack.
Larger cracks need routing. Use a grinder with a diamond blade to widen the crack to about one-quarter inch and give it square edges. This creates a proper keyway for the filler to lock into. Without routing, filler often pops out within months as the crack continues to move.
Structural cracks (wider than one-half inch, actively growing, or with vertical offset) need professional evaluation. These indicate foundation movement that crack filler alone won’t solve.
Install or Improve Your Threshold
A raised threshold creates a physical barrier that water has to crest before entering the garage. Even a one-inch rise stops most casual flooding from driveway runoff.
The simplest option is a commercial threshold seal kit. These bolt to the floor just inside the door and create a low dam. Installation takes an hour with a drill and basic hand tools.
For a permanent solution, pour a concrete threshold. Build a form two to three inches high across the door opening. Use fast-setting concrete (sets in 20 to 40 minutes) so the garage isn’t out of service long. Smooth the face at a slight angle so water drains away from the door. This approach is cost-effective and lasts indefinitely.
If pouring concrete isn’t appealing, aluminum threshold ramps work well. These angle up from the driveway and create a raised lip at the door. The gradual slope makes them easier to drive over than a blunt step.
One caution: local building codes sometimes limit threshold height to maintain accessibility. Check requirements before installing anything over two inches tall.
Address Exterior Grading Issues
The ground around your garage should slope away in all directions. Water collecting against the foundation will find its way in through cracks, under the door, or through the slab itself if hydrostatic pressure builds high enough.
Walk the perimeter and look for low spots where water puddles after rain. Check especially where landscaping, sidewalks, or patios meet the garage. These transitions often create unintended dams.
Proper grading calls for a six-inch drop over the first ten feet away from the foundation. Measure with a four-foot level and a tape. Set the level on the ground with one end against the foundation wall. Lift the far end until level, then measure the gap. That gap should be at least two inches for a four-foot level (equivalent to six inches over ten feet).
Fix grading problems by removing soil from high spots and adding it to low areas. Work outward from the foundation, shaping the soil into a smooth slope. Compact the added soil with a hand tamper to prevent settling.
If you’re adding significant depth (more than four inches), use a clay-based fill rather than topsoil. Clay sheds water better and compacts more solidly. Top the clay with two inches of topsoil for appearance and to support grass or plantings.
Avoid piling mulch, gravel, or soil against the garage siding. Maintain at least six inches of clearance to prevent moisture wicking into the walls.
Install a French Drain System
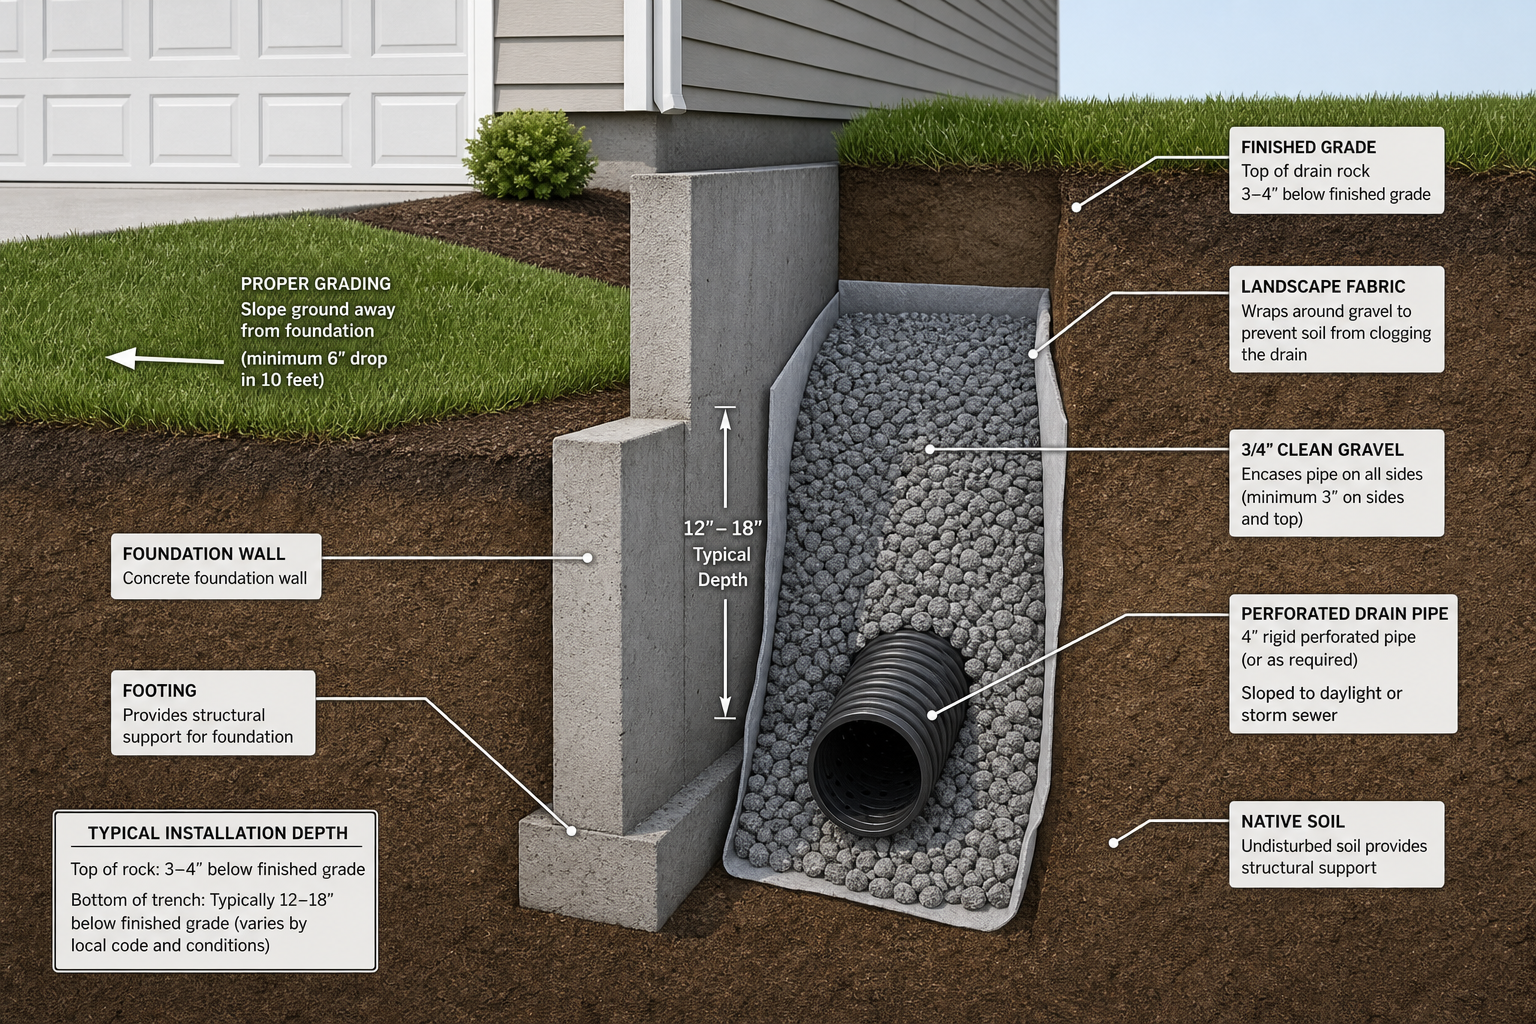
When grading fixes and threshold barriers aren’t enough, you need subsurface drainage. A French drain intercepts groundwater before it reaches the garage, routing it away to a lower area or storm sewer.
The classic French drain is a gravel-filled trench with a perforated pipe at the bottom. Dig the trench parallel to the garage wall, about three feet out from the foundation. Depth should be at least 18 inches (below the frost line in cold climates) with a slope of one-eighth inch per foot toward the outlet.
Line the trench with landscape fabric to keep soil from clogging the gravel. Add four inches of three-quarter-inch drainage rock, lay the perforated pipe (holes down), then cover with more rock to within two inches of grade. Wrap the fabric over the top and finish with topsoil.
Size the pipe based on runoff volume. A four-inch pipe handles most residential applications. Upgrade to six-inch if you’re draining a large area or dealing with heavy clay soil that sheds water quickly.
Outlet options depend on site conditions. Ideal is a daylight outlet where the drain emerges at a lower spot on your property and releases to open air. If no natural outlet exists, tie into a storm sewer (with permit) or terminate at a dry well.
DIY French drain materials are reasonably priced per linear foot. Expect to move a lot of dirt; a 40-foot drain means hauling roughly three tons of soil. Renting a trencher beats hand digging on any run longer than 20 feet.
Professional installation varies by depth, access difficulty, and local labor rates. Pros bring excavation equipment and finish in a day or two rather than a weekend project stretching into weeks.
Consider Interior Water Management
If water is getting under the slab from a high water table or subsurface springs, exterior fixes only go so far. You need to manage water inside the garage footprint.
A sump pump system collects water at the lowest point and pumps it outside. For garages, this usually means cutting a sump pit into the floor near the back corner (farthest from the door where water naturally collects). The pit holds a submersible pump that activates when water reaches a set level.
Dig the pit about 18 inches deep and 16 inches in diameter. Line it with a plastic sump basin. Install a quality sump pump with a vertical float switch. Pedestal pumps are cheaper but submersible units last longer and run quieter.
Discharge piping should be one and a half inches minimum, running to an outlet at least 10 feet from the garage. Bury the pipe below the frost line or use heat tape in cold climates to prevent freeze-ups. Add a check valve near the pump to prevent backflow.

Every sump pump needs a dedicated GFCI outlet; factor in electrician costs if one isn’t already present. For more detailed installation guidance, check our garage floor drain installation guide.
Battery backup sump pumps add critical insurance. The worst flooding happens during power outages when standard pumps are dead. A battery backup runs for hours on a marine deep-cycle battery.
Interior channel drains capture water entering under the door and route it to the sump. Cut a shallow trench across the garage just inside the door, set a plastic or metal channel flush with the floor, and slope it toward the sump pit. Cover with a grate. This setup stops water from spreading across the entire floor even if the door seal fails.
Upgrade Your Drainage System
Garages built before the 1990s often lack any floor drain. Adding one improves water management and makes cleanup easier.
Floor drains require two things: a low spot for water to collect and a destination for that water to go. If your garage floor already slopes toward one area, that’s your drain location. If not, you’ll need to build up the floor edges to create slope or saw-cut a sloped channel.
The drain itself is a cast-iron or PVC fixture with a removable grate. It connects to four-inch drainpipe that runs under the slab to either a sewer connection (if allowed by code), a dedicated drywell, or to daylight at a lower spot on the property.
Installing a floor drain in an existing garage means cutting concrete, trenching under the slab for piping, and patching. This is heavy work. Plan on renting a concrete saw and a small jackhammer.
Trench drains (also called channel drains) offer easier installation. These are long linear drains that sit on top of the slab rather than cutting through it. Slope the garage floor slightly toward the channel, which connects to outlet piping. Trench drains work well in garages with even modest slope already present.
Understand Moisture Sources and Solutions
Moisture in a garage comes from two primary sources. Vapor transmission moves water through the concrete slab from soil below. Condensation forms when warm humid air contacts the cooler slab surface. Each requires a different solution, and treating the wrong one wastes time and money.
A simple plastic sheet test identifies which type you have. Tape a 2-foot square of plastic flat on the floor, seal all edges, and leave it 48 hours. Moisture on top means condensation (humidity issue). Moisture underneath means vapor transmission (slab issue). Different root cause, different fix.
Vapor transmission requires a moisture barrier. If you’re repainting or coating the floor, use a vapor-barrier primer or epoxy rated for high moisture conditions. For severe cases, install a membrane system (like a rubberized sheet product) before applying floor coatings. Our garage floor sealing guide covers this process in detail.
Condensation responds to dehumidification and air circulation. A 50-pint dehumidifier pulls moisture from the air before it can condense on the floor. Run it during humid months and drain it to the sump or a floor drain. Adding a ceiling fan or box fan improves air movement and reduces condensation further.
Insulating the garage helps with both issues. Insulation raises the interior slab temperature, reducing the
