
Standing water in your garage after washing the car or during heavy rain isn’t just annoying. It can lead to concrete damage, mold growth, and that constant musty smell that never seems to go away. Installing a garage floor drain solves this problem, but it’s not always a simple weekend project. The complexity depends heavily on your existing setup and what lies beneath that concrete slab.
Before you start breaking up concrete, you need to understand what’s involved and whether it makes sense for your situation. Let’s walk through the entire process, from planning to the final pour.
When Installing a Drain Makes Sense (And When It Doesn’t)

The feasibility of adding a floor drain depends on two critical factors: access to drainage and your garage floor construction. If your garage has a concrete slab on grade with accessible sewer or storm drain lines nearby, you’re in good shape. The project becomes much more complicated with a raised foundation or when the nearest drain connection is 50 feet away.
You’ll also need to consider your local drainage regulations. Many municipalities prohibit connecting garage drains to sanitary sewer lines because of potential contamination from vehicle fluids. Storm drains or a drywell might be your only legal options. Check with your local building department before planning anything.
The project stops making sense when you’d need to trench more than 20-30 feet, bust through foundation walls, or install a sewage ejector pump. At that point, you’re looking at serious costs that might exceed the value of the improvement. For situations where full drain installation isn’t practical, there are several moisture control options that might better suit your needs and budget.
Permits and Code Requirements
Most jurisdictions require permits for this work. You’re modifying plumbing and drainage systems, which falls squarely under permit territory. Expect inspections at the rough-in stage (before you pour concrete) and after completion.
Code requirements vary, but common ones include minimum drain pipe diameter (usually 2 inches for point drains, 3-4 inches for trench drains), proper trap installation to prevent sewer gas backup, and specific slope requirements. Your drain pipe typically needs a slope of 1/4 inch per foot minimum, though 1/2 inch per foot is better for garage applications where you might have debris.
Some areas also require backflow preventers if you’re connecting to municipal systems. This prevents sewage from backing up into your garage during main line blockages.
Point Drains vs. Trench Drains
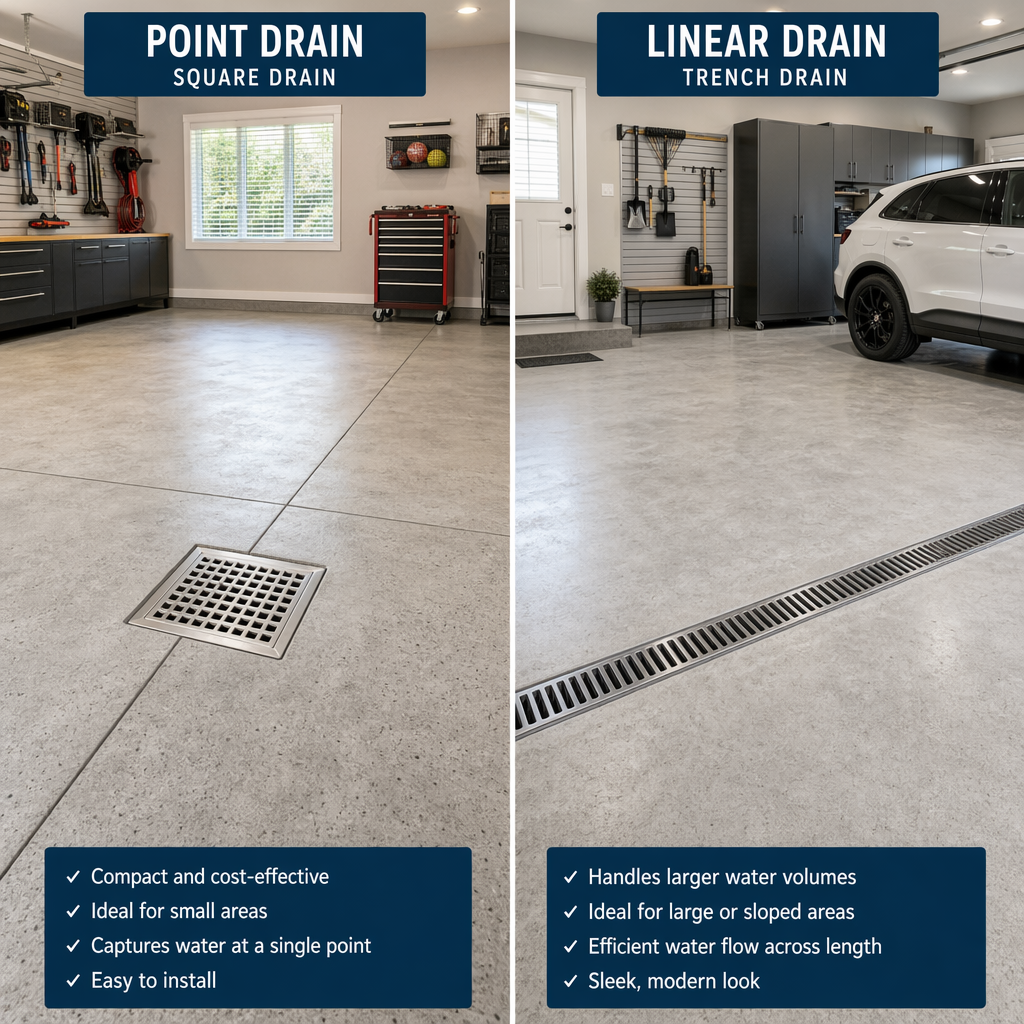
You have two main options: point drains and trench drains. Each works better for different situations.
Point drains are single round or square grates installed at the low point of your floor. They’re simpler to install and work well if your floor already slopes toward one area. You can add multiple point drains if needed, though that multiplies your trenching work. The main limitation is that water needs to flow across the floor to reach the drain, so you need adequate slope throughout the garage.

Garage Floor Point Drain
Best choice for garages with existing slope toward one location
Trench drains run the width of your garage, typically near the door opening. They catch water before it spreads throughout the space and handle larger volumes more efficiently. Installation requires more concrete removal since you’re cutting a channel across the entire width, but they’re more forgiving if your floor slope isn’t perfect. Many people prefer the look too. If you’re considering this option, we have a detailed guide on trench drain installation techniques that covers the specific challenges you’ll face.
The Trenching and Installation Process
First, you’ll need to map out your drain location and the path to your connection point. Use a laser level or long straightedge to verify your floor slope. Water should naturally flow toward your planned drain location. If it doesn’t, you’ll need to address this when you repour concrete.
Mark your cutting lines with chalk or tape. For a point drain, you’re typically cutting a 12×12 inch area plus a trench for your drain line. Trench drains require a channel about 6-8 inches wide running across your garage floor.
Rent a concrete saw for this job. A demo hammer will crack more concrete than necessary and create an enormous mess. Make your cuts to the full depth of the slab (usually 4-6 inches). Wear proper safety gear including respirator, eye protection, and hearing protection. Concrete dust is serious business.
After cutting, use a jackhammer or demolition hammer to break out the concrete sections. Remove all debris and dig down to create your trench for the drain pipe. The trench depth depends on your required slope and where you’re connecting to the drain system. In some cases, if your drainage needs extend beyond the garage or you’re dealing with groundwater issues, you might need to consider French drain installation as part of your overall drainage strategy.
Install your drain body according to manufacturer instructions. Most point drains have adjustable height so you can set them flush with your finished floor surface. Connect your drain pipe, maintaining proper slope throughout the run. Use PVC cement rated for your application.

PVC Drain Pipe and Fittings
Use schedule 40 PVC for reliable drainage that won’t crack under your garage floor
Before pouring concrete, call for your rough-in inspection. Inspectors want to see proper slope, correct pipe diameter, and appropriate trap installation. Don’t skip this step or you might end up tearing everything out later.
Pouring and Finishing Concrete
After passing inspection, prepare for the concrete pour. Set the drain grate to the correct height using shims or adjusters. Most drains have a way to protect the grate during the pour. You want the finished grate surface to match your floor level or sit slightly lower to ensure water flows into it.
Pour concrete to match your existing floor thickness. Use expansion joint material between old and new concrete to prevent cracking. Work the concrete under and around the drain body carefully, eliminating air pockets. A concrete vibrator helps but isn’t essential for small pours.
Finish the concrete to match your existing floor texture. For most garage floors, a basic broom finish works fine. Create a slight slope toward the drain if your existing floor is relatively flat. Even 1/8 inch per foot helps water movement.
Let the concrete cure for at least 7 days before driving on it. Keep it moist during curing by misting with water or covering with plastic sheeting. Rapid drying causes cracks and weakens the concrete.
Maintenance and Long-Term Care
Once installed, your drain needs regular attention. Remove the grate monthly and clear out any debris. Leaves, dirt, and small stones accumulate quickly and can block water flow.
Pour water down the drain every few weeks if you don’t use it regularly. This keeps the trap filled and prevents sewer gas from entering your garage. A dry trap is a common complaint about garage drains that sit unused for extended periods.
Watch for slow drainage, which usually indicates a partial blockage. A drain snake handles most clogs without calling a plumber. For stubborn blockages, you might need a power auger.
Alternative Solutions to Consider
Before committing to cutting up your floor, consider whether simpler solutions might work. Garage floor containment mats catch water and snow melt without permanent modifications. They’re not as elegant, but they’re also not a multi-day construction project. For protecting against oil spills and general floor protection, specialized garage floor mats offer an effective and reversible solution.
Improving your garage door seal and weather stripping keeps most water out in the first place. Combine this with better ventilation, and you might solve your moisture problems without breaking concrete.
For minor water issues, strategically placed absorbent products or simply improving floor slope near the door might be enough. Not every garage needs a drain system.
Frequently Asked Questions
Can I install a garage floor drain myself, or do I need a professional?
You can handle this as a DIY project if you’re comfortable with concrete work and basic plumbing. The physical labor is significant, and you’ll need to rent specialized equipment like a concrete saw and possibly a jackhammer. However, the plumbing connections are basic, and the concrete work is forgiving. The most challenging part is often navigating permit requirements and ensuring code compliance. Consider hiring a professional for the plumbing inspection if you’re uncertain about meeting local codes.
How much does it typically cost to add a garage floor drain?
Costs vary widely based on your situation. A simple point drain with a short run to an existing drain line might be manageable on a modest budget for DIY installation. Professional installation costs significantly more, especially if extensive trenching is required or if you need to connect to a distant drain line. Trench drains cost more than point drains due to increased materials and labor. Get multiple quotes from licensed plumbers who can assess your specific situation and local code requirements.
What’s the minimum floor slope needed for a garage drain to work properly?
Your garage floor needs at least 1/8 inch of slope per foot toward the drain for water to flow reliably. However, 1/4 inch per foot is better and more commonly recommended. For a 20-foot wide garage, this means the floor should drop 2.5 to 5 inches from the back wall to a drain near the door. Many existing garage floors already have some slope built in for this purpose. You can check yours using a long level and measuring the gap at different points across the floor.
Related Articles
- How to Install a Trench Drain in Your Garage Floor
- How to Install Garage French Drains
- Best Garage Floor Moisture Solutions: Complete Buyer’s Guide
- Drymate Oil Spill Mat Review: Garage Floor Protection
This article contains affiliate links. We may earn a small commission at no extra cost to you.