Your neighbor’s been giving you the look again. You know the one. That subtle grimace every time your garage door opens and the sound of your drum kit or table saw comes rolling out. Converting your garage into a music studio or workshop space is fantastic until you realize sound travels way too well through those thin walls and that massive garage door.
The good news is that you don’t need to spend thousands on professional soundproofing to make a real difference. Most garage musicians and hobbyists just need to control echo and reduce noise bleed, not build a recording studio that meets professional isolation standards. Let’s look at what actually works without emptying your wallet.
Soundproofing vs. Sound Dampening: Know the Difference

Before you buy anything, you need to understand what you’re trying to accomplish. Soundproofing and sound dampening are not the same thing, and confusing them will waste your money fast.
True soundproofing stops sound from entering or leaving a space. It requires mass, density, and often complete reconstruction of walls with multiple layers of drywall, resilient channels, and air gaps. This is expensive, permanent, and honestly overkill for most garage applications.
Sound dampening (also called acoustic treatment) absorbs sound waves inside a room to reduce echo, reverberation, and that awful hollow sound garages naturally have. This is what most people actually need. It won’t make your garage silent to the outside world, but it will reduce the volume that escapes and make the space far more pleasant to work in.
For garage studios and workshops, focus on dampening first. You’ll reduce noise bleed by 30-50% with good acoustic treatment, which is usually enough to keep the peace with neighbors. Plus, your recordings or video calls will sound infinitely better without all that echo. If you’re also dealing with ventilation issues from the extra equipment and activity, consider adding proper exhaust fans to keep air quality comfortable.
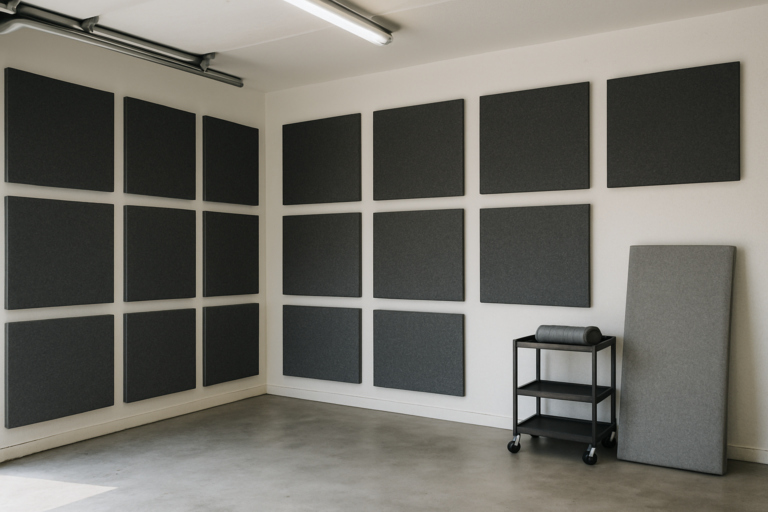
Acoustic Foam Panels: The Popular Choice
Walk into any home studio and you’ll probably see those distinctive wedge or pyramid-shaped foam panels on the walls. They’re popular because they work well for mid to high frequencies, which is where most of the annoying echo happens.
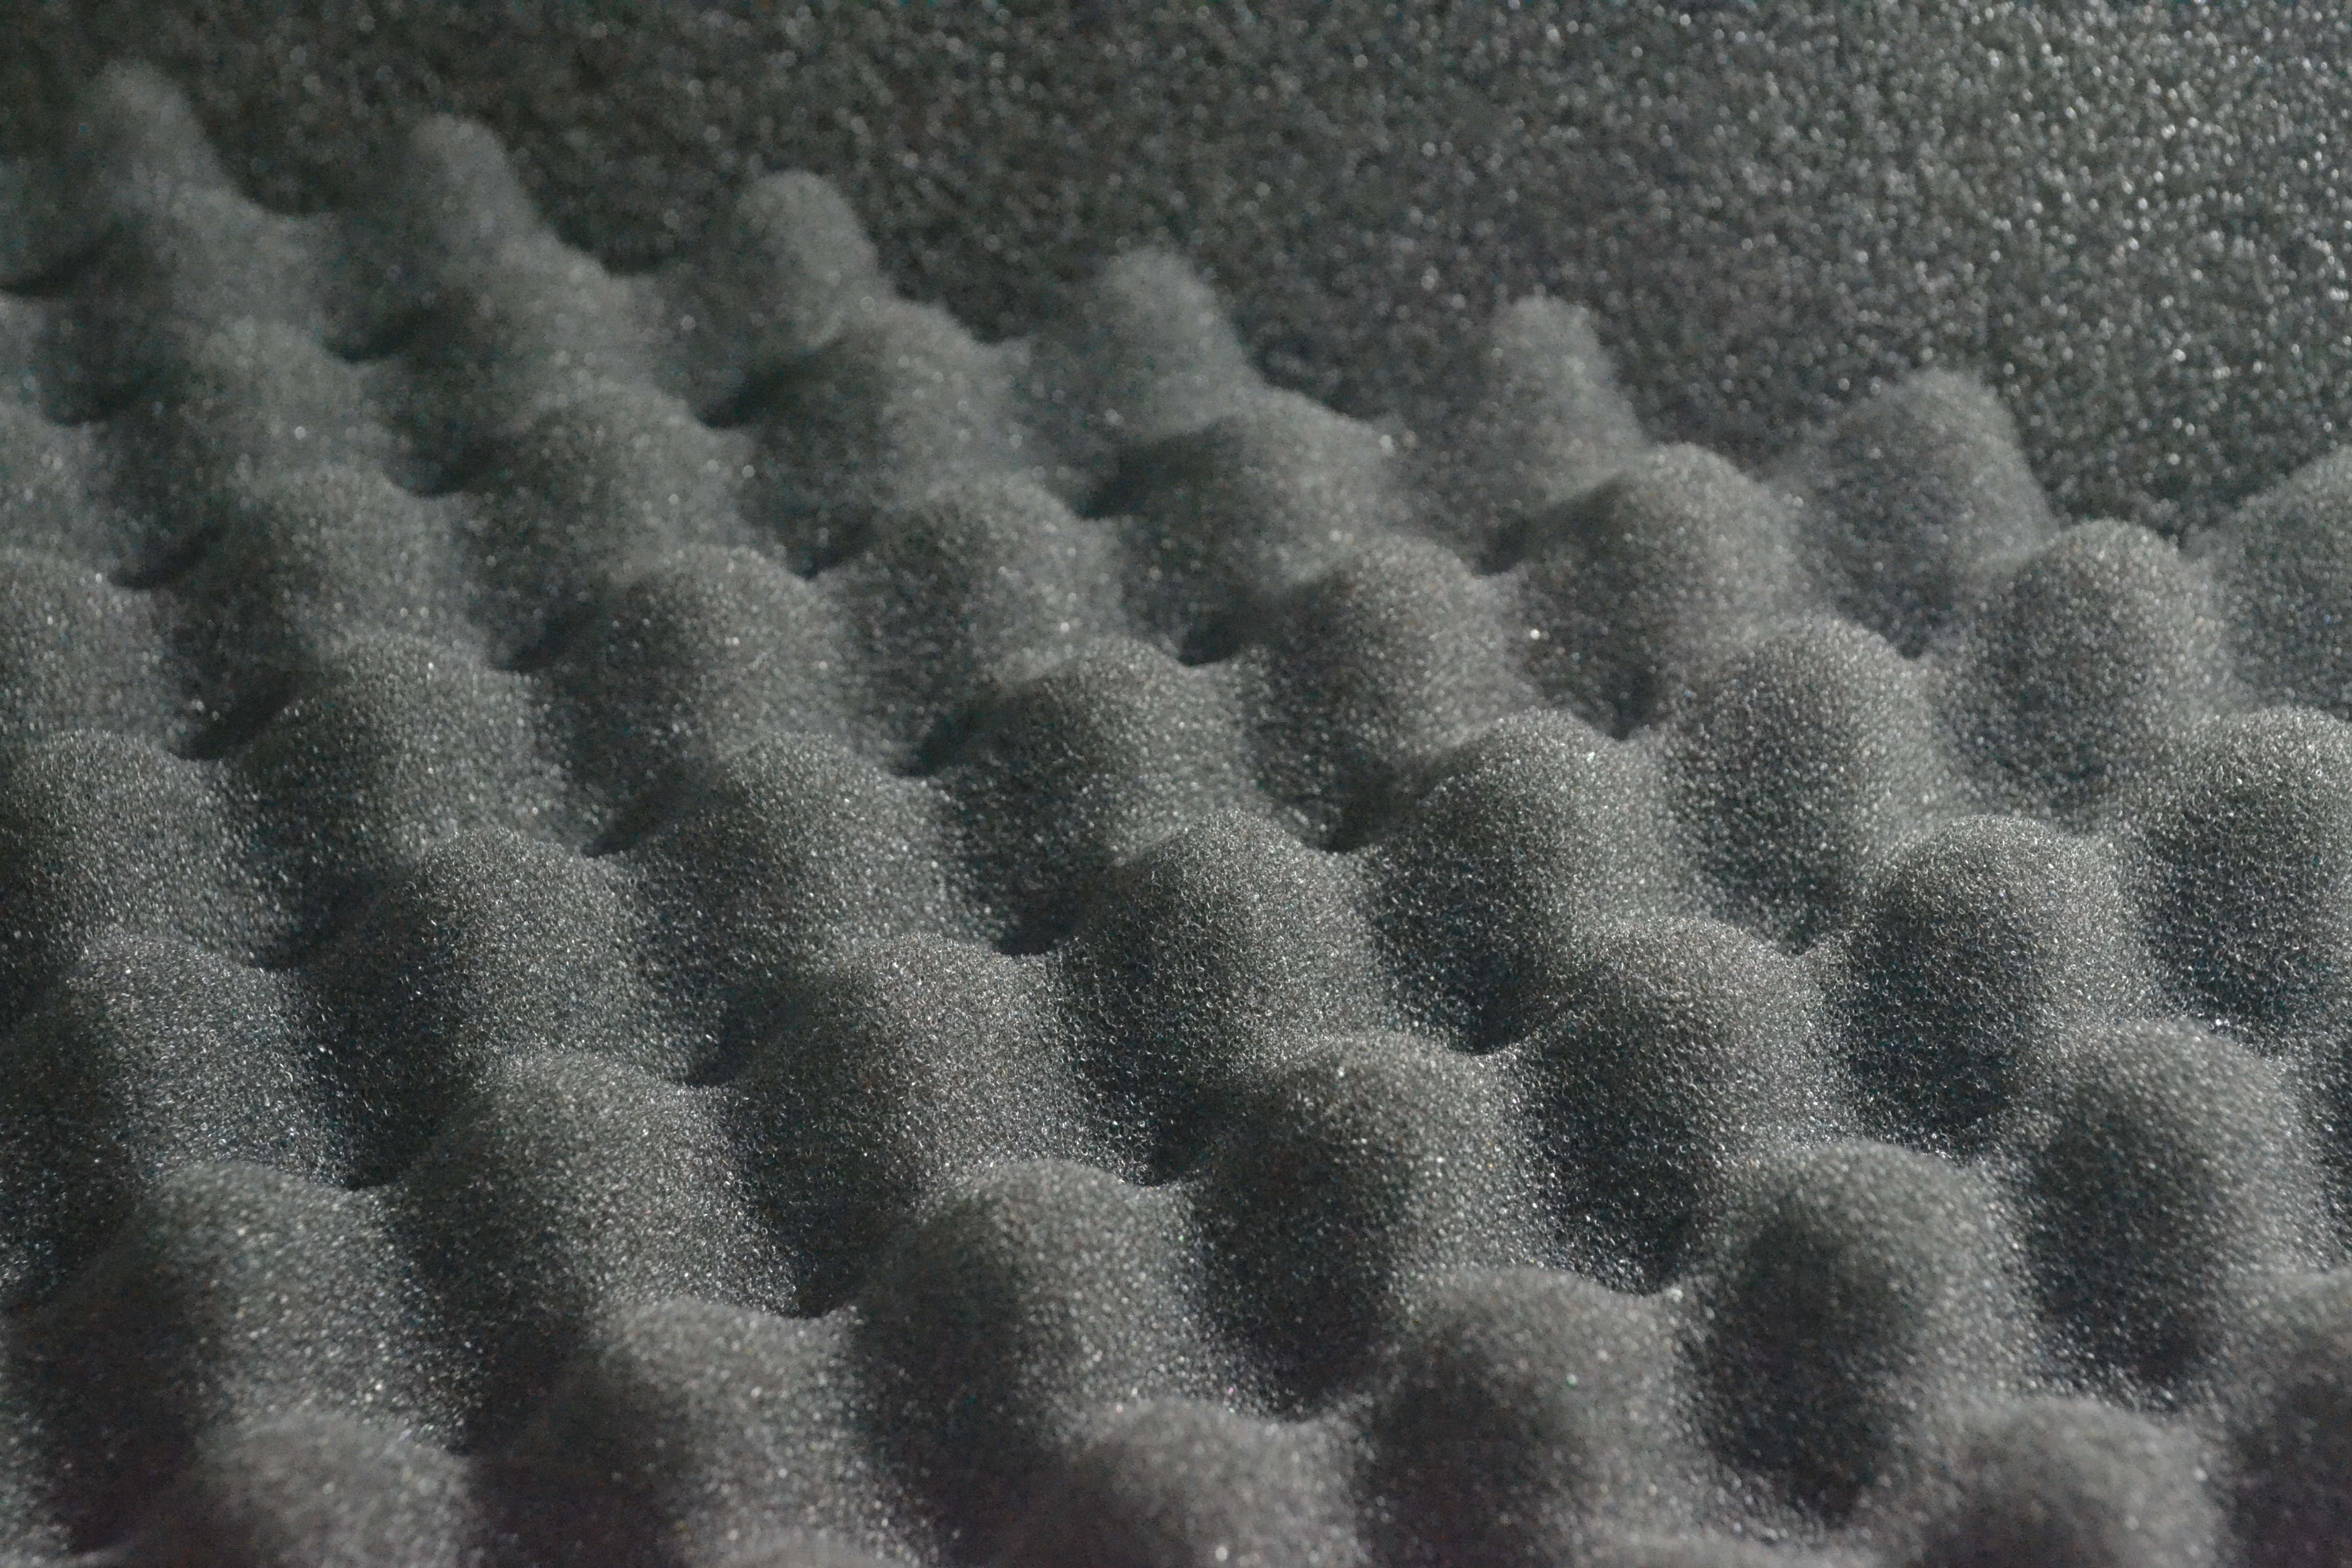
Standard acoustic foam panels come in various thicknesses, typically 1, 2, or 3 inches. Thicker panels absorb lower frequencies better. For a garage space, you want at least 2-inch thickness. The 1-inch stuff is basically decoration.

Acoustic Foam Panels 2 Inch
Two-inch thickness hits the sweet spot for garage spaces, handling the frequencies that matter most.
Installation is simple. Most foam panels come with adhesive spray or adhesive squares. Clean your wall, stick them up in a pattern that covers 25-40% of your wall space, and you’re done. You don’t need to cover every square inch. Strategic placement near sound sources and reflection points works better than random full coverage.
The downside? Foam panels don’t do much for low-frequency sounds like bass guitars, kick drums, or power tools. They also deteriorate over time, especially in garages with temperature swings and humidity. Expect to replace them every 3-5 years if your garage isn’t climate controlled.
Rockwool and Fiberglass Panels: The Upgrade Option
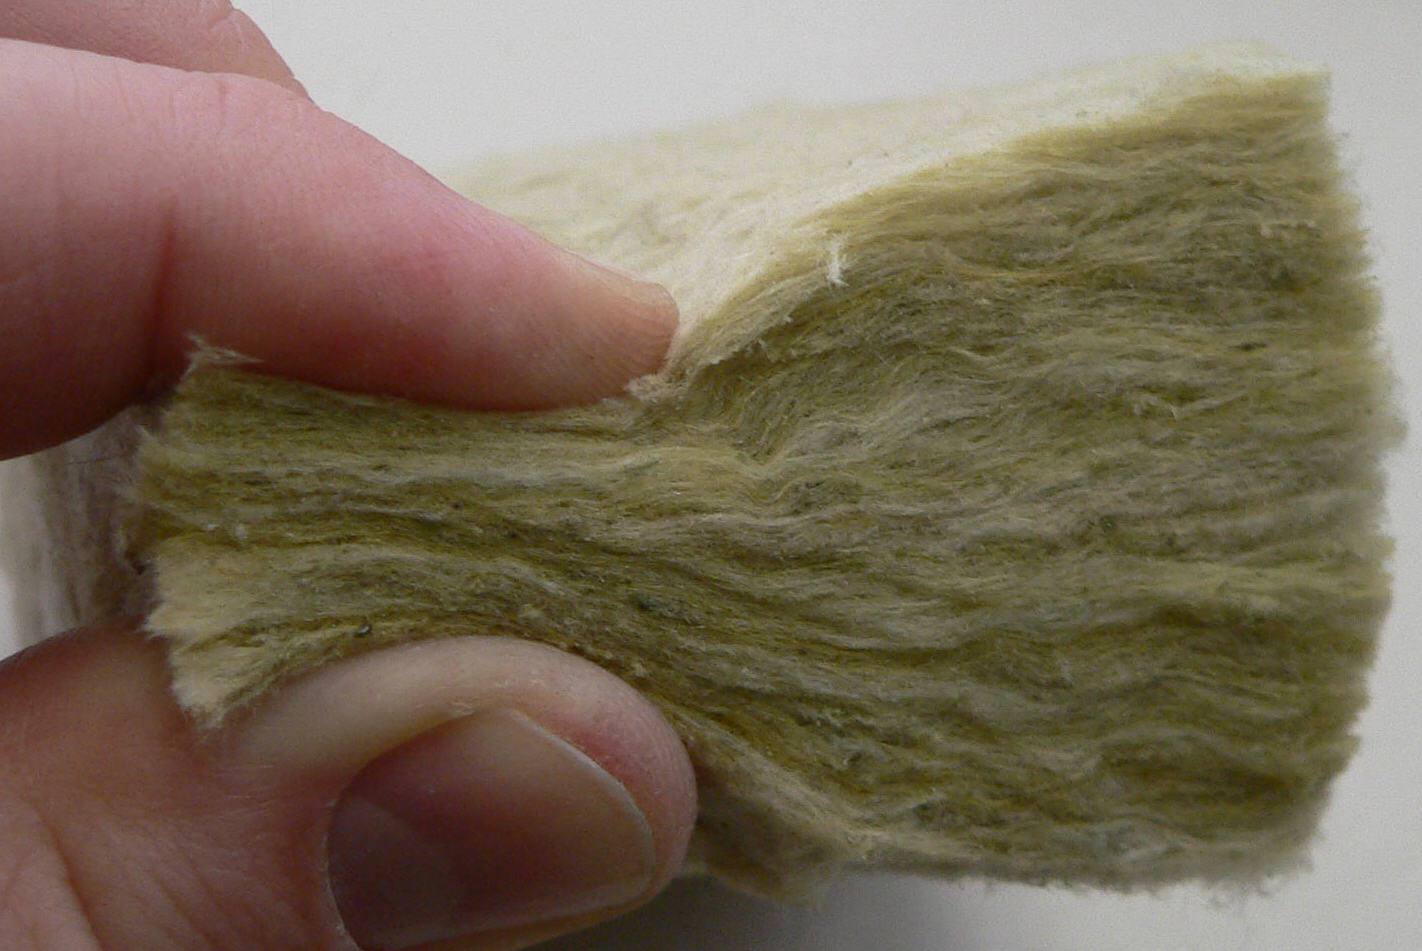
Professional studios use rigid fiberglass or mineral wool (Rockwool) panels for good reason. They outperform foam across the entire frequency spectrum, especially in the bass range where foam barely makes a dent.
These panels are denser and heavier than foam. They come wrapped in acoustically transparent fabric and can actually look pretty decent on your walls. Brands like Roxul, Owens Corning, and ATS Acoustics make panels specifically designed for acoustic treatment.
Rockwool panels are particularly good for garages because they’re fire-resistant, won’t absorb moisture, and handle temperature extremes without breaking down. They’re also more effective at blocking sound transmission through walls, giving you a bit of actual soundproofing benefit along with the dampening.

Acoustic Mineral Wool Panels
Superior performance across all frequencies and built to last in garage conditions.
Installation takes more effort since these panels are heavier. You’ll want to use proper hanging hardware or construction adhesive rather than spray adhesive. Some people build simple wooden frames to mount them, which also adds an air gap behind the panel for even better absorption.
Moving Blankets: The Budget Champion
Don’t laugh. Professional movers’ blankets are secretly one of the best budget acoustic treatments available. They’re thick, dense, and designed to absorb impact and sound. Plenty of home studio owners use them with excellent results.
You can hang sound dampening blankets directly on walls using curtain rods, hooks, or even grommets and zip ties. They work especially well covering the garage door, which is usually the biggest source of sound leakage and the most reflective surface in the space.
The acoustic performance is similar to mid-grade foam panels, but blankets cost a fraction of the price. You can cover your entire garage door with blankets for less than a few boxes of decent foam panels. They’re also completely reversible, you don’t damage your walls, and you can take them with you if you move.
For the best results, hang blankets with some space behind them rather than pressing them flat against the wall. This air gap improves absorption, especially in lower frequencies. Stack two layers if you really want to knock down the sound. If your garage door itself needs additional thermal efficiency, combining acoustic treatment with proper insulation gives you both sound control and energy savings.
DIY Acoustic Panel Projects
Building your own acoustic panels is easier than you think and saves serious money. You can make professional-quality panels for about one-third the cost of buying pre-made ones.
The basic design uses wooden frames (1×4 or 1×3 lumber) filled with Roxul Safe’n’Sound insulation or Owens Corning 703 rigid fiberglass, then wrapped in acoustically transparent fabric. You can find complete tutorials online, but the process is basically: build frame, cut insulation to fit, wrap in fabric, staple fabric to back of frame.
A single 4×2 foot panel costs about the same as a large pizza to make yourself. Buy the same thing pre-made and you’ll pay three to four times more. Make a dozen panels over a weekend and you’ve got enough treatment for most garage spaces.
The fabric matters more than you’d think. You need something acoustically transparent that won’t block sound from reaching the insulation inside. Guilford of Maine and other acoustic fabric suppliers sell the right stuff, but you can also use certain types of burlap fabric or even some canvas materials from fabric stores.
One builder trick: make your frames 4 inches deep instead of 2 inches and you’ll get much better low-frequency absorption. The extra depth costs barely anything in materials but makes a noticeable difference if you’re dealing with bass-heavy instruments or equipment.
Strategic Placement: Where to Put Your Panels
Randomly sticking panels all over your walls wastes materials and money. Sound behaves predictably, and you can get better results with fewer panels by placing them where they’ll have the most impact.
Start with first reflection points. These are the spots on your walls where sound bounces directly from your sound source to your ears (or microphone). Sit in your normal playing or working position and have someone hold a mirror against the wall. Move the mirror until you can see your speakers or instrument in it. Put a panel there. Repeat for both side walls and the ceiling if possible.
Corner bass traps are your next priority. Low frequencies collect in corners and cause that boomy, muddy sound. You can buy triangular bass traps or make them by stacking regular panels diagonally across corners. Floor-to-ceiling corner traps work best, but even partial coverage helps.
The back wall (behind your listening or playing position) benefits from scattered absorption. Don’t cover it completely, though. Some diffusion (sound scattering) creates a more natural sound than total absorption. Alternate panels with hard surfaces, or leave some wall exposed.
For garage doors, focus treatment on the upper half where sound reflects most. You can hang blankets on a track system that lets you open them when you need garage door access and close them when you’re working. When the weather’s nice, consider installing a screen door to maintain airflow while keeping the main door open during practice sessions.
What About Bass Frequencies?
Low frequencies are the most frustrating part of garage acoustics. They’re also what your neighbors hear most through walls. Bass waves are long and powerful, passing through standard acoustic treatment like it’s barely there.
Proper bass traps require serious thickness and density. A 2-inch foam panel does almost nothing below 250 Hz. You need 4-6 inches of dense material to start affecting bass frequencies effectively. This is where DIY panels really shine since you can build them as thick as you want.
If you’re a bassist, drummer, or run loud power tools, invest most of your budget in corner bass traps and thick panels rather than lots of thin foam. Four thick corner traps will do more for your low-end problems than forty thin wall panels.