
One of the things I’ve been wanting to do to upgrade my garage was to add some overhead storage. Since I’m a fan of their storage cabinets, the Gladiator GearLoft overhead storage rack seemed like an obvious choice.
My house doesn’t have a lot of closet space. The plan was to look at each of the major brands of overhead storage and do a roundup review, like when I upgraded my garage lighting.
Recently, a friend of mine was looking for some overhead storage racks. So I gave them a few of those test units (to get them out of my garage), and they let me take photos of the installation.
In this article, we will walk through the Gladiator overhead storage installation process. I’ll then let you know what we liked and didn’t like about the Gladiator GearLoft overhead storage.
Gladiator GearLoft GALS44M2KW Overview
I chose the Gladiator GearLoft overhead storage for a couple important reasons.
First, I’m a big fan of Gladiator storage. If you’ve read any of my previous reviews or seen photos of my garage, this won’t surprise you. In addition to various RTA (Ready To Assemble) and Premier cabinets, I have two Gladiator workbenches and a heavy-duty steel shelf.
So I know they make good stuff.
Gladiator makes the GearLoft overhead storage in various sizes and colors. You can get them in 4′ x 4′, 2′ x 4′, 2′ x 8′ and 4′ x 8′ sizes. They all come in two color options, hammered granite, and hammered white.
We will install the 4′ x 4′ GearLoft in hammered white (GALS44M2KW).
This leads to the second significant benefit. Looking at the specs, the Gladiator GearLoft is very competitive with its main rivals SafeRacks and Fleximounts.
Prices are similar for all three units. That’s usually the case, no matter what brand you’re looking at.
However, the Gladiator is a much sturdier unit.
The Gladiator holds up to 350 lbs, while the SafeRacks is only rated to 250 lbs. Fleximounts no longer offers a standard 4′ x 4′ rack. They only offer a motorized lift system, rated for 300 lbs, but at almost double the Gladiator’s price.
Important note: These are the maximum capacities of the shelving units, not what you can hang from your garage ceiling. Before installing any overhead storage, verify how much weight you can hang from your garage ceiling.
Gladiator Overhead Storage Installation: Unboxing
I usually don’t mention unboxing during a product review. That seems like something tech blogs do.
But, the packaging for the Gladiator GearLoft was compact and appropriate, so I wanted to call it out.
There wasn’t a ton of Styrofoam, which is always a mess to clean up. Everything could be unboxed quickly, with minimal searching for misplaced bags of screws.
Each hardware set was clearly identified and packaged separately, which is a huge plus.

The instruction manual was easy-to-read, like assembling an IKEA shelf (but easier to understand).
It was very clear on what tools were needed. However, we did need to use a bigger size drill bit. The included 3/16″ bit wasn’t big enough for the lag bolts, but we’ll cover that in the next section.
Tools Required
- Electric Drill
- Drill bit (3/16″) – included
- 1/2″ socket wrench and/or 1/2″ open end wrench
- 6 mm hex wrench – included
- Stud finder
- Tape measure
- Step ladder
- Pencil/marker
- Masking tape
Gladiator Overhead Storage Installation: Prep & Layout
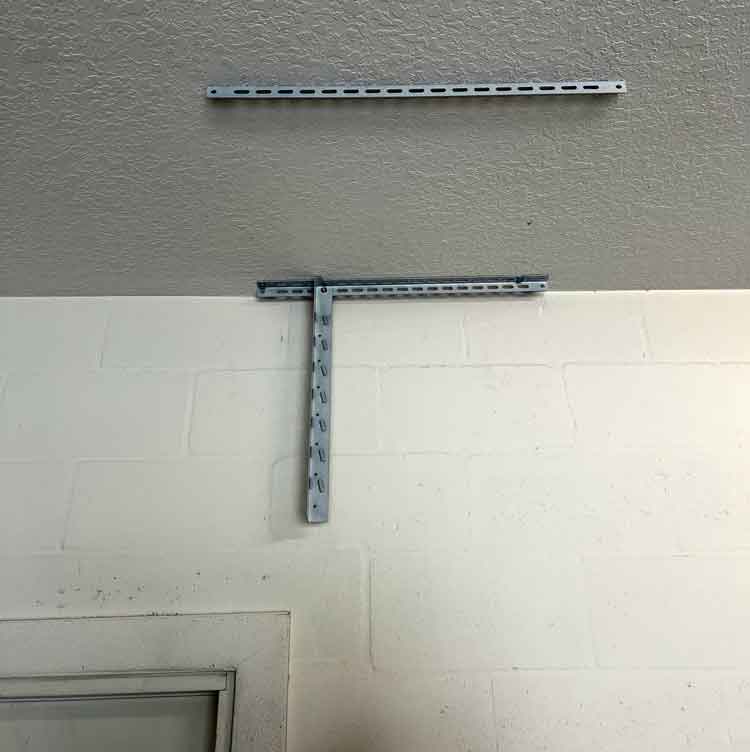
One of the things I like about the Gladiator GearLoft overhead storage is the vertical rails are adjustable.
Unlike other brands, the vertical rails comprise two separate pieces (see image below). You can adjust them between 23″ and 37″, depending on how much room you have on your garage ceiling.
This was great for us because we were installing it next to a garage entry door. We wanted to ensure people coming through the door wouldn’t immediately bang their heads on the storage rack.

Interestingly, we couldn’t use the included 3/16″ drill bit and had to switch to a 1/4″ bit instead. Other than that minor change, everything went smoothly.
The layout was simple, following the directions. Using a stud finder, locating and marking where the lag bolts would go was easy.
The ceiling brackets are wider than needed, so they had more than enough holes to work through any adjustments that we had to make.
It should be noted that the ceiling brackets should be installed at least 2.5″ away from the wall. This allows room to tighten the rectangular nuts.
Gladiator Overhead Storage Installation: Assembly & Mounting
Once the layout was complete and the pilot holes were drilled, it was time to mount the hardware.
The lag bolts were tough to install with the recommended 1/2″ socket wrench. So I opted to use an impact drill for most of the installation. There was an issue with one of the bolts, breaking off near the threads.
Thankfully, they included an extra bolt with the hardware. The rest of the bolts went in with no issues.
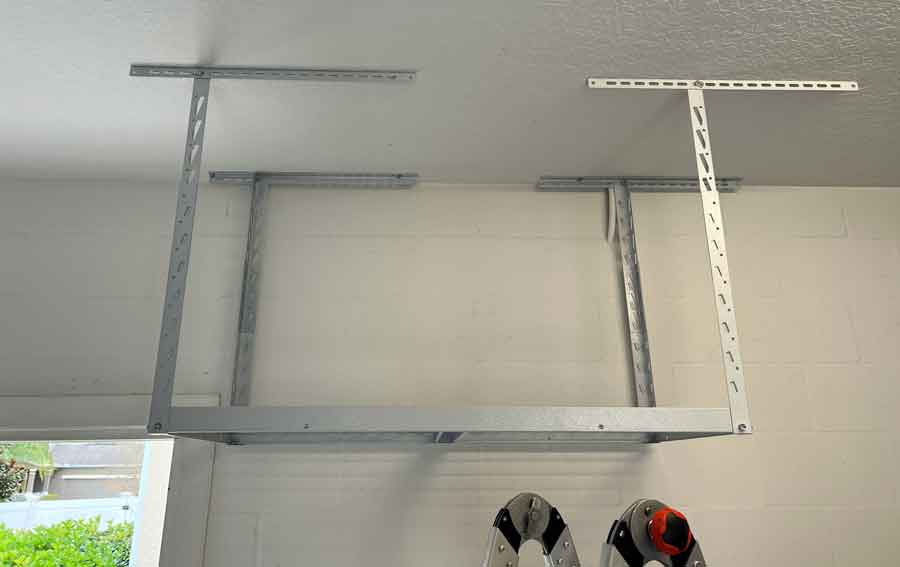
Once the ceiling brackets were installed, the vertical corner supports were next.
The only other hiccup during my Gladiator overhead storage installation was entirely my fault. I didn’t pay close enough attention to the diagram. I ended up installing the lower supports where the upper supports should have been.
That was an easy fix, though. The vertical pieces attached very easily to the ceiling brackets.
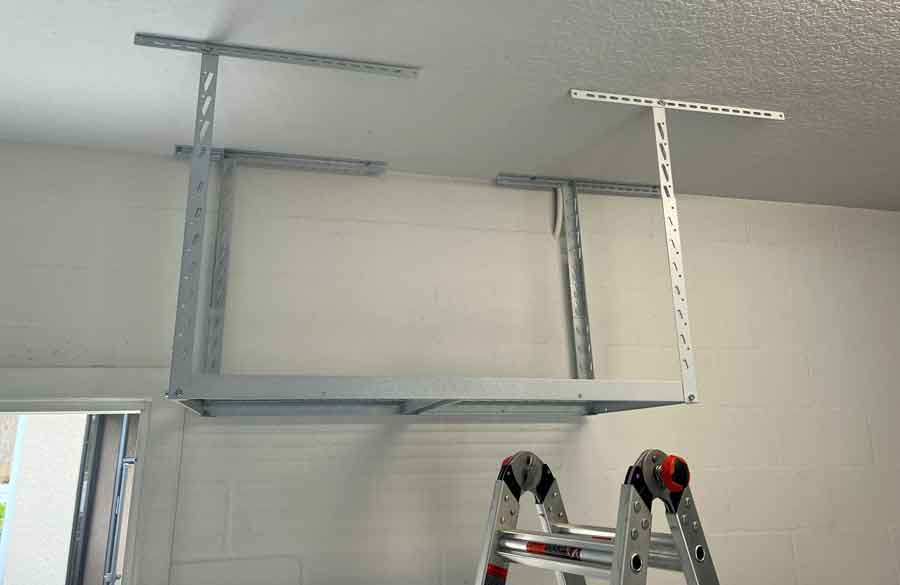
With the proper supports installed, assembly of the rack to the lower supports was very easy.

The bolts were easy to align and hand-tightened to start. The included Allen wrench was all you needed to tighten them. The threading in the bracket was perfect for the bolts, and we didn’t have to fight to align or start them.
They recommend having two people for a Gladiator overhead storage installation. Here’s why.
Attaching the completed lower assembly to the mounted upper assembly (ceiling brackets and upper vertical corner supports) absolutely takes two people!
The instructions say to use two people, and they mean it.
It also requires two ladders, or one ladder and one NBA player.
Once they were connected, the locking pins went in quickly, and my Gladiator overhead storage installation was complete.
Final Thoughts
Overall, the Gladiator GearLoft overhead storage was easy to install and durable enough to last in a Florida garage for a long time.
The packaging was great, and there was minimal cleanup and trash to throw out afterward. The manual was easy to install and came in several different languages. It would have been nice to have sticker labels on the pieces to help identify them, though.
The drill bit they included wasn’t big enough to drill the pilot holes, and one of the lag bolts broke.
Overall, the Gladiator GearLoft overhead storage rack came together nicely. Still, it was heavy…far too heavy for one person to install. You definitely need two people to lift the lower assembly. Once installed, the finish looked great. There were no cracks or chips anywhere.
If you’re looking for a durable, sturdy, reasonably priced overhead storage rack, you can’t go wrong with the Gladiator GearLoft.

- 48" L x 48" W x 23-37" H (Height Adjustable)
- Holds up to 350 lbs
- 50 cu. ft. of overhead storage
- 10-year limited warranty
- Available in Granite (GALS44M2KG) or White (GALS44M2KW)