
I’ve never really been happy with my garage lighting, but I’ve always put off upgrading it for some time down the road.
Well, that time has come.
This article will take you through the process of how to install garage light fixtures using my new Hykolity shop lights.
When we built our house, I asked our builder to wire up four recessed LED lights, one in each corner. I knew the one light bulb on the garage door opener wouldn’t be enough.
It also allowed me to wire garage lights when I was ready to upgrade my lighting.
Hykolity SL4FT40W5K and SL8FT110W5K
If you’ve read any of my LED shop light reviews, you’ll know that the lights I chose for my garage were the Hykolity 4′ and 8′ lights.
The 8′ light fixture comes in two different versions. One is 9750 lumens and uses 75 watts of power, while the second version puts out an impressive 14,300 lumens using 110 watts of power (SL8FT110W5K).
I’d done a simple calculation to figure out how many lumens needed to light my garage. In my case, I needed a little over 62,000 lumens to get the result I wanted.
A little spreadsheet math helped me figure out that the cheapest way to do that was to use four 8′ fixtures and one 4′ fixture.
Since I already had the 4′ light fixture from my comparison review (SL4FT40W5K), that meant the only thing I needed to buy was the 8′ fixtures.
Hykolity sells these in packs of two through Amazon Prime.

Stunning pure-white light and 14,000 lumens per 8' bulb, these lights turn even the darkest garage into a detailer's paradise. This is what I put in my own garage and the results are amazing!
Planning My Garage Lighting Layout
When planning your garage lighting layout, the goal is to give a nice, even spread of light across the entire garage and limit the number of shadowy areas as much as possible.
Then if you need more focused light in a specific area, like over a workbench, you add task hyper-bright lighting.
My existing recessed LED garage lights were spaced out about four feet from the side walls and about three feet from the front and back walls. I didn’t want any exposed wiring running along my ceiling, so I wanted to use as much of the existing wiring as possible.
That limited my options, but I found a lighting layout that works.
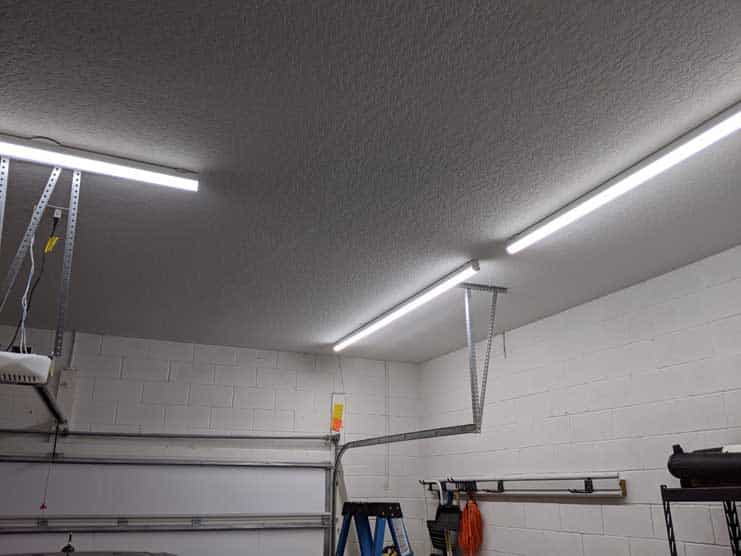
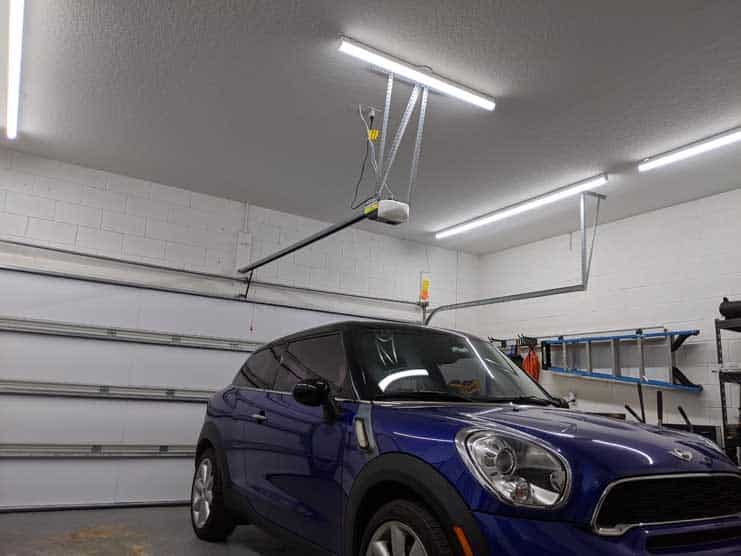
My plan was to replace each recessed LED light fixture with one 8′ Hykolity LED fixture running the length of my garage.
That’s enough to light the entire length of the garage walls above each Gladiator workbench, where I spend most of my time.
Finally, since I eventually want to detail my car inside my garage, I added one 4′ light perpendicular to the others, directly over where my front hood would be.
It could use the old screw-in light socket next to the garage door opener.
How to Install Garage Light Fixtures
Once I decided how to space out my LED lights, it was time to install them.
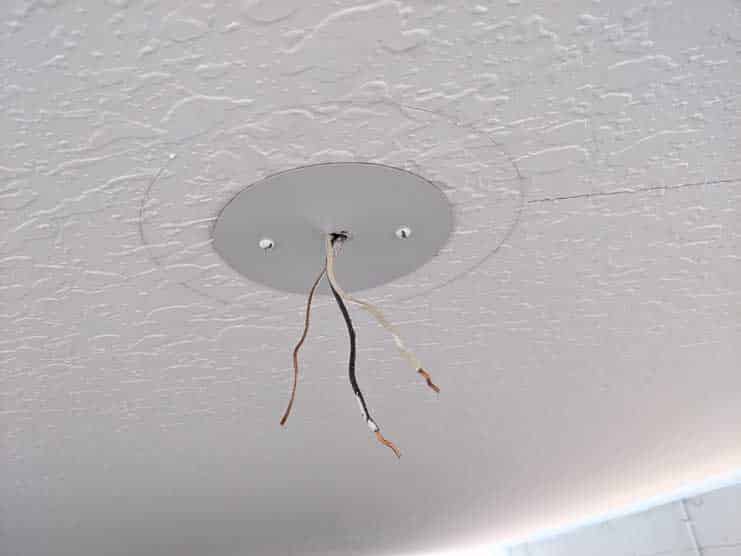
While waiting for the lights to be delivered, I removed one of my recessed LED lights to get an idea of what was involved with the installation.
Remove Old Recessed Lights
Anytime you’re working with electricity, ALWAYS turn off the electrical power at the circuit breaker.
Safety first.
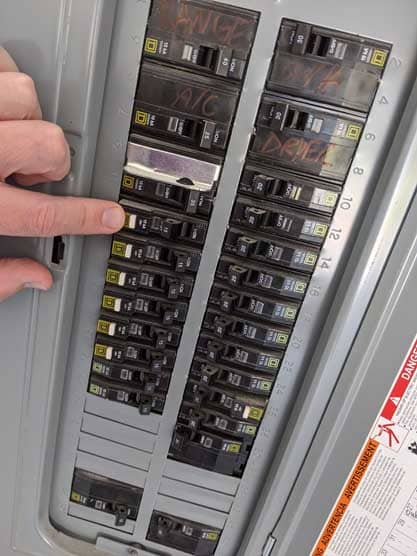
Once the power was turned off, removing the old recessed lights was as easy as removing two screws and disconnecting the wiring.
Most home electric fixtures will have three wires: black, white, and either green or bare copper.
The black wire is usually the positive (live) wire. The white is the negative wire, and the copper or green wire is the ground wire.
All three need to be wired correctly to turn the light on.
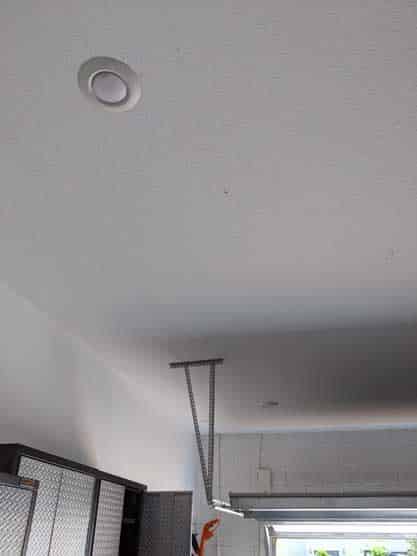
Hykolity lights include a small metal plate that you can attach to the fixture to cover up the hole left by your old lights.
Unfortunately the cover was too small to cover the hole in my ceiling, so I opted to get some white outlet concealers. Then, I drilled a small hole in the center to let me pass the electrical wires through.
Once all the lights are installed, I plan on going over the cover with some flat white paint to match it to the rest of the ceiling.
The sharp-eyed among you may have noticed that pencil line on the right side of the picture. Let’s talk about that next.
Measure twice…
You know the saying: Measure twice, cut once.
It applies here as well.
Before you do anything permanent, you need to get your lights lined up correctly.
I’m OCD enough that I can’t stand a crooked picture frame, so I needed the lights to be as straight and even as possible.
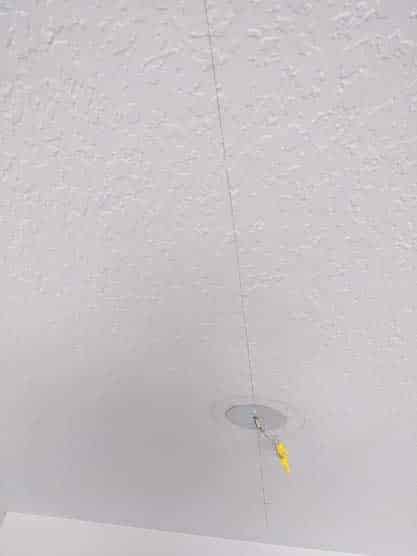
If you have a chalk line or laser line, this is the time to use it.
Be careful, though. Your existing light fixtures may not be as straight as you thought. But more on that at the end.
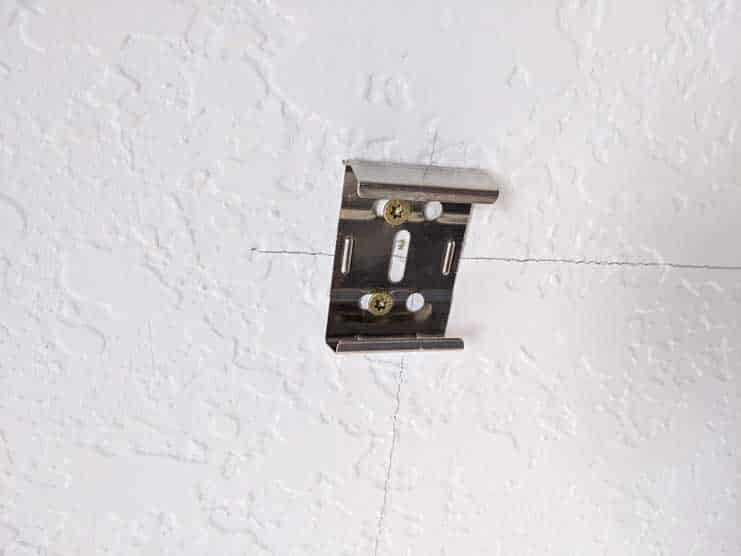
In this step, we’re getting the line marked so we can install the ceiling brackets with a minimum of error.
The wiring hole for the 8′ Hykolity garage light fixture isn’t in the center like I expected. It’s actually about a third of the way from one of the edges, which worked out well.
The ceiling brackets slide into slots on the fixture itself. So a best practice is to measure from those slots to the wiring hole.
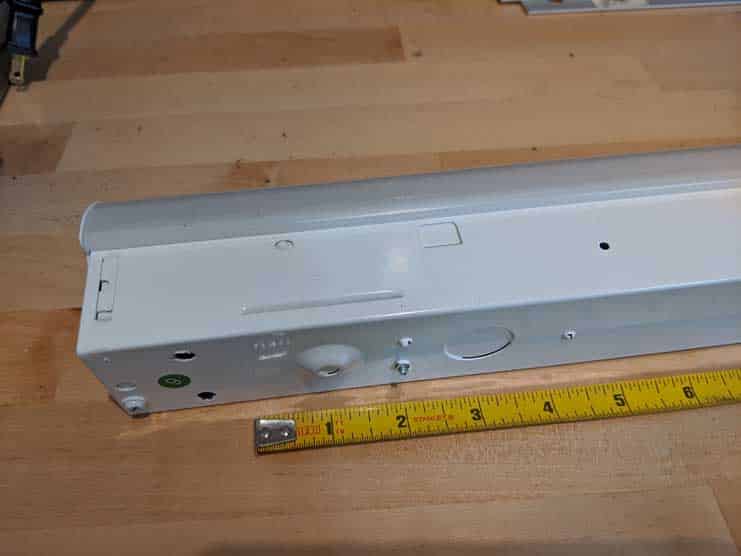
I measured out 25 1/4 ” to the shorter side and 65 1/2″ to the longer side.
Installing the Ceiling Brackets
With those numbers, installing the ceiling brackets is very easy.
Each light fixture weighs around ten pounds, so it’s recommended that you screw it into your ceiling trusses or joists. If that’s not an option, use some wall anchors to make things safer.
Each of the brackets has a few different options where you can screw into them.
Since I drew the lines, I was confident that I wouldn’t need to shift the bracket side-to-side, but I figured I would have to make slight adjustments forward and back.
Hykolity gives you some small screws and wall anchors with the light. However, I recommend tossing those and using heavier-duty screws and anchors instead.
I went for some star-bit exterior wood screws I’ve used on several projects before.
Hardwiring the LED Lights
This part of the installation process is much easier if you’ve got a second pair of hands, but it’s possible if you’re doing this alone.
Just be prepared to have something to rest the light on while you’re wiring it up.
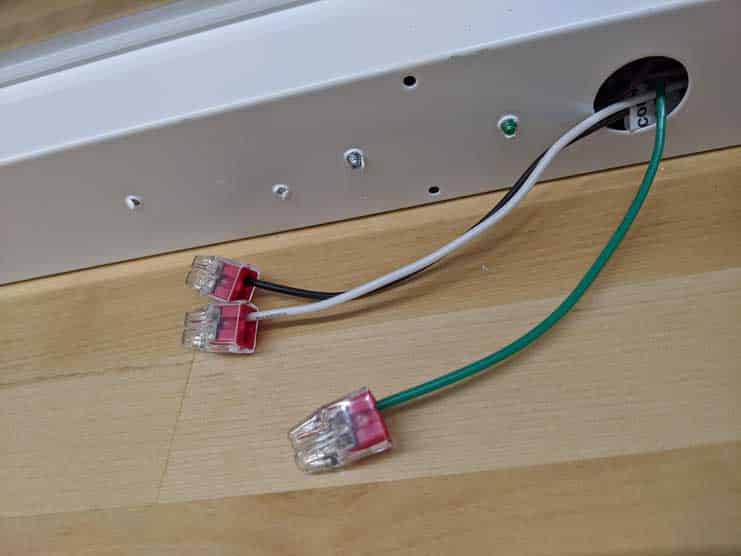
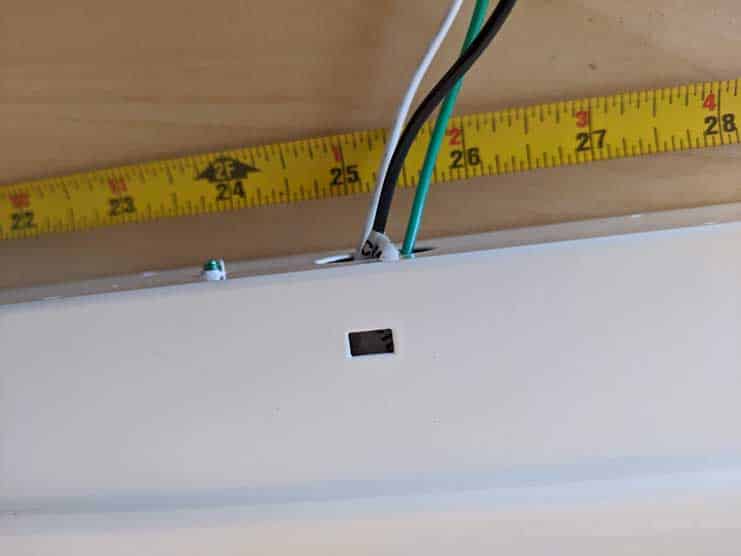
Manufacturers don’t typically include wire couplers with their light fixtures, and Hykolity is no exception.
Here you can see that I added some quick-connect wire couplers that I love. They’re low profile, which helps squeeze them into that tiny hole in the fixture to keep them out of sight.
Hardwiring the light itself is super easy. Just match up the color wire to the same color wires in your ceiling.
Black wire to black wire.
White wire to white wire.
Green/copper wire to green wire.
Once each light fixture is wired up, it’s a good idea to flip the breaker and test it out before you button things up. Just remember to flip the breaker off again before you get back up on the ladder.
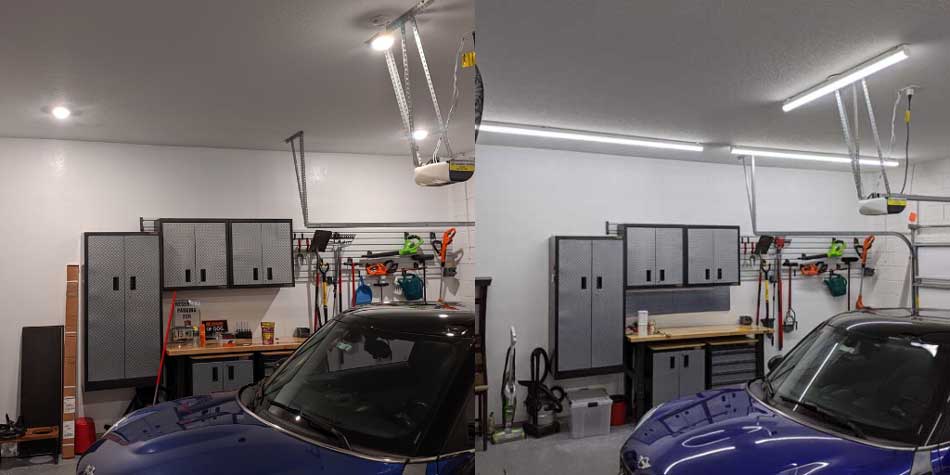
How Do They Look?
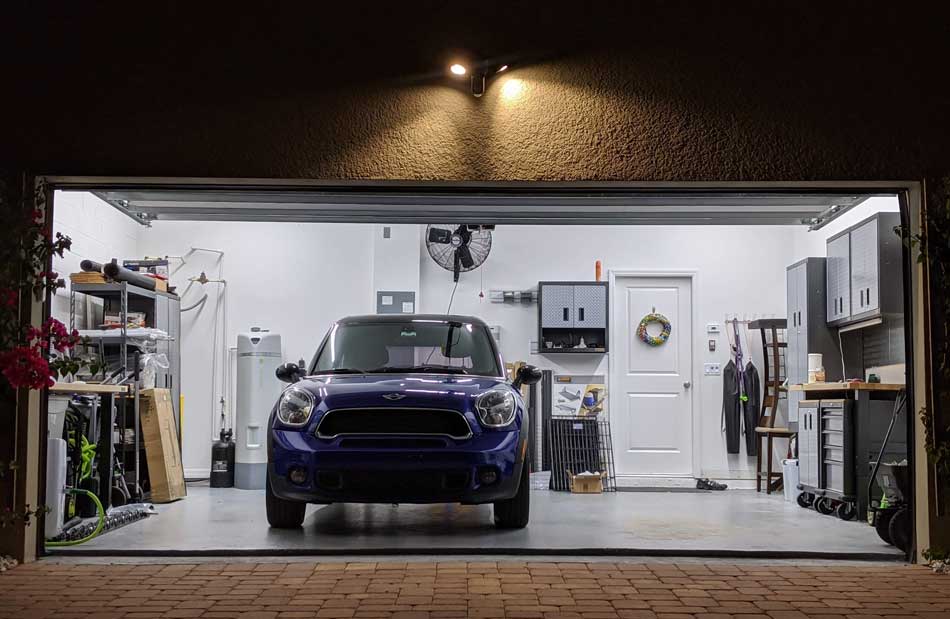
After wiring up two 8′ light fixtures, I wanted to see how they looked.
The Hykolity garage lights look great!
They put out a ton more light than my old recessed lights, as you can see in the picture below.
These lights have a cool white color temperature which is perfect for a garage. Everything looks crisper and clearer.

I’ll admit, it’s not a fair comparison because the four old recessed LEDs weren’t strong enough to light the entire garage. I mean, that’s the same number of lights in our master bathroom, and it’s a fraction of the size.
Still, the point of upgrading your garage lighting is to get better lights, right?
That’s where the Hykolity garage lights really shine (pun intended).
Overall, I’m thrilled with these lights. This is the kind of project that makes everything else in your garage look better.
That said, it also exposed some of the flaws in my garage.
For example, I’ve got a stain on my epoxy floor where I was careless staining our wooden patio chairs. That stain was easier to ignore when the garage was darker, but now it’s so obvious that I need to fix it quickly.
Wrapping It Up
As I said, I couldn’t be happier with these lights. This is a project that I should have done a long time ago.
I used to pull my car outside to do any cleaning or detailing. It’s not a good idea to wax your car in direct sunlight, and it’s even worse to spend too long in a car with a black interior sitting in the hot Florida sun.
So I’m already doing a lot more work on my car inside the garage, which is easier to see and much more comfortable.
I highly recommend the Hykolity LED garage lights. They’re an inexpensive, high-quality light that puts out a ton of light and makes a huge difference!
Hopefully, this article gives you an overview of how to wire garage lights. It’s a fairly straightforward DIY project that can be done in a single afternoon.
For more on the Hykolity LED lights, check out my review here. Or, if you’re ready to make a massive improvement to your garage, check out my super-detailed guide to finding the best LED garage lights here!