When I heard that Wall Control was doing something different with pegboard, I instantly dismissed it.
Growing up, my dad had some old, brown pegboard in our garage that I hated. It would disintegrate if it got wet, and chunks would fall off if you bumped it too hard.
That experience tainted my view of pegboards ever since.
Then I started seeing some amazing pegboard ideas on some YouTuber’s channels and had to try them out.
I’m still not a massive fan of pegboards because I prefer to keep my stuff organized in a drawer instead of on display.
That said, a metal pegboard that looks as cool as this definitely has a place in my garage. I was able to increase storage space in an area that would have otherwise gone unused.
Here’s my review and installation overview of
See my comparison article here to see how Wall Control pegboard matches up against Gladiator GearTrack!
Wall Control Metal Pegboard Sizes and Colors
Before getting into some of the quirks, let’s briefly discuss
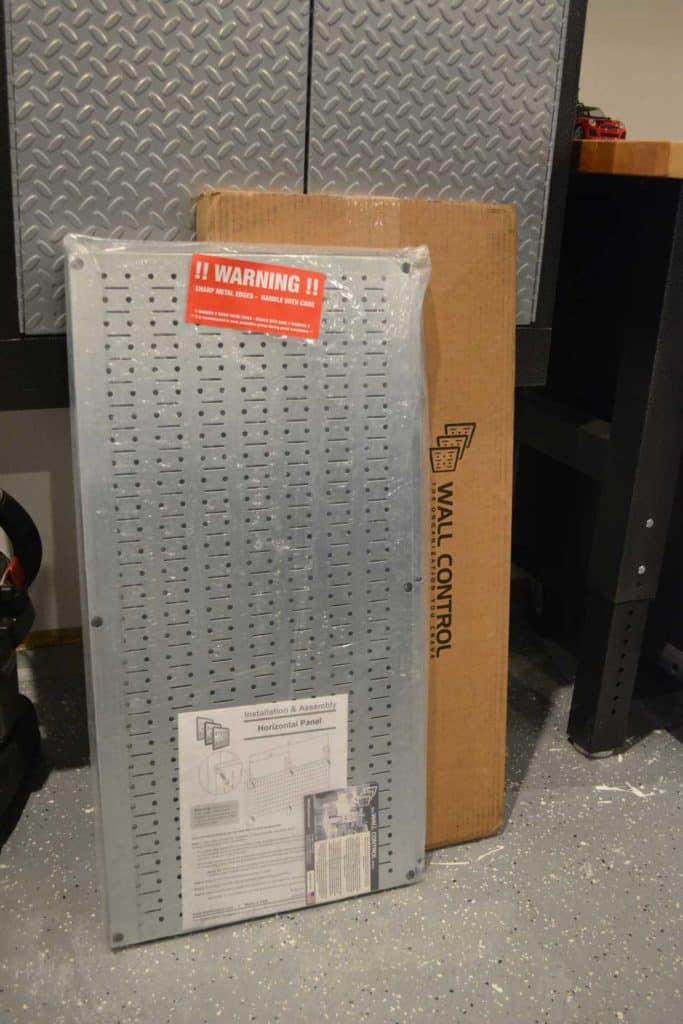
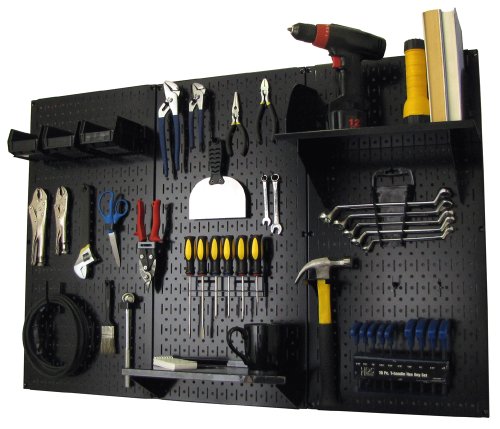
Wall Control metal pegboard panels are made of 20-gauge galvanized steel and are resistant to rust and stains. The boards I chose are each 32″ x 16″ and come in two to a pack.
The boards come in a few other sizes like 12″ x 16″, 8″ x 32″ or even a 3″ x 32″ pegboard strip if you only want a single row of small tools.
The galvanized steel pegboard looks fantastic, but that’s not the only color they come in.
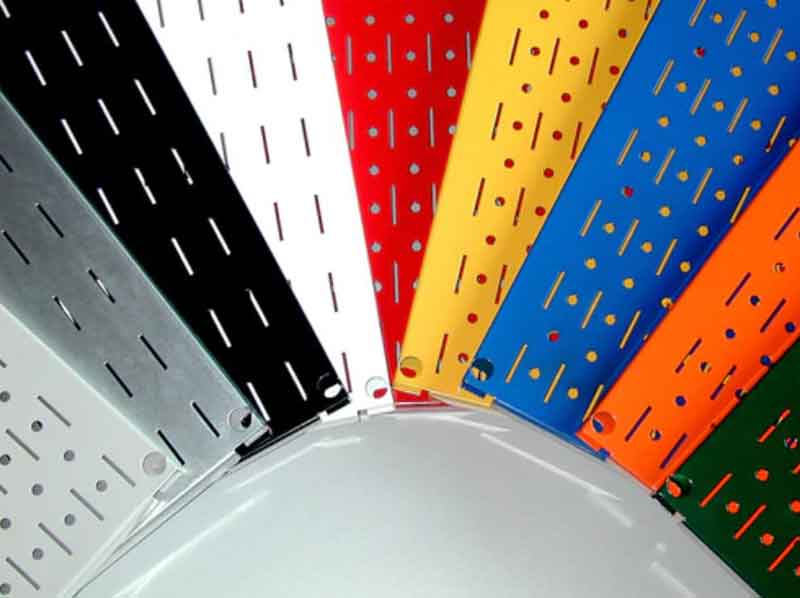
Wall Control pegboards also come in a variety of different colors, all in a powder-coated finish: black, white, beige, gray, blue, red, orange, yellow, green, pink, and purple.
Not every size comes in each color, but that still gives you several options for decorating your garage.
Wall Control Pegboard Design & Specs
With most pegboards, you need to install a backing panel or spacer so the pegboard hooks have room to slide in and secure.
Usually, this is nothing more than a couple of wooden studs you screw the MDF pegboard into.
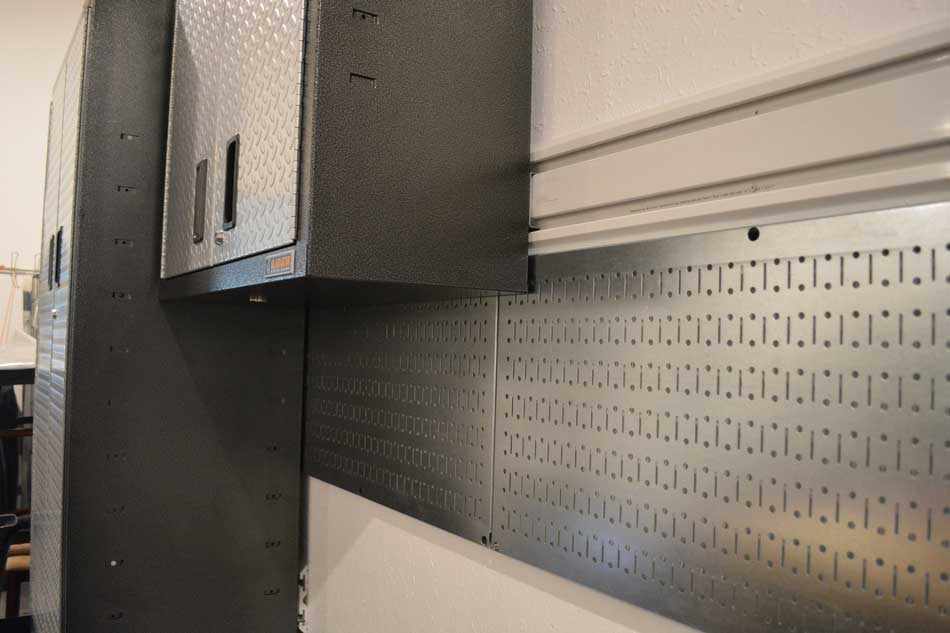
Wall Control makes its metal pegboards from a single piece of 20-gauge galvanized steel folded over and rounded off so there are no sharp edges.

That built-in fold-over creates a 3/4″ spacer between the panel and the wall. The mounting screws attach right to the pegboard, making them more secure.
Some flex is built into the metal panels, but they feel solid. The panels have no finish since I got the bare, unpainted metal. They’re smooth to the touch and even a bit oily.
Here are some highlights:
- 10 Times stronger than conventional pegboard
- Made from 20 gauge steel
- Accepts
Wall Control Slotted Accessories - Accepts 1/4 ” and 1/8″ peghooks
- Magnetic surface
- Available in 10 Colors: Red, White, Blue, Black, Gray, Green, Yellow, Orange, Beige, or Galvanized
- Made in USA

Horizontal vs Vertical Wall Control Panels
If you’ve used pegboard before, this next part might throw you for a loop.
With normal MDF pegboards, you can install them any way you like. The holes are slotted equal distances apart, regardless of how you mount the board.
That’s not the case with the
Because they use a patented design that locks the peghooks into place (more on that later), the pegboards themselves will only work in one direction.
Wall Control panels are specifically designed to be installed either vertically or horizontally. The peghooks won’t fit correctly if the pegboard is installed in the other direction. You need to decide how you’re mounting them before purchasing.
I found that out the hard way, unfortunately.
I’d purchased two horizontal
However, after living with them for a few days, I realized that vertical panels would have worked much better for that particular space. So, I purchased another two packs and re-mounted them on my garage wall.
I know…measure twice, cut once.
So, if you’re wondering why you’ll see images of pegboards with slots running in different directions…now you know.
Try not to laugh, eh?
Special Edition Pegboards
There are two special versions of pegboard that you can get directly from
The first one is a “slotted-only” pegboard.
As I mentioned earlier, the peghooks don’t need standard pegboard holes.
Instead, they lock in place using the slots.
Unless you plan on using any standard peghooks (and why would you?), you don’t need the peghook holes.
You only need the slots.
With that in mind,
It’s a slightly cleaner design that still has all of the flexibility of pegboard.
The Signature Series pegboards are variations on a theme.
All
The Signature Series offers heavier-duty powder-coat finishes that are even more durable and scratch-resistant.
The colors are more subdued than the regular versions, so they won’t look as shiny under your garage lighting.
How Much Weight Can Wall Control Pegboard Hold?
Because of their unique design,
That’s more than enough to store power tools or craft supplies. However, a few users use it to store weights and accessories for their garage gym with no problem.
The weight capacity for an ordinary pegboard varies depending on its material.
High-density fiberboard (HDF) or High-strength fiberboard (HSF) are the most common materials. Each has a rated strength of 50lbs\ft.
However, like fiberboard pegboard, it depends on how evenly you distribute the weight and the type of wall anchors you use.
A surprisingly interesting study was done back in 2012 (pdf source). It looked at the failure point of pegboard hooks and found that the type of peghook and how much weight you hang from them have a more significant impact than the board itself.
This leads to the thing I love most about
A Different Kind Of Peghook
Jumping back to my dad’s old MDF pegboard, I hated when the pegs would fly off the wall when I grabbed an item.
Wall Control’s unique pegboard design has standard-sized peghook holes that accept both 1/4″ and 1/8″ peghooks.
Even though you can technically use standard peghooks on a
Wall Control’s peghooks and accessories fit snugly in the slots on the board, not the round holes.
In fact, as I mentioned earlier, they have some pegboard designs that omit the holes entirely.
The best part is that
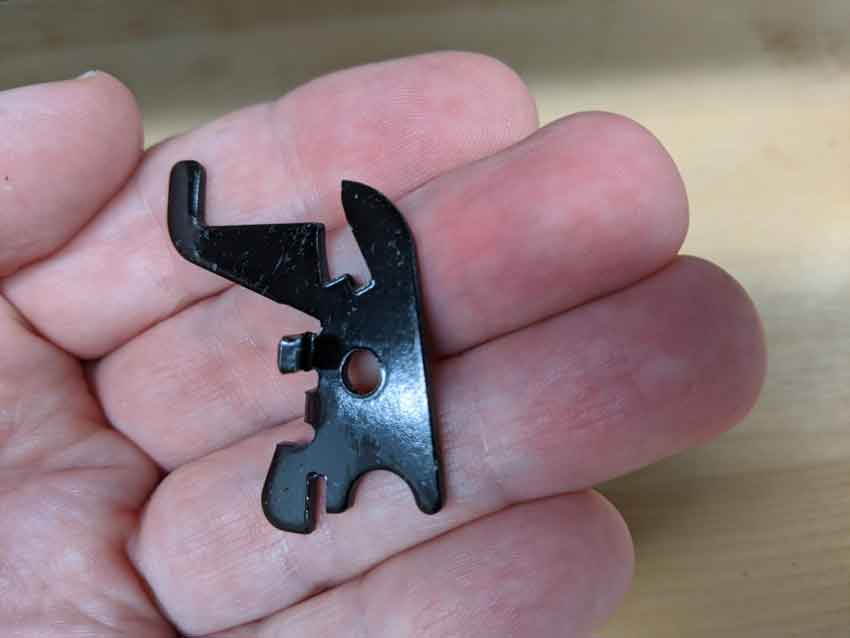
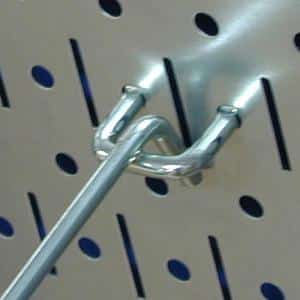
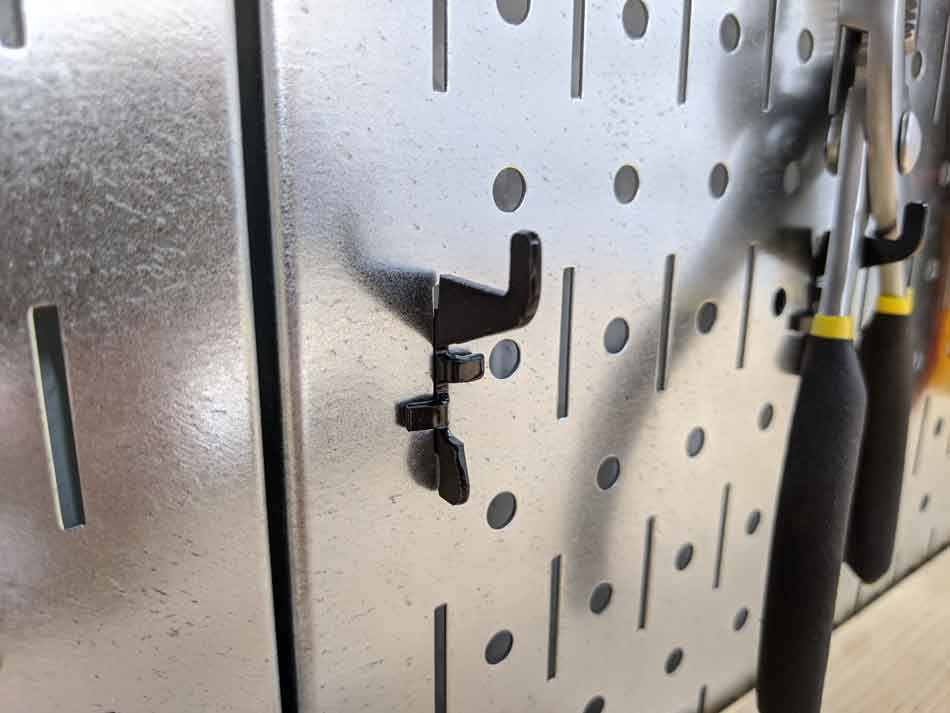
Each hook has notches along the top and bottom edges to let them snap into the pegboard.
They’re so sturdy that you’ll need two distinct motions to pull one of the hooks off. First, pull up to unlock it, then swing the bottom of the hook out, away from the board.
There are also small tabs on the front of the hook, underneath the hook itself. These tabs rest against the front of the pegboard, so the hook doesn’t move from side to side.
At first, it was difficult to remove the hooks. Once I got the motion down, it became a lot easier.
The result feels very secure. I’m not worried I’ll accidentally pull one of the hooks off the wall when grabbing my tools.
How to Install Wall Control Pegboard
Installing my
I won’t go into the entire process here because there are many YouTube videos on that already. If you want a complete video of the process, I recommend watching Mother Daughter Projects’ video here.
However, I want to cover some things that stood out in my installation.
First, I highly recommend having someone help you install your
It’s not like the pegboard is heavy – it’s not.
Each 16″ x 32″ panel only weighs about six pounds. However, it does take some wrangling to get the boards in place long enough to screw them into the wall.
I didn’t have anyone to help.
Well… let’s be honest. I chose to do it myself instead of getting help. So, there’s a small gap between the two panels.

It’s not noticeable unless you know what you’re looking for.
The other challenge I had was that the studs weren’t precisely at 16″ in one place in my garage.
The reason was that I needed to frame the wall in sections, which I’ve pointed out in the “Lessons Learned” section of my article describing how I framed my garage wall.
At any rate, I needed a combination of drywall anchors and regular screws to do the installation. They’re both included in the box, so you’re covered either way.
Finally, I hoped for a seamless integration with my Gladiator Premier cabinets and
That meant I would lose some usable storage space on the pegboard.
But it also meant I could mount the pegboard flush against the GearTrack, which would look great.
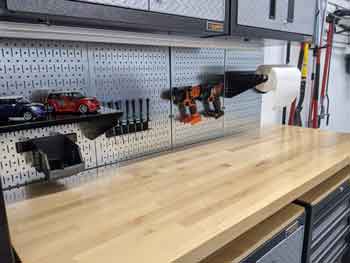
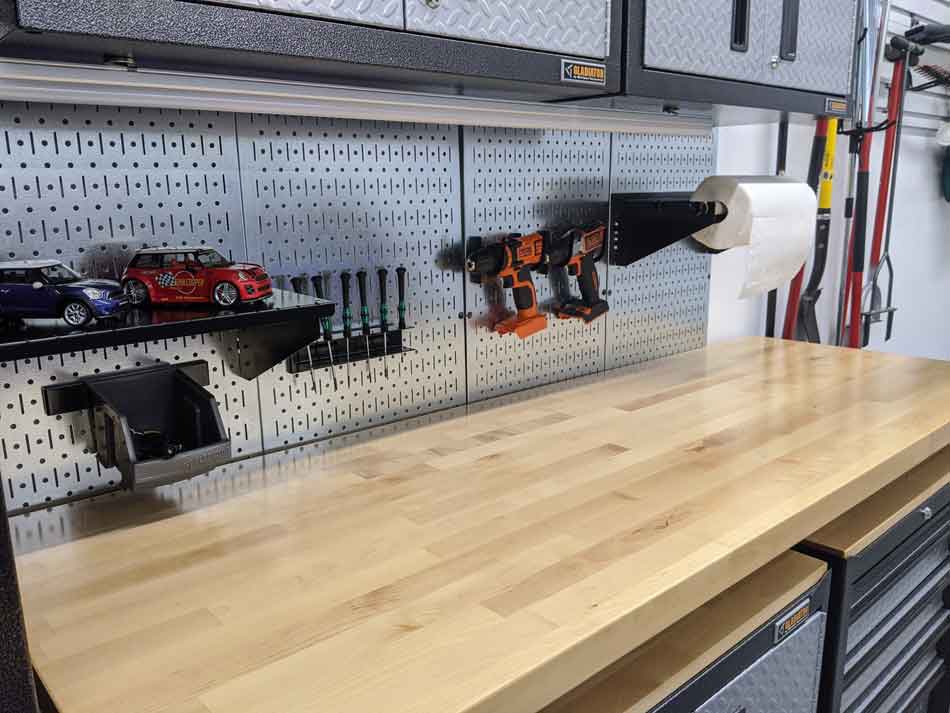
Above, you’ll see the initial photo of the horizontal
At this point, I could tell there would be some gap between the bottom of the panel and my Gladiator Workbench, but I didn’t know how much.
After a couple of days, the gap bothered me too much.
I swapped out my horizontal panels for vertical ones. I could have added more horizontal panels underneath, but it wouldn’t have worked well with the existing GearTrack rails.
Best Wall Control Pegboard Accessories
The great thing about
That said,
I picked up a few for my installation and will briefly cover them here.
There’s more available on
Deluxe 26-Piece Accessory Pack
The 26-piece Deluxe Slotted Accessory Pack (KT-200 -DLX) is the best place to start.
It comes in four colors (black, white, red, and blue) and includes most of the pegboard accessories you will use anyway.
So you might as well get them all in one package, right?

I liked seeing the different options and how they fit with my tools. My favorite were the U-shaped hooks that are perfect for mounting power tools above my workbench.
While I didn’t use everything in this accessory pack, I used enough attachments to make it worthwhile.
It’s a perfect (and affordable) start for your pegboard.

- (10) Standard Hooks
- (4) Medium Hooks
- (2) U-Hooks, 3in Reach
- (4) Medium 90 Degree Hooks
- (2) C-brackets, 1in x 1in
- (2) C-Brackets, 2in x 2in
- (1) Extended Hook, 9in Reach
- (1) Handle Hammer Hanger, 1-1/4in Wide Opening
Metal Screwdriver Holder
In some of my older articles, you may have seen my Wera 2035/6 micro screwdriver set sitting on my workbench. While I love them, I never liked the holders they came with.
Rather than throw them in my tool drawer and mess up my organization system, I wanted a holder I could mount on the pegboard.

Wall Control offers two different screwdriver holders, the ASM-SD-008 pictured here and the ASM-SL-008. The only difference is whether the slots are enclosed or open.
I opted for the enclosed slots because the screwdrivers were so small that I didn’t want them to fall out of the front.
Each screwdriver holder is available in four colors (black, white, red, or blue).

Paper Towel Holder & 4″ Shelf
No matter what you do in your garage, you always need paper towels.
None of the other paper towel holders I saw looked good… until this one.
The 4″ Shelf\Paper Towel Holder combination (ASM-HS-1694) is made of the same high-gloss metal as all other
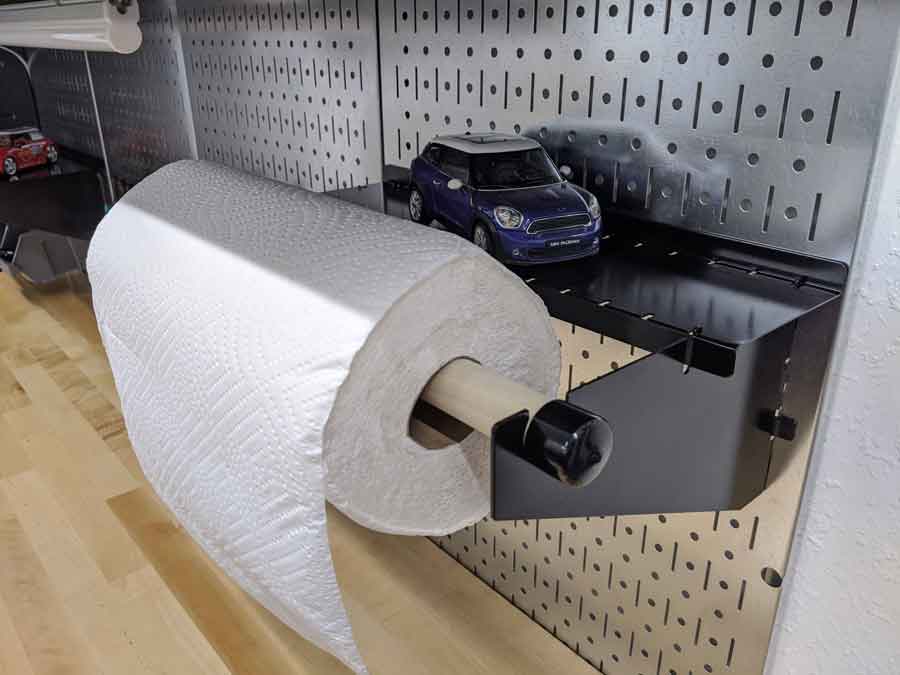
The paper towels fit over a real wooden dowel rod, leaving plenty of room for a 4-inch shelf. It’s also made of thicker, 14-gauge steel.
Some people may feel it’s a little pricey, but it looks great, so I’m OK with it.

9″ Metal Shelf
Wall Control has several different shelf widths available, ranging from 4″ all the way up to 12″ depths.
I went for the 9″ shelf, which is wide enough to display some of my model cars but not so large that it takes space away from my workbench.
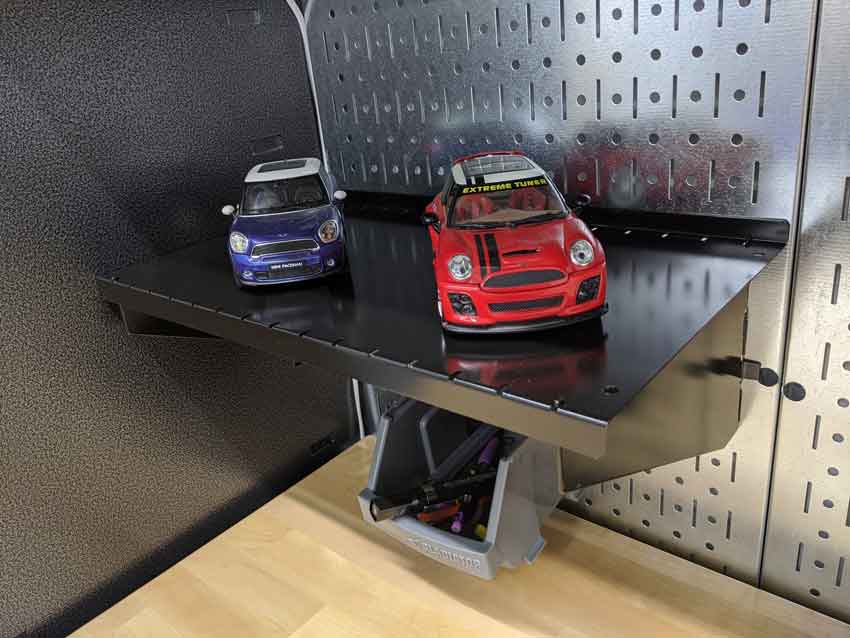
The 9″ Metal Shelf (ASM-SH-1609) is also made from 14-gauge steel, which makes it feel solid with very little flex. I also liked that the 9″ shelf has available dividers, so you can partition it if you want.
The variety of shelves was one of the bigger selling points for
As I said earlier, I’m not big on displaying my tools, but I like having the option to display items on small shelves in my garage.
You can find the metal shelf on Amazon in 4″, 6″, 9″ and 12″ depths.
