
I recently completed framing, insulating, and adding drywall to one wall of my garage. I thought it would be a good time to talk about how much insulating and drywalling a garage costs.
There are a couple estimates for the cost to drywall and insulate garages online, but (as usual) they didn’t cover everything involved.
So, I will go into detail and cover ABSOLUTELY EVERYTHING I used to insulate and drywall my garage…mistakes and all.
How much does it cost to insulate & drywall a garage? For insulation, expect to pay about $350 for two 10′ x 20′ walls (around $0.88 per square foot). Drywall was less expensive but more time-consuming. If you’re doing it yourself, expect to pay around $275 for the materials and tools (around $0.68 per square foot). If hiring a contractor, expect to pay between $1-$2 per square foot, depending on how smooth you want your garage walls.
Thankfully, I already had spray foam insulation on my garage ceiling, so that was already taken care of. I added a garage door insulation kit in a separate article that you can check out here.
Here is how that splits out for one wall of my two-car garage:
Garage Insulation Cost:
- 7 John Manville R-15 Mineral Wool Insulation ($22 each): $154
- Spray Sealant (4 cans @ $6 each): $24
- Total Cost: $178 for a 10′ x 20′ wall, or $354 for the entire garage
Garage Drywall Cost:
- 8 Drywall sheets ($11 each): $88
- Joint Compound ($13 each): $13
- Drywall tape ($3 each): $6
- Plastic drywall mud pan: $4
- 6″ stainless steel taping knife: $10
- 12″ blue steel taping knife: $10
- Corner trowel: $15
- Pole sander: $15
- Sandpaper (3 @ $5 each): $15
Total Cost to Insulate and Drywall a Garage: $176 for a 10′ x 20′ wall or $277 for the entire garage
Disclaimer: I wanted to do it right..as “right” as possible. I’m an amateur homeowner who’s never put up drywall before. If this were in my living room or anywhere my wife would be walking past every day, I’d probably hire someone to do this for me.
In other words, this isn’t professional advice. This is just how I went about installing my garage wall insulation.
Let’s break that down.
Cost to Insulate Garage Walls: My Materials
For one garage wall (20′ long x 10′ high), my total cost for sealant and insulation was under $200. Not too bad when you consider that finishing your garage will increase your home’s resale value.
It’s a small investment now that will pay off when it’s time to sell the house.
Mineral Wool Batt Insulation
I wanted to do this project myself to keep costs down. That meant making some sacrifices along the way.
For starters, I decided to go with mineral wool insulation material instead of spray foam insulation. I could have chosen fiberglass insulation material instead, but the mineral wool saved me a bit of money.
If you have an attached garage, as I do, adding garage wall insulation will make an immediate difference in your energy bills. So this isn’t an area where you want to cut corners. In general, you want at least R-13 insulation in your garage walls.
However, there comes a point where it’s not cost-effective to keep chasing a higher and higher R-value. For example, R-19 insulation is only about 3 percentage points more energy efficient than R-13 insulation.
The key is to find a point where getting the next-higher R-value insulation would result in a big jump in cost.
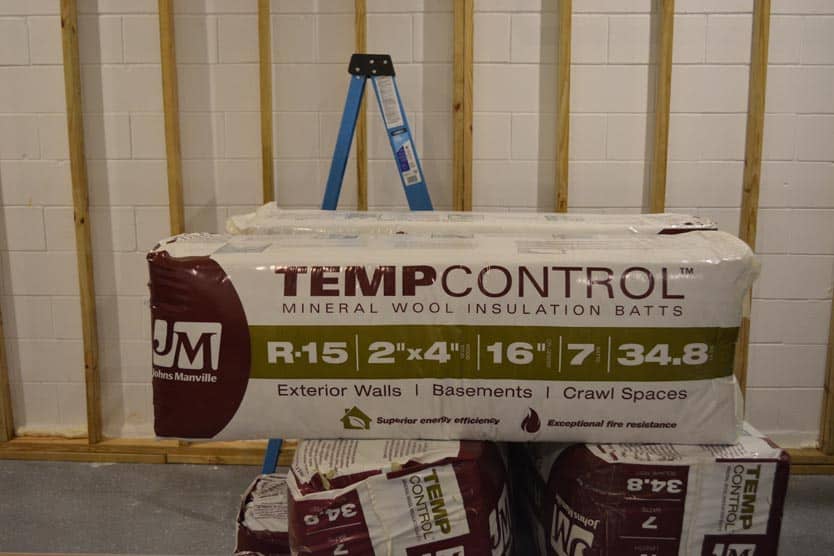
I chose to use Johnson Manville TempControl mineral wool unfaced batt insulation with a rating of R-15.
Each insulation pack will cover just over 34 square feet, so I’d need 6 packages. Accounting for a bit of waste from cutting, I bought 7 packages at $22 each from Lowe’s.
Spray Sealant
Even the most minor cracks can let outside air seep into your home, so I wanted to seal the gaps between the frame and my concrete walls.
Since this was my first time using spray sealant, I used four cans. I didn’t understand how much this stuff expands once it dries, and I was messy in some places.
I bought four cans of spray sealant in total. Two cans of “big gap” sealant and two cans of “small gap” sealant for around $6 each.
Cost to Insulate a Garage: Summary
- 7 John Manville R-15 Mineral Wool Insulation ($22 each): $154
- 4 cans Spray Sealant ($6 each): $24
- Total Cost: $178 for a 10′ x 20′ wall

Cost to Drywall Garage: My Materials
Even the most minor cracks can let outside air seep into your home, so I wanted to seal the gaps between the frame and my concrete walls.
Since this was my first time using spray sealant, I used four cans. I didn’t understand how much this stuff expands once it dries, and I was messy in some places.
I bought four cans of spray sealant in total. Two cans of “big gap” sealant and two cans of “small gap” sealant for around $6 each.
Drywall Sheets
Depending on your local building codes, your garage may need as thick as 5/8 inch drywall, often called “fire-code” drywall.
If your garage is attached to your home like mine is, the wall between the garage and your living space will need to be thicker, 5/8″ fire-rated drywall. It’s a slightly higher cost, but it’ll keep your home compliant with building codes.
In my case, that’s the wall between the garage and the kitchen. If there is a fire in your garage, that will help slow its progress.
If you’re covering concrete blocks like I am, you can opt for the thinner 1/2″ drywall panels. Either way, expect to pay between $10 and $15 per 4′ x 8′ sheet (48 square feet). Always get an extra sheet or two, especially if you’re starting out, so you have room to make some mistakes along the way.
For my 10′ x 20′ garage wall, I bought eight drywall sheets @ $11 each, for a total cost of $88. When everything was done, I had a full sheet and pieces of a second sheet left over, so I could have saved some money here.
You can pick up drywall sheetrock at Home Depot or have it delivered. Delivery can add a little extra, but it’s worth it if you don’t have access to a pickup truck.
Joint Compound
Here in the US, we only have a couple of different options for joint compound. The most popular ones are All-Purpose and Lightweight.
In Canada, there are different compounds for each step in the process:
Taping mud, durabond, finishing compound, dust-control, and the lightweight and all-purpose mud we have down here.
A joint compound is different than spackle and designed for a different purpose. So they have different strengths and consistencies, depending on how you’re using them.
In the US, we accomplish almost the same thing by adding water to thin down the consistency of the mud. We lose some of the specific characteristics of the different mud, but we can buy one tub of it and use it for everything.
I bought a 1-gallon tub of premixed joint compound and burned through it the first day. I vastly underestimated the amount of drywall mud I’d need to do a wall.
After that initial mistake, I bought a large, 60 lb tub of all-purpose, pre-mixed joint compound, and it lasted the entire wall with a lot of compound left over. The total cost was $14.
You can get this through Amazon, but I REALLY don’t recommend it. The same 60 lb tub that you can buy at Home Depot for $14 will cost you over $40.
Drywall Tape
There are two basic types of drywall tape, and I recommend you get both. The cost is very minimal, and you’re definitely going to need both to drywall your garage.
I recommend using mesh tape initially for larger gaps between panels (bigger than 1/4 inch wide).
By attaching the mesh tape over the gap and then stuffing the joint compound through the mesh into the hole, the mesh acts like a support to keep the mud in place.
You don’t want to use the mesh tape everywhere since the mesh isn’t as smooth as the paper tape. But it’s great for filling large gaps in your wall.
I bought one roll each of paper tape and mesh self-adhesive tape for around $3 each.
Cost to Drywall a Garage: Summary
- 8 Drywall sheets ($11 each): $88
- Joint Compound ($13 each): $13
- Drywall tape ($3 each): $6
- Total cost: $107 for a 10′ x 20′ wall
Cost of Tools To Drywall Your Garage
Depending on what you’ve already got in your tool chest, things could get expensive. I had to start from scratch, so this started adding up quickly.
I’m going to list all of the tools I actually ended up using first, and then I’ll have a second section of tools I bought but never found a use for.
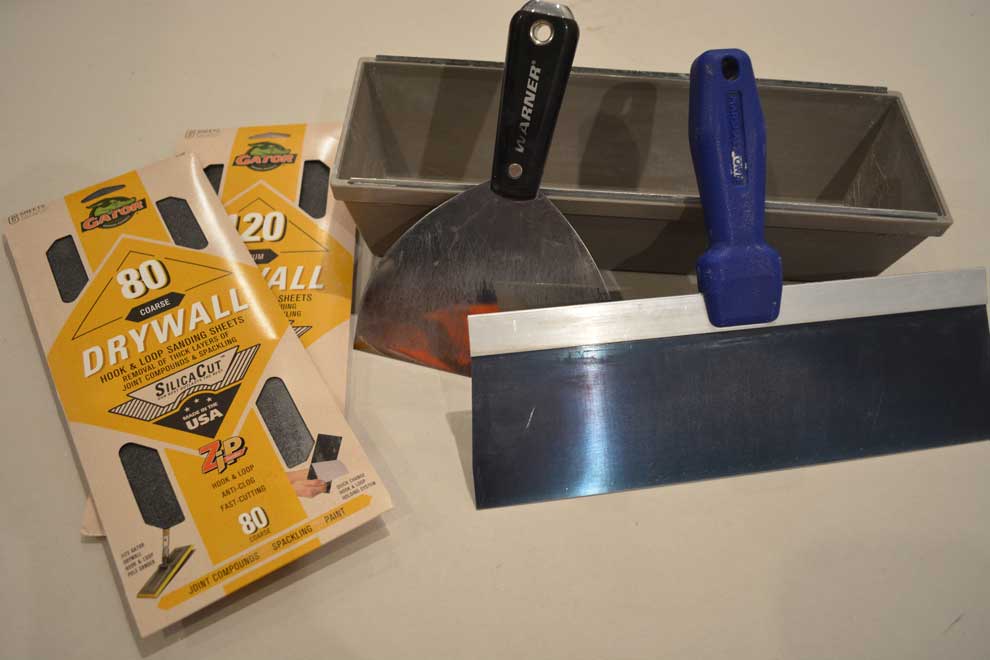
Drywall Mud Pan
A drywall mud pan is simply a rectangular, shallow bucket for the mud you’re working with. It’s got to be wide enough to accommodate your widest knife and not too deep to dry out your mud.
You can usually find these at any big-box store for between $4 for a plastic pan and $18 for an all-metal pan. If you get a pan with a metal edge on the top to clean off your blade, there’s no reason to go expensive here unless you’re doing this for a living.
I bought a plastic mud pan with a metal cleaning edge for $4. If I had to do it again, I’d spend a little extra for an all-metal mud pan that costs between $15 and $20.
One thing to note. When shopping for tools, you’ll see drywall hawks, which are flat metal panels with a handle on them. You use them almost like an artist’s pallet. The way you hold them helps your wrists, but it doesn’t allow you to thin down your mud as much as you may need.
A drywall hawk will make the process more manageable if you do a lot of mudding (like dry-walling a garage for farm machinery). You’ll still need a mud pan to thin down your mud.
6″ Metal Drywall Taping Knife
This is your most important tool, so if you splurge a little….do it here. I used my 6″ knife for everything except the final finishing coats.
Important points: You’re looking for a comfortable knife with a good grip that won’t slip out of your fingers. The blade needs to be metal (not plastic). Buying a blade that won’t get nicked or scratched on the edge is critical. Even a tiny imperfection on the edge will find its way onto your wall every time.
You’ll see “blue steel” and “stainless steel” knives. Blue steel tends to be lighter and more flexible than regular stainless steel knives. It’s usually a matter of personal preference which you want to use.
You can usually find these knives for between $5 – $15. I’ll repeat it, don’t cheap out here. It’s only an extra couple of dollars, making a massive difference.
I bought a 6″ stainless steel blade from Marshalltown with a soft, textured, rubberized handle for around $10. Well worth the extra $3 above the basic steel model.
12″ Metal Drywall Taping Knife
Similar to the 6″ knife but used only in the final finishing steps. Here I wanted a blue steel knife for the extra flexibility in the blade. You’ll still want a comfortable, non-slip handle, but the blade is critical in this step.
I bought a 12″ blue steel taping knife for $10.
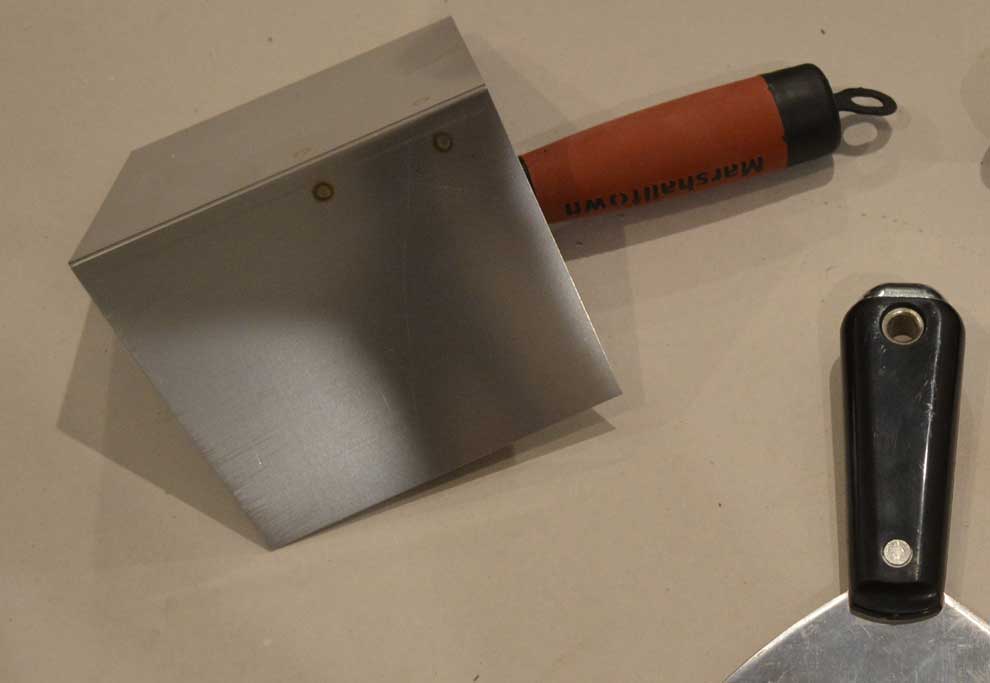
Corner Trowel
This tool is a lifesaver!
Depending on the layout of your garage, you’ll have at least a few inside corners and maybe some outside corners.
If you stand next to a corner and the walls are coming toward you, that’s an inside corner. If they’re going away from you, it’s an outside corner.
An inside corner trowel will let you mud the wall joint and get a consistent, smooth finish in the corner the entire way down the wall. This tool almost made it too easy, so I can’t recommend this enough.
I bought a Marshalltown corner trowel for around $15.
Pole Sander and Sandpaper
The biggest pain in the *%@ about drywalling your garage is sanding the drywall between coats of mud. You want a smooth finish, but sanding down a 200 sq foot wall is murder on your shoulders. I recommend getting a good pole sander to help you out.
A pole sander is just a removable sandpaper head on a long pole. You want to get a head that will lock in the sandpaper so it doesn’t slide around, but beyond that, there’s not much to these tools.
To make things easier on yourself, ensure you get the same brand of sandpaper as your pole sander’s head – or at the very least, make sure it’s compatible.
I initially bought sandpaper that wasn’t designed for the sander head. It constantly slipped as I was sanding the wall.
You will want a minimum of 80, 120, and 220 sandpaper grits.
If your mudding went well and you’ve got nice, smooth edges, swap out the 80 and 150-grit sandpaper for 100 and 150-grit paper. My initial joints were pretty rough, so I had a lot of sanding to do early on.
I bought a Gator pole sander for $15 and several different grits of sandpaper for around $5 each. I had a spare stick in my garage already from painting.
Summary:
- Plastic drywall mud pan: $4
- 6″ stainless steel taping knife: $10
- 12″ blue steel taping knife: $10
- Corner trowel: $15
- Pole sander: $15
- Sandpaper (3 @ $5 each): $15
- Total cost: $69
Drywall Tools I Didn’t Need
Depending on what YouTube training video you watch, they’ll tell you that you need a different length knife for each stage of the finishing process.
That’s great in theory, and if you’re a professional, then, by all means, get specific tools for the finishing stage you’re on. But for most homeowners, you don’t need an 8″ or 10″ finishing knife.
- I used my 8″ knife once to do a finishing pass on my inside corners, but that was it. I still went over them again with a 12″ blade.
- My 10″ finishing knife was only used when cutting drywall tape to length. It happened to be the closest tool at the time. However, it wasn’t really what it was designed for.
I mentioned earlier in the pole sander section that I bought the wrong sandpaper for the sander head that I had. I’d already spent more on the sandpaper than the head itself, so I bought another head (the Gator) compatible with the paper.
Not buying these would have saved me about $30, so please learn from my mistakes.
Hanging vs. Taping vs. Finishing Drywall
While researching adding drywall to my garage, I saw wildly different cost estimates online.
Some places listed $1.50 per square foot (about $300 per wall). Others quoted as much as $3000 for the entire garage.
That’s a huge variance!
Before you decide which route to go, check out my article, where I talk about if a finished garage adds to the resale value of your home.
The reason why is that evidently, there’s a big difference between “hanging drywall,” “taping drywall,” and “finishing drywall.”
Hanging drywall means people will physically hang the drywall on your wall, working around windows and doors and trimming where necessary. When the wall is ready for taping, their job is done.
Taping drywall is the other half of the job. The contractors work with bare drywall and use mud and tape to make a smooth surface for painting. There are 5 levels of drywall finish which I’ll get into a little later. It’s important to know which one you’re paying for.
Finishing drywall is the most ambiguous. Usually, it means the exact same as “taping drywall,” but it can combine hanging and taping drywall. It depends on the contractor. If you get a quote for finishing drywall, get specific details on what is covered.
If I’m paying someone, I expect a paint-ready wall when they’re done. I’d be a little ticked off if all they did was LITERALLY hang the drywall.
That’s one of the reasons why I decided to do the project myself. It took longer, but I saved a ton of money and didn’t have to deal with contractors.
Drywall Finish Levels
Here’s another area where you need to know the right questions to ask your contractor. What finish level do you need if you’re drywalling your garage?
There are five levels of drywall finish. They range from gaps and exposed nails to a perfectly smooth finish.
Obviously, the higher the finish level, the more it will cost to drywall a garage: either in money or your own time.
Why would you want a higher drywall finish? The glossier the paint you want on your wall, or the brighter your garage lighting, the higher the finish level you need.
Any shadows on your wall look like a neon arrow pointing at any imperfections in the wall’s finish if you have bright led garage lighting.
The same goes for glossy paints, which reflect light back to your eyes. I wrote an article on the best paint for garage walls that goes into much more detail on which paint finishes you should use for your garage.
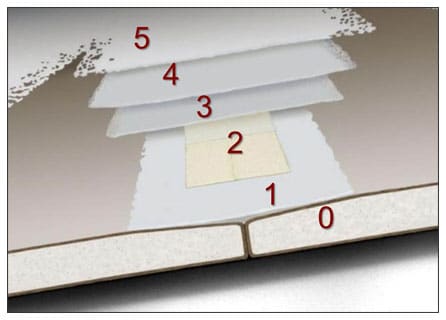
I’ll highlight the levels of drywall briefly here:
- Level 0: This is a “lack of finish” level. The drywall is simply hung on the wall. You can see gaps between the sheets and exposed screws or nails holding it up.
- Level 1: A layer of mud and joint tape is added to help seal the gaps. Normally this is only found in areas of the building that have very little foot traffic.
- Level 2: There’s a layer of finishing mud over top of the drywall tape to help smooth out the joints. There can still a fairly pronounced bulge (speed bump) over the joint. Any screws or nails are covered as well.
- Level 3: There’s an extra layer of finishing mud over all joints and screws ails. Usually this layer is spread with an 8″-10″ joint knife for a more gradual hump over the joint.
- Level 4: Yet another layer of finishing mud over all joints. This layer may be as much as a full 12″ on either side of the joint. It’s very hard to see the individual joints. If you want to use a satin or flat sheen paint, you’ll need this finish.
- Level 5: This adds a final, extremely light, skim coat of drywall mud to help create a uniform wall surface. If you have bright, harsh lighting or you intend to use a glossy paint, you’ll need this level of drywall.
When hiring someone to drywall your garage for you, the cost of the skim coat (level 5) typically costs the same amount as hanging and finishing the drywall to a level 3 finish.
Sanding your wall to get a super-smooth finish takes a lot of time.
If you’ve hired a contractor, each coat usually means another trip back to your house for the workers.
For me, I just meant that I had to wait a day in between coats to allow the drywall mud to dry.
Wrapping It Up
My garage’s drywall and garage insulation cost was much lower than I initially expected.
However, I spent A LOT of time mudding and sanding to get the finish I wanted. If you don’t enjoy doing the work yourself, or you’re pressed for time, I recommend hiring a contractor.
When it comes time to drywall the other wall in my garage next summer, I’ll still do it myself. I’m not in a rush to do the job, and I’d instead put the money to better use than pay a contractor’s labor costs.