In this article, I’ll show you how to insulate cinderblock walls in your garage with batt insulation.
This was the second step in my garage transformation after I built a wooden frame for one of my garage walls. The insulation portion of this project was super-simple and can be done in about an hour as long as your studs are lined up correctly.
If you missed the first post in this series, check them out using the links below:
- Waterproofing your garage walls with Drylok
- Framing garage walls over concrete (step by step)
- How much does it cost to drywall a garage?
- How to drywall your garage
I recommend starting with the waterproofing article so you can see the entire project from start to finish.
What Type of Insulation to Use in the Garage
A big part of deciding whether you should insulate your garage is choosing the right type of insulation.
That means looking at several factors:
- R-Value of the Insulation
- Interior vs. Exterior Insulation
- Faced or Unfaced Insulation
- Foam vs. Mineral Wool vs. Fiberglass
- Batt vs. Roll Insulation
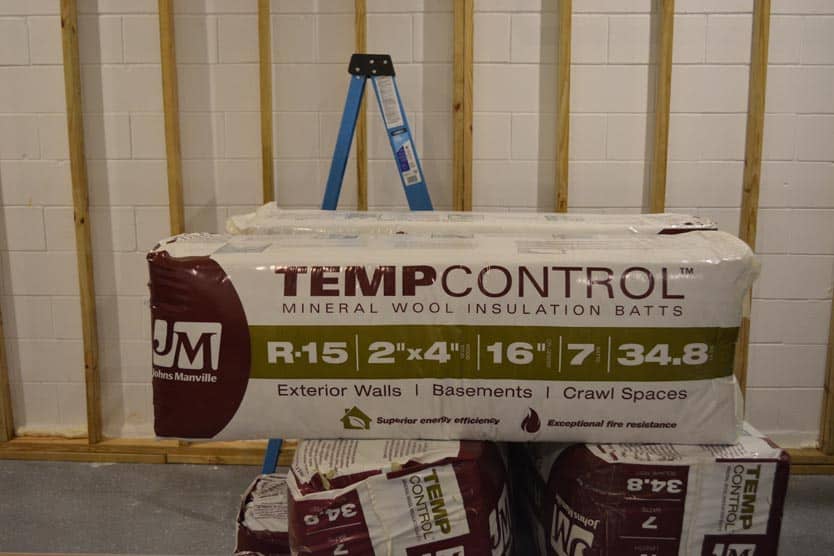
I chose to use Johnson Manville TempControl mineral wool unfaced batt insulation for exterior walls with a rating of R-15.
There’s a lot to that, so let me break it down.
The Insulation’s R-Value
The R-value is a measure of how effective the insulation is. The higher the R-Value of the insulation, the more effective it is at keeping the heat where you want it.
However, you don’t necessarily need to chase the highest R-value possible when you insulate your garage. For example, an R-Value of 16 is only about 5% more efficient than insulation with an R-Value of 8.
My insulation is rated at an R-15, which is good but not excellent.
Since my walls face other buildings and aren’t exposed to direct sunlight, I didn’t feel it was necessary to go crazy high on the R-Value.
Remember, at a certain point, there are diminishing returns.
Get the insulation that works for your garage and your area of the country. Don’t overspend.
Interior vs. Exterior Insulation
Always use exterior wall insulation in the garage.
No matter how well you waterproof, seal, or paint your concrete block walls, they’re still exposed to the elements. Cinder blocks are porous, so plan for moisture to get in at some point.
You want to choose insulation designed to handle it.
Faced vs. Unfaced Insulation
Next, you’ll need to decide whether to get faced or unfaced insulation.
Faced insulation is insulation with a barrier on one side made from aluminum foil or paper.
Typically, you want to use unfaced insulation when you don’t need a vapor barrier or have a separate moisture barrier. In Florida, I do not, so I opted for unfaced insulation.
Matt Risinger, a builder in Texas on the cutting edge of building science (yes..that IS a thing), has a great video about whether or not you need a vapor barrier.
Rigid Foam vs. Mineral Wool vs. Fiberglass Insulation
Many homeowners choose spray foam or rigid foam insulation, and in certain situations, they’re the right solution. In fact, I have a rigid foam board insulation kit on my garage door.
Rigid foam can be attached directly to cinder block walls, making it cheap and effective.
However, since I already had a wood frame over my concrete block walls, I had other options available.
Mineral wool insulation is similar to the fiberglass insulation we know and…well…tolerate.
Generally speaking, mineral wool will have slightly higher R-values than the same thickness of fiberglass insulation. However, it will be considerably heavier.
You can usually find mineral wool and fiberglass insulation at a similar price. This comes down to personal preference.
Batt vs. Roll Insulation
Batt insulation is similar to a roll of insulation, except they’re cut in strips instead of one continuous length. In my case, the strips are sixteen inches wide x four feet long.
Batts are easier to install than rolls because there are fewer cuts to make. However, they’re more prone to air leaks since it relies on the installer to get a good fit.
How to Insulate Cinderblock Walls in Your Garage (Step by Step)
Here’s my step-by-step process for how I insulated my concrete garage wall.
Step 1: Seal Up Any Gaps
Even the smallest cracks can cause drafts, so we want to seal any gaps before insulating our concrete garage wall.
Air sealing the walls differs from insulating them, but they go hand-in-hand.
You’re spending your hard earned money to insulate your garage. Sealing the gaps behind the walls will set you up right from the start.
What Type of Air Sealant To Use
I used a combination of several different sealants because I didn’t buy enough at the beginning.
However, when I returned to the store, I found an excellent sealant that also included an insect repellent.
I’m used to finding Daddy Longleg (Cellar) spiders in my garage, so a sealant with an insect repellant is a nice added benefit.
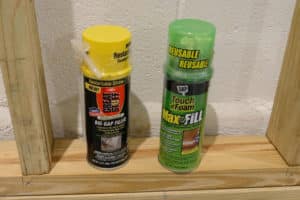
Sealants come in “big gap” and “small gap” varieties. The “big gap” is for any gaps larger than one inch that you want to fill. For everything else, use the “small gap” spray.
I suggest purchasing some of both. Depending on the gap you’re filling, you’ll need some of each.
I definitely did.
How to Use Air Sealant (Cleaning up the Mess)
Start by spraying the sealant in every gap between the frame and the concrete.
I like to spray a little bit on a small area to see how the spray expands.
Ideally, you want the sealant to look like a solid bead that runs along the gap between the frame and the concrete, like in the picture below.

It’s common for the sealant to bubble up and expand over the edge of the frame. Be sure to clean that up before you put the insulation on top.
In other areas, my spray sealant wrapped around the edges of the frame, which required me to trim it with an X-acto knife.
As you can see from the image below, it was really sloppy. This made it a pain to trim and sand it once it dried.
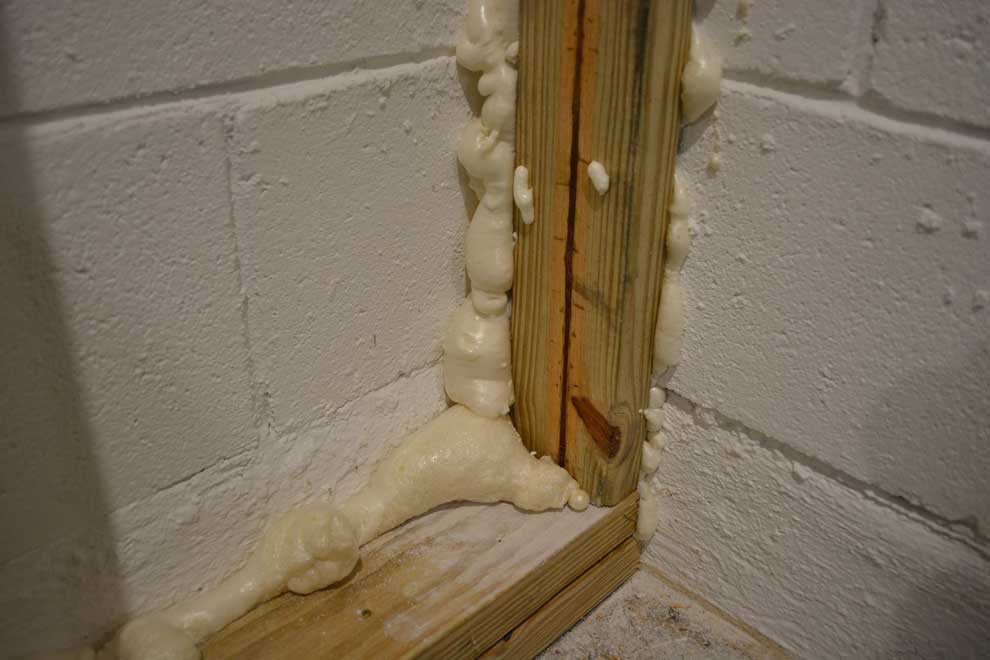
In this corner, I trimmed out the outside edges flush to the frame, then cut out space to allow the insulation to fit flush.
The goal is for the sealant to look as uniform and neat as possible. Still, don’t be shy about making a mess.
It’s easy to trim off the excess to make it neat.
Remember, we don’t get points for neatness. We get them for keeping drafts out of the house.
Step 2: Safety Precautions
Here’s my little safety warning.
Wear long sleeves and gloves when you install insulation.
Fiberglass insulation is made up of tiny particles of glass which can irritate the skin. Even if you’re using mineral wool insulation like I was, keeping exposed skin protected is still a good idea.
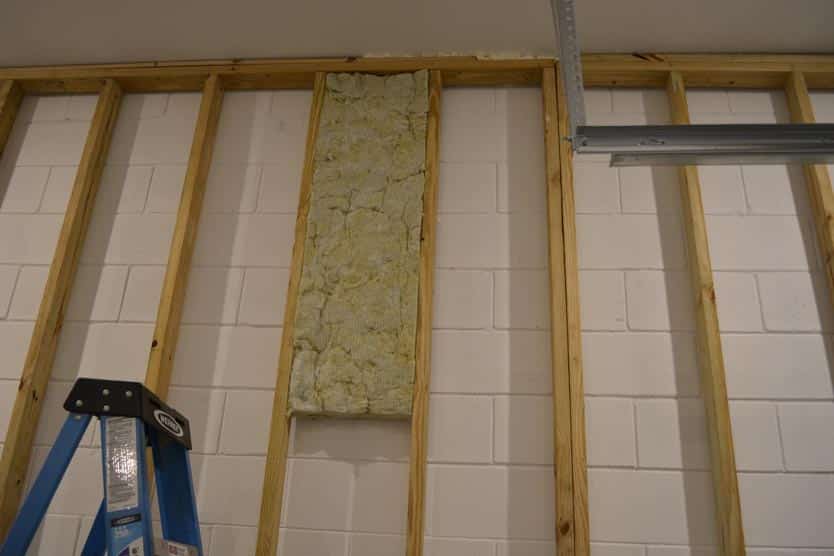
Step 3: Insert the First Piece of Insulation Near The Ceiling
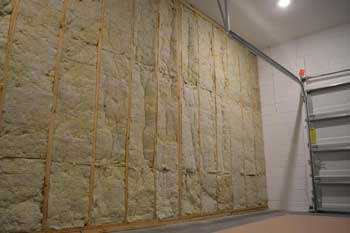
Installing insulation on my concrete block garage wall was one of the easiest things I’ve done around the house. It took less than an hour, including cutting pieces to fit.
Start from the top corner and work your way down.
Batt insulation is designed to fit snugly in between your wall studs, as long as your studs are a standard width (either 16″ or 24″).
Important note: Never compress the insulation!
Insulation needs space to breathe.
More specifically, it needs to trap the cold air between the exterior wall and not let it through to your garage.
That means it’s critical to avoid compressing the insulation to fit a space. When it doesn’t fit snugly in the area you’re trying to put it, cut it to fit using your knife.
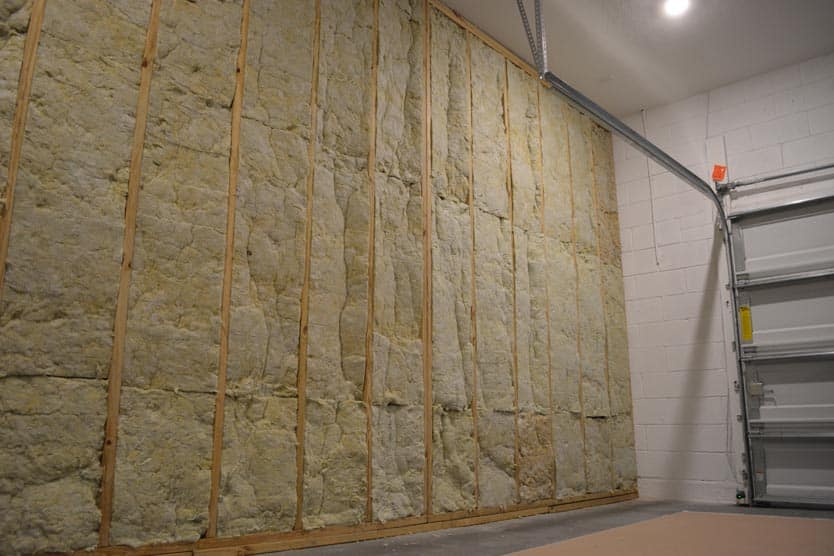
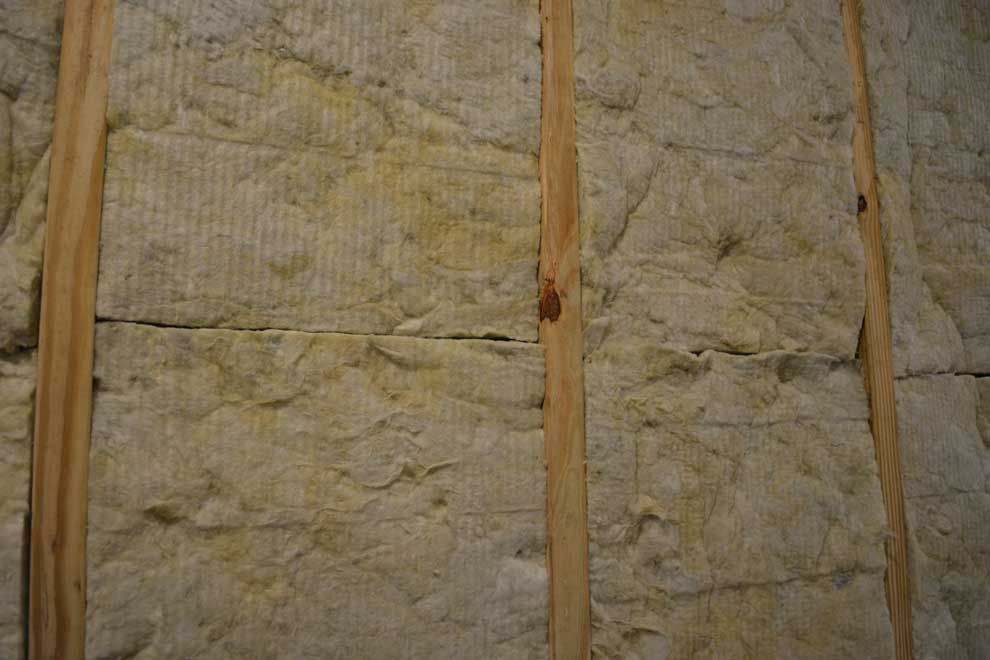
Ensure the edges of the insulation fit flush with the edges of the garage wall stud. That way, when the drywall is mounted on top, there’s a minimal gap between the drywall’s edge and the insulation’s edge.
In the image above, note how almost all edges are flush except for the top center.
If you have a section that’s pressed in slightly like that, pinch the insulation and try to fluff it out a bit. You don’t want any space where large pockets of air can be trapped.
Step 4: Continue Down the Wall
The top row of insulation is easy.
The challenge comes when you put the next piece of insulation underneath it.
Use the same techniques to ensure a clean fit with the piece above it. Slide the next piece of batt insulation about 3″ underneath the one above it.
Then, gently slide the insulation up the stud until it rests against the batt above it.
I’m going to sound like a broken record, but your goal here is not to compress the insulation. If you do, it will lose its ability to keep the outside air where it belongs – outside.
In the image above, you can see one join that worked out perfectly (on the left) and one that had to be fluffed out a bit (on the right).
Obviously, you’ll want everything to fit snugly as it does on the left. But even if it doesn’t, you can still adjust.
On the right side, I’d pull out the right corners next to the stud, so it’s as smooth as possible.
Not every join will be perfect on the first try, and it’s worth going back and taking a second look once you’re all done.
Remember, we want to have as smooth a surface as possible for the drywall to lay on top.
Step 5: Cut the Bottom Insulation Pieces
If you’re lucky, it’ll all work out perfectly, so you can use full lengths of batt insulation for your garage walls.
That never happens, by the way.
You’ll always have to cut the insulation to fit at some point. For me, it was a little 2′ section at the bottom.
Note: You do not want insulation to touch the concrete floor. Because garages are prone to flooding, always leave a gap between the garage floor and walls. This still applies if you have a top-rated garage floor coating.
If you need to cut the insulation to fit, grab your utility knife, tape measure, and a T-square or level.
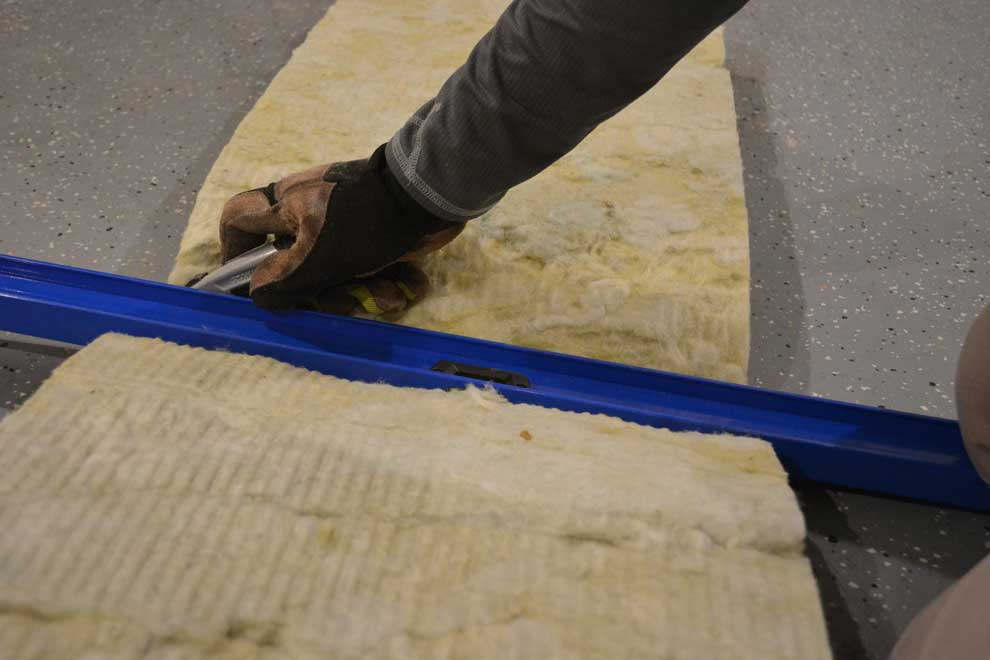
Measure so the insulation is long enough to fit snugly without any gaps.
Once you have the length you want, use your T-square or level as a guide. Then use your utility knife or X-acto knife to cut the insulation to fit.
Remember: don’t compress the insulation.
Step 6: The Finished Product: An Insulated Garage Wall
Depending on how many pieces you have to cut, installing the insulation will only take an hour or so per cinder block wall of your garage.
Insulating my Cinder Block Wall: Cost
For one garage wall (20′ long x 10′ high), my total cost for sealant and insulation was under $200.
That’s pretty good when you consider that finishing your garage will increase your home’s resale value. It’s a small investment now that will pay off when it’s time to sell the house.
Spray Sealant
Since this was my first time ever using spray sealant, I used four cans. I didn’t understand how much this stuff expands once it dries, and I ended up being messy in some places.
I could have gotten away with three cans, but I’ll do the calculation with four to be consistent.
Total cost: $24
Insulation
Each insulation pack will cover just over 34 square feet, so I needed six packages. I factored in a bit of waste from cutting, and I bought 7 packages at $22 each from Lowe’s.
Total cost: $154
Grand total: $178
Wrapping It Up
Overall, I’m pleased with the way that the insulation turned out.
I was really impressed by how much of a difference it made by insulating my concrete garage walls. I can definitely feel the difference in temperature during the summer.
The next step is to drywall the garage. Stay tuned!