
I finished framing and insulating my garage wall in the previous step of my personal garage transformation. Now, I only need to install the drywall and slap some paint on it before this part of the project is complete.
In this article, I’ll cover how to drywall a garage that started cinder block before I added a wood-frame and insulation.
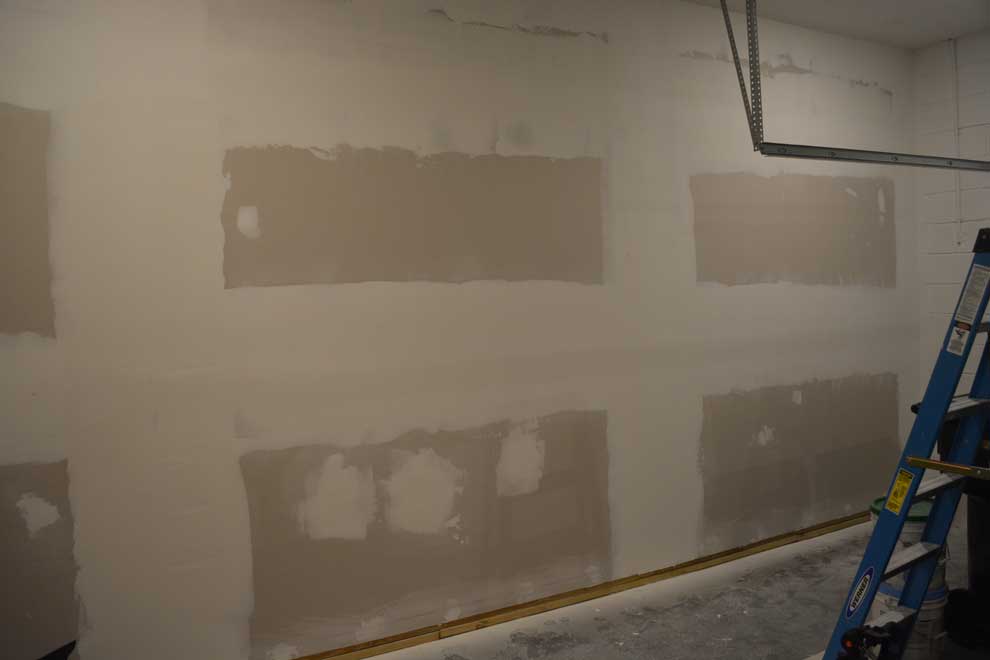
Table of Contents
Should You Drywall a Garage?
Drywalling garages can be complicated, but there are several good reasons why you might want to consider it.
Your garage would be more comfortable year-round. If you live in a colder climate, installing drywall over insulation can keep your garage above freezing in the winter, which helps keep your pipes from freezing. In warmer climates, like Florida, where I live, insulation and drywall help keep the hot air outside where it belongs. Either way, your garage is more comfortable to work in.
It’s much easier to add additional electrical outlets. Once the house is built, running the wiring through the cinder block can be messy and complicated. After you frame the wall, adding additional outlets and hiding the wires in the wall is easy. You do it just like you would throughout the rest of your house.
Finishing your garage will add value to your home. Studies have shown that a finished garage can add several thousand dollars to the sale price of your home. Even if it doesn’t directly add money to the sale price, a well-done garage will set your home apart from others in your area.
How to Drywall a Garage Step-by-Step
You should already have your garage wall framed with pressure-treated lumber and insulated.
The only thing left is to seal it with drywall and mud, then prime and paint it.
We’ll be covering both in the remainder of this article, but I’ll split the tutorial into three sections:
- Installing garage drywall
- Finishing garage drywall
- Priming and Painting
I’m doing that because the tools and techniques you’ll use are very different at each step of the process.
So let’s get started.
How to Install Garage Drywall
In this section, you’ll install the drywall panels on your wall.
Professionals will call this Drywall Finishing Level 0 because, technically, the garage drywall is just hung and not finished.
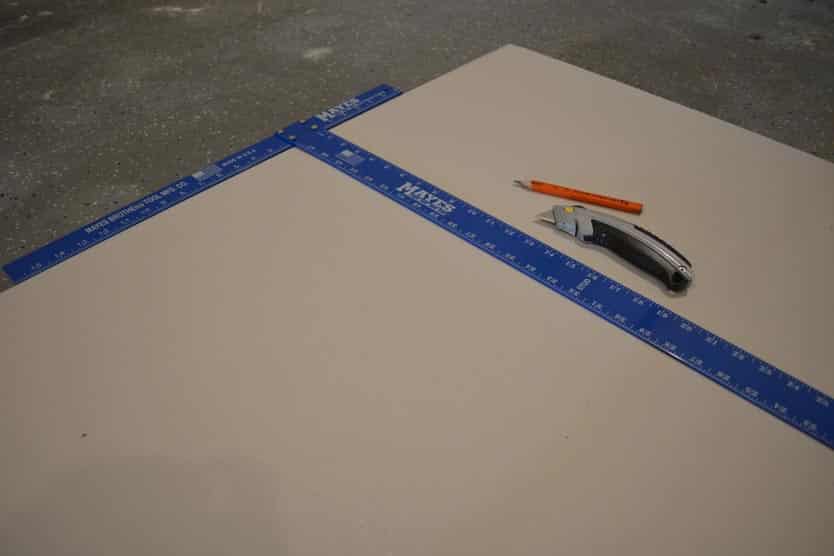
Tools you’ll need
- Cordless screwdriver
- 1 5/8” drywall screws
- Heavy cutting knife
- Tape measure
- Carpenter’s T-Square
- 4’ level (or longer)
- Carpenter’s pencil or marker
Lessons Learned
This is the first time I drywalled anything larger than a patch in the wall. During this process, I found several things I’ll do differently when I drywall the other wall in my garage.
Next time, the primary thing I’ll do differently is start at the top of the wall instead of the bottom.
The standard garage size height is around 10′ high, so you’ll need to cut some drywall sheets to fit. It’s better to have those joints and seams near the bottom of the wall instead of the top.
The empty space near my ceiling is right next to my garage lights, highlighting any imperfections in the wall. The area near the floor will be much farther from the light, and you’ll likely have tools or cabinets covering them anyway.
I’ll also use more drywall screws for the wall on the other side of the garage. You want to ensure the wall is snug to the studs and doesn’t pop out.
In the image at the top of the article, you can see that I only used drywall screws around the edges of the drywall sheets. While finishing the drywall, I noticed that the sheet was popping off the stud, so I had to go back and add additional screws to make it fit right.
I recommend getting another set of hands to help you lift the drywall sheets into place and secure them. Doing this yourself is possible, and I’ll show you how. Having help makes it much easier and lessens the chances that you’ll strain your back in the process.
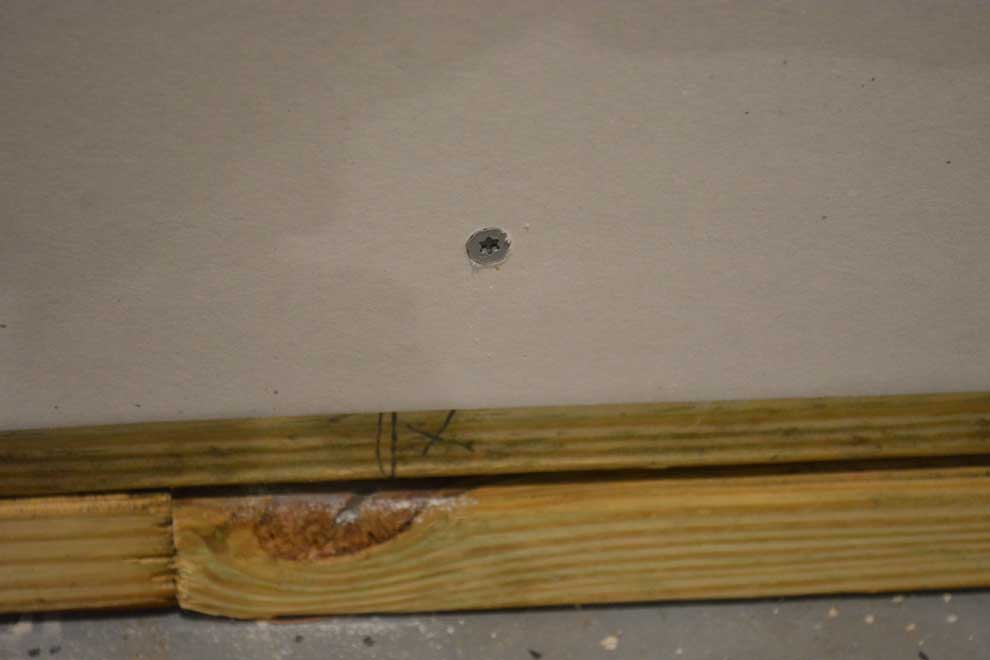
Where the Drywall Meets the Floor
There needs to be a small gap where the drywall meets the floor.
Drywall and concrete are both extremely porous. Any water left on your garage floor can seep into the concrete and through the garage drywall.
Obviously, the impact is lessened if you have one of the best waterproof garage floor coatings. However, you’ll still want to be careful here.
If it can’t dry quickly, mold can grow behind your walls and create big, expensive problems down the road.
I planned to leave a two-inch gap between the floor and the bottom of the drywall. Ideally, the gap doesn’t need to be that large – ¾ of an inch will do.
I went with a larger gap because I’ll be installing interlocking garage floor tiles down the road. I wanted to leave myself enough room, so I didn’t have to cut the drywall later.
I also added an L-shaped metal channel designed for roofing applications to help channel any water spills along the bottom of the wall and out through the garage door.
It took a little construction adhesive to lock it into place and a small bead of silicone sealant to keep water from getting underneath the metal.
For less than $10 per wall, I have a water-tight barrier for my drywall walls.
Step 1: Plan Out How to Arrange Garage Drywall Sheets
Most drywall sheets come in 4′ x 8′ panels, so you can hang them horizontally or vertically.
If your garage is 10′ x 20′, you’ll have to make some cuts, no matter how you hang your garage drywall.
The object is to make as few cuts as possible and make them in inconspicuous places.
In my case, I opted to hang the sheets horizontally, which meant I’d have narrower sheets along the top and one side that would need to be cut.
I had slightly more cuts to make this way, but ultimately, I wasted drywall sheets.
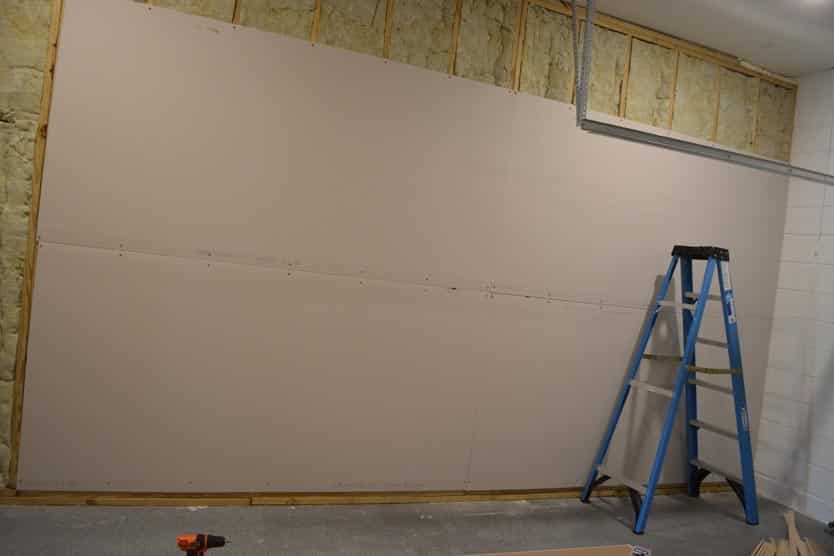
Step 2: Hang the First Drywall Sheet
You must get the fit on the first sheet as clean as possible. Every other sheet of drywall you hang will depend on this.
If you make a mistake here, you may not figure out how bad it was until you reach the end.
I’m speaking from experience here.
Put the first piece of drywall snug up in the upper corner of the wall where it meets the ceiling.
You want to make sure it’s right next to the walls and ceiling. Don’t worry about leaving a gap on this sheet.

If you elect to start from the bottom, as I did, you can use scrap pieces of wood to raise the drywall sheet off the concrete floor.
I only recommend starting from the bottom if you have a garage that will fit your garage drywall sheets without cutting any to fit. Otherwise, start from the ceiling.
Either way, having a helper hold the drywall in place while you secure it with drywall screws is good.
Since I was using ½” drywall sheets, I opted for 1 5/8 inch drywall screws. You’ll want the screws to be at least an inch longer than the width of your drywall so they have enough room to sink into the stud and keep the garage drywall sheet secure.
Once the drywall sheet is in place, it’s time to make minor adjustments to ensure a good fit.
Take your time here. It’ll pay off in the end.
Once you’re satisfied with how it looks, it’s time to lock that first sheet of drywall down.
Use a drywall screw every 8″ -12″ along every stud – not just the studs along the edges of the drywall sheet.
Securing the drywall sheet along every stud will ensure there aren’t any gaps where the drywall can pop out.
Tighten the screws just far enough into the drywall so that they’re flush with the garage drywall sheet. If it’s too high, they’ll bulge out from the wall. If it’s too deep, you’ll shred some of the drywall.
If you don’t feel confident in getting it right, use your cordless screwdriver to tighten the screw and finish it off with a hand screwdriver.
Step 3: Hang the Remaining Full-Size Drywall Sheets
Once the first sheet is secured, it’s time to hang the rest of the full drywall sheets. Start with any snug against the ceiling and the first sheet you’ve already hung.
You may have pieces that don’t fit precisely flush to every edge. Garages have a slight slope, so any liquids that spill on the floor will run out toward the garage door.
It’ll feel like you’re trying to put a rectangular peg into a trapezoid-shaped hole somewhere along the line.
That’s OK.
When deciding where to leave a gap, look for the place that will stand out the least.
For example, if you have to leave a gap between the wall and the ceiling or between two pieces in the wall, I’d leave the opening at the top.
We can cover both, but the farther the gap is from eye level, the easier it will be to hide.
Here’s where having a second pair of hands would be helpful. If you don’t have someone around, you can invest in a drywall lift that holds the panel until you secure it.
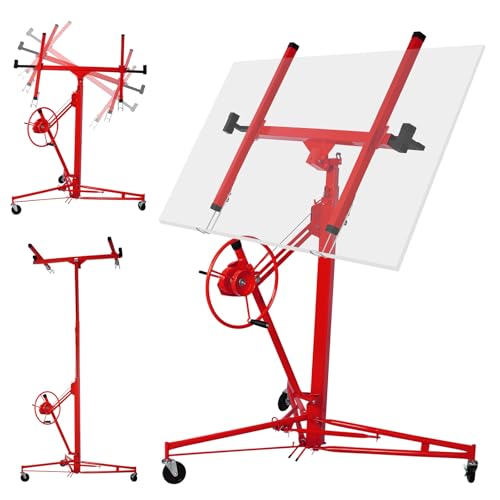
- Sturdy welded steel construction with powder coating
- Caster Wheels For Easy Rolling
- Hoist tilting for ceilings and walls
- Built-in winch with brake
- Foot Stops To Keep The Lift In Place For Safety
- Easy assembly and disassemble no tools required
Secure each sheet of drywall with drywall screws along each stud, just as you did with the first sheet.
Once you have the full-size pieces in place, you can start making some cuts.
Step 4: Cut Garage Drywall Sheets To Fit
You’ll need to cut several pieces to fit unless you have a perfectly sized garage.
You want to leave no more than a ¼” gap along each edge when you make cuts. We can fill anything up to a one-inch gap. Ideally, you want to make the gap as small as possible.
Take measurements at the top and bottom of the empty section. Grab a fresh sheet of drywall or a scrap section with enough area to make the cuts.
Important note: If you’re using a scrap sheet of drywall (one that you’ve already cut pieces out of), use as many factory edges as possible.
Even if you make perfectly straight cuts, the factory edges are rounded slightly to help them fit together smoothly.
Once you’ve got the measurements, mark them on the top and bottom of the new garage drywall sheet with a carpenter’s pencil or marker. Mark them on the front of the sheet, not the paper backing.
Using a carpenter’s T-square or long level, connect the two markings lightly with your pencil so you have one solid line to cut along.
I believe in “measure twice and cut once,” so now’s a good time to double-check your work before you make that cut.
Once you are satisfied with the measurements, it’s time to make the cut.
On the front side of the drywall sheet, make a deep incision into the drywall, but don’t cut through the paper backing.
As you see below, we want to make the cut barely deep enough to fold the sheet along the line.
The cut doesn’t have to be perfectly clean, but the straighter it is, the better it will fit with the pieces next to it.
With the sheet folded along the line, you can easily cut through the paper backing with your knife.
Once you’ve got the piece cut, test the fit and make any minor adjustments before you screw it into place.
Repeat the process until you’ve mounted all of your garage drywall sheets.

How to Mud & Tape Garage Drywall
In this section, we’ll make that new drywall look pretty and ready for paint.
I’ll be including a couple of YouTube videos from a fantastic series from Vancouver Carpenter.
I watched many different drywall tutorial videos but learned the most from this guy. I highly recommend binge-watching his channel before getting started!
Drywall Tools You’ll Need
Most homeowners should have essential drywall tools like a 4″ drywall knife and a drywall pan.
But just because you have them lying around doesn’t mean you should necessarily use them.
Check the edges of your drywall knives to ensure that there aren’t any nicks or gouges.
Any imperfections on the blade’s edge will be transferred onto the wall when trying to smooth out the mud.
- 6″ stainless steel drywall knife
- 10″ or 12″ taping knife. You can usually get by with only one of these, so it’s a personal preference here. I went with a 12″ blade.
- Corner trowel. This is a lifesaver and makes corners super-easy. I went with the Marshalltown 4″ x 5″ corner trowel, which you can find on Amazon.
- Drywall mud pan. Either get an all-metal pan or something with a good metal edge.
- Pole sander. I like Gator Finishing products, but you can use whatever you want here.
- Sandpaper in various grits. I ended up using the 80 grit and 120 grit the most.
- Paper drywall tape
- Joint compound (drywall mud). This usually is around $15 for a 60 lb tub at your local Lowe’s or Home Depot.
- (Optional) Mesh drywall tape if you have larger gaps that you need to fill

Mudding Tips & Tricks
Check your edges! I mentioned this above, but it’s worth repeating. Check the edges on your blades.
Keep them clean. If they get damaged, get a new tool. I went over and over the same section of the wall, trying to fix imperfections, only to find out that my drywall knife was causing them.
Get a comfortable tool that fits your hands. I bought a couple of new knives because the cheap ones hurt my wrists.
The 6″ blade with the black handle above was great…for about 30 minutes. The handle was heavy and was hard to hold for long periods. My advice is to find something that you’re comfortable with…even if it costs a bit more money.
Buy a big tub of joint compound from the start. I thought I could get by with a one-gallon tub of joint compound, but I burned through it quickly and had to run back out to the store for more.
The worst part was that the bigger containers only cost a few dollars more for a lot more compound.
Drywall Mesh Tape vs. Paper Tape
I’m glad I learned this secret before I started because there’s so much misinformation online about using paper drywall tape vs. mesh tape.
Most online articles will say to use mesh tape.
However, I’ve talked to professional drywallers who only use mesh tape for specific things.
Paper tape:
- is more rigid, so there’s less likely to be cracks in the joints
- has a built-in seam in the middle, making it ideal for corner joints
- is thinner and smoother, so it’s easier to hide
- is cheaper (usually about $3 a roll)
Mesh tape is:
- self-adhesive so it can be used to cover larger gaps
- more flexible
- stronger overall than paper
- faster to set since you don’t have to embed the mesh tape into joint compound
I found that mesh tape was harder to cover up with drywall mud.
Because the mesh fibers are thicker than the paper tape, I used more coats of joint compound and had to spread the mud out farther to hide the joint.
Step 1: Fill any Large Gaps
You will have gaps between your garage drywall sheets, and some will be too big to fill with joint compound by itself.
In fact, anything larger than ¼” needs something to help keep the joint compound in place. As you can see in the image below, that’s where I used mesh tape.
This gap was probably small enough to use paper tape, but some areas of the wall definitely needed the mesh.
You may not need mesh if you’re lucky enough (or good enough) with your garage drywall installation.

Once the mesh is in place, you can stuff drywall mud in the gap through the mesh.
The mesh will hold it in place, allowing the joint compound to set correctly.
Let it dry overnight, and then you can fill and sand like any other joint.
Step 2: Mud Over the Drywall Screws
While waiting for the joint compound to dry in large gaps, you can fill in the drywall screws.
Before you start, look at your screws and ensure they’re flush in the drywall. If they’re sticking out, you’ll notice the edge of the screw through the mud.
I like using two coats of mud to cover up the screws to ensure smoothness. You could get away with only one coat, but the extra drywall mud it takes to cover them again is minimal. It’s definitely worth it.
Take your 4″ drywall knife and cover the screw with some joint compound. Use a fairly heavy pressure to scrape off any excess, then let it dry.
You should be able to cover all the screws on the wall in around thirty minutes.

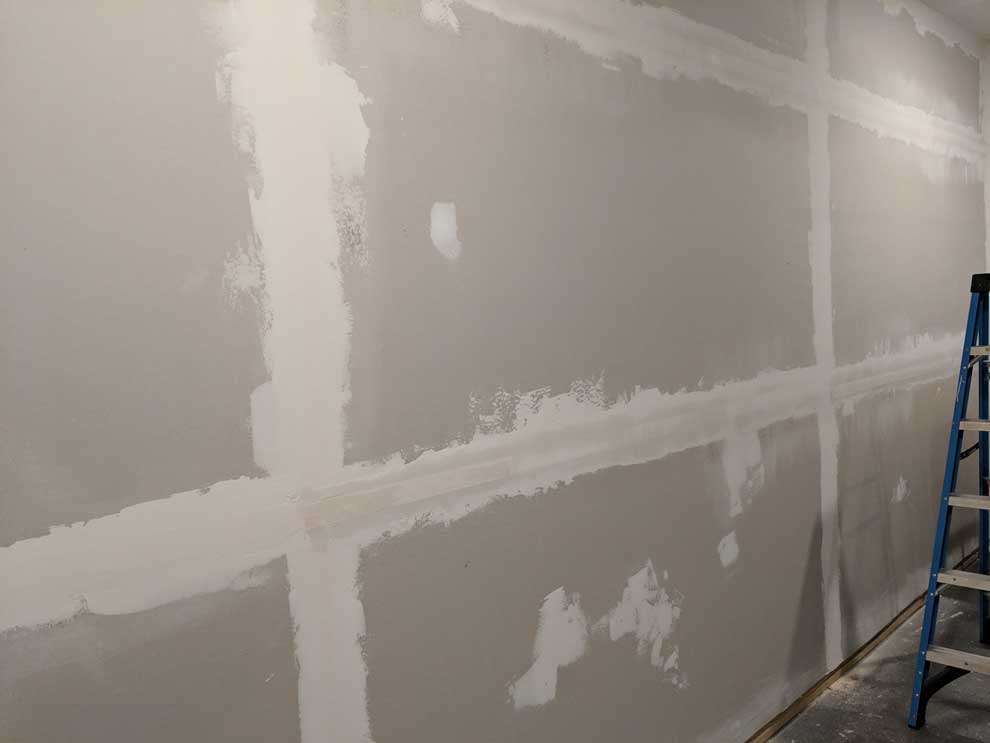
Step 3: Tape the Seams
Let’s finish up those last significant gaps between the drywall sheets to get this wall sealed up and looking pretty.
The joints are where you’ll make or break the finish of your wall.
Nail this step, and your wall will be as flat as a racetrack.
If you mess it up, your wall will have more speed bumps than an elementary school zone.
There are two types of joints: flat joints and butt joints. The main difference is how the two garage drywall sheets fit together. No matter how you fit your drywall sheets together, you’ll have a mixture of both on your wall.
If you hold a drywall knife against the wall to bridge the joint and you can still see daylight between the blade and the fall, it’s a flat joint.
Skip to 2:30 in the video below to see what a flat joint looks like.
Flat joints are the easiest because there’s a natural valley between the drywall sheet’s two recessed edges.
You can build up the valley to a smooth finish, and you won’t have to spread the drywall mud out from the joint very far.
By contrast, butt joints don’t have a valley between your garage drywall sheets, fitting right up against each other.
If you aren’t careful with butt joints, this is where you end up with “speedbumps” on your walls.
No matter what joints you’re filling, take as much time as you need to smooth out the edges of your drywall mud.
The smoother the edges are now, the less you’ll have to sand later.
Let them sit overnight when you’ve taped and mudded your joints. You’ll usually find some small (or not-so-small) mistakes you must fix.
It’s much better to catch them early.
When you mess up…
If this is your first time working with large amounts of drywall, you will mess up.
Drywalling takes practice.
After this project, I have a lot of respect for the tradesman who does this for a living.
I’ve learned that everything can be fixed if you catch it before painting the wall.
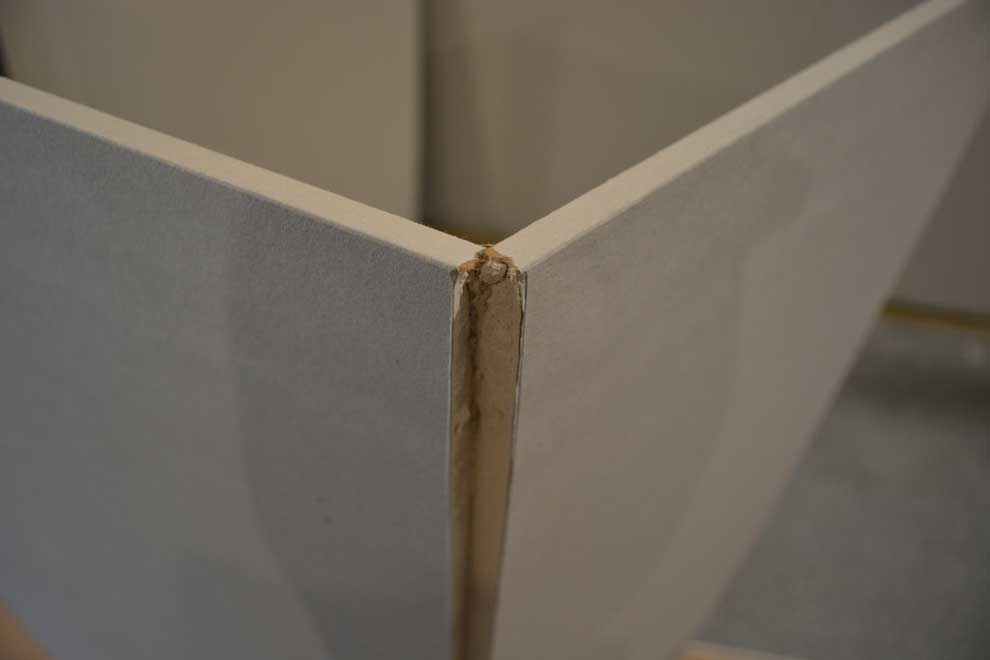
The tape started to bubble up from the surface in a couple of places because I didn’t have enough joint compound underneath the tape.
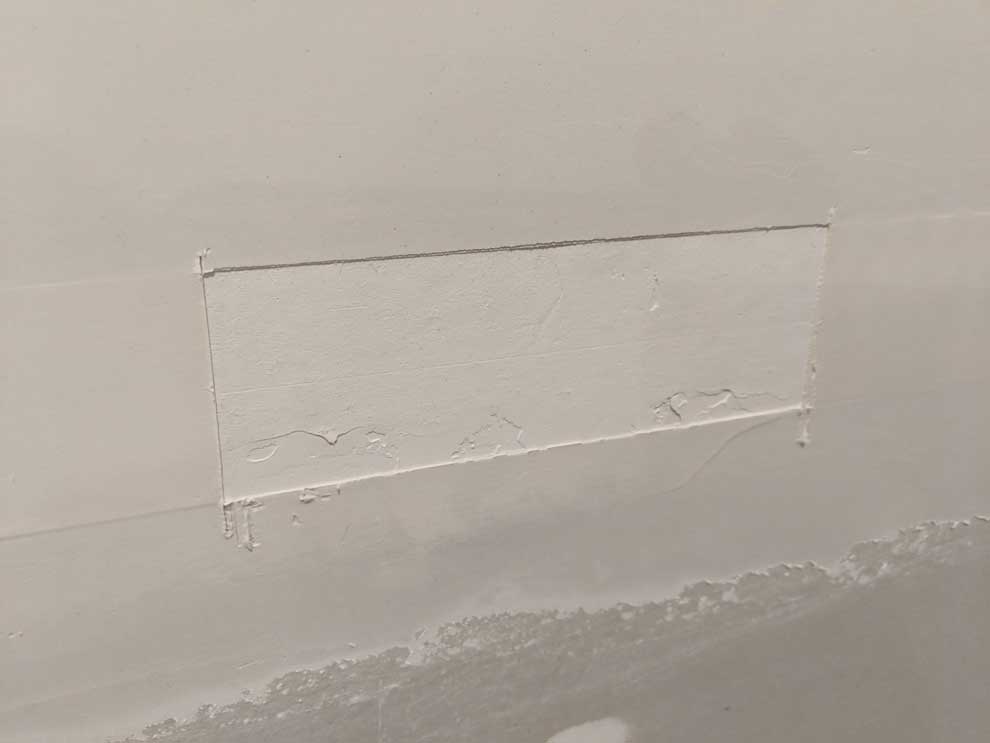
This picture shows one of the first joints I did. You’ll see a few problem spots, like messy edges that needed a lot of sanding, but the big one I want to talk about is the bubble in the drywall tape.
This is one of the reasons why they recommend letting the joints dry overnight to allow these bubbles and imperfections to show up.
When I saw the first bubble on my wall, I freaked out. I thought I would need to re-tape the entire joint, but that’s unnecessary.
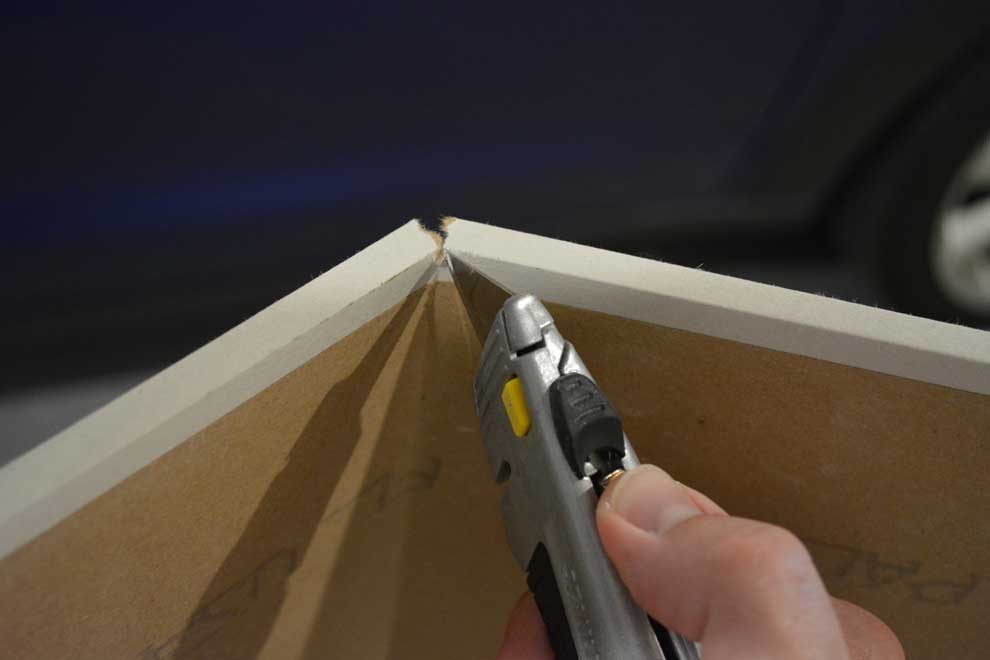
Thankfully, all you need to do is cut out the bubbled section with your utility knife and replace that section.
In the picture above, you’ll see shallow knife marks on either side of the bubble. This is where I will make the incision to cut out the bubbled drywall tape.
Be sure to let the drywall tape adequately dry before you do this!
Once the offending piece of drywall tape is cut out of the wall, you can fill it like any other joint.
Just be sure to put enough drywall mud underneath the tape this time.
The drywall tape will need to overlap the edges slightly so you don’t have cracks in the wall show up down the road.
Once all major imperfections are taken care of, it’s time to move on to the finishing stage.
Step 4: Sand and Smooth. Sand and Smooth
This step is simple: Every time you add drywall mud to one of the joints, you lightly sand the wall after it dries to get it as smooth as possible.
I’m not going to lie. Sanding and smoothing garage drywall sucks – especially if you were sloppy with feathering out the initial edges of your seams like I was in some places.
Sanding is really dusty, even if you get a low-dust drywall compound. I recommend moving or covering up anything that’s still in the garage.
Move your car to the driveway for a few days while you finish up.
Yes, I said, “a few days.”
You can hide a lot with a good texture on your wall, but that doesn’t mean you can skimp out here.
This part is all about minor fixes. You’ll check each joint and seam individually to make it as level as possible.
Start with a clean, dry 6″ or 8″ drywall knife if you have them. Pace the knife directly over the seam at various points and look for gaps that need to be built up or places where the knife rocks from side to side.
Skip to 0:50 of this video to see an example of the process.
If you find a spot where the knife is flat against the wall but still see the light between the wall and the blade, you need to add drywall mud until the gap disappears.
If you find an area where the knife rocks back and forth (skip to 2:12 in the video above), you’ll need to spread the mud from the center of the joint until the wall is smooth.
Once it’s dry, lightly sand it smooth and recheck the fit.
Eventually, you’ll repeat the process with longer drywall knives, rulers, or levels until you’re satisfied that the wall is smooth. Another helpful test is to close your eyes and run your fingertips along the wall to feel for imperfections.
Once I couldn’t find any gaps in the wall using a 4′ level, I moved on to the next seam.

Step 5: Skim Coat (Optional)
If you’re using a texture on your wall, apply a skim coat as a final step before priming and painting.
A skim coat is a light coat of drywall mud that adds a thin, final layer of drywall to give a consistent surface to paint on.
You’ve probably got sections of your wall with several coats of drywall compound and other areas where you can see the drywall underneath.
Bare drywall is more porous than joint compound, so the paint will adhere to the surface slightly differently.
Applying paint directly to the wall at this step, even paint with a primer in one, you’ll still see differences between the sections with mud and those without.
Some people use a skim coat to even out the surface and make it consistent.
If you’ve done a good job sanding and smoothing your wall, I’d skip the skim coat and opt for a dedicated primer coat instead.
More on that in a later section.
How Many Coats of Drywall Mud Do You Need?
Now that we know what to use to perfect your mudding, let’s dive into what each coat of drywall should look like. This way, you can figure out how much you will require for your next project.
Remember, it’s better to apply thin coats of drywall compound to cut down on sanding.
First Coat
Your first coat of drywall mud should be smoother and softer, having a consistency much like sour cream. This layer will hold your drywall tape in place and fill in any screw holes or imperfections on the surface. This step will require a small, thinner, putty knife to tackle the tiny areas.
The seams should be smooth, and this first coat should dry for 24 hours. You will not have to sand much after the first coat as long as you remove any clumps or bumps with your putty knife during the application process.
Second Coat
The second coat of drywall mud will go directly over the drywall tape. In some cases, you can apply the second coat immediately after the first coat when you adhere the paper tape to the wall. This process can save time since the first coat will be thin and will help the drywall tape stay in place.
Other times, you will need to sand down the first coat in spots with uneven texture or lumps. Once the sanding is complete, you can apply the second coat of mud.
Touch up any spots you missed around the corners or screw heads the first time. A wide, flat putty knife will help distribute the mud efficiently and make the sanding process less hassle.
Allow the mud to dry completely for 24 hours or more.
It should be white and chalky-looking. If the drywall mud is off-white or beige, it is still wet and will need more time to dry.
Applying the mud too thick will take extra time to dry, so scraping and smoothing are critical steps that help save time in the finishing process.
Third Coat
Sanding the second coat is vital in preparation for the third application of drywall mud. You want smooth edges around any taping spots, corners, or imperfections you touched up.
Then, use thicker drywall mud to go over the previous layers and scrape it evenly across the drywall.
There should be no visible bubbles or ridges. This coat can be challenging if you are a beginner and use a thin putty knife. If you are still relatively new to drywall mudding, opt for a broader knife to help create a smoother surface.
The third coat will need at least 24 hours to dry before you sand it down thoroughly.
Fourth & Fifth Coats
Many DIYers will need to apply a fourth and fifth coat to their drywall in the final preparation for any painting. It is normal to continue with an extra coat or two for the perfect finishing touches if your drywall is uneven or you are still new to smoothing the edges down.
Remember always to allow each coat to dry between application and sanding. Otherwise, you risk damaging the area and having to restart the process all over. It is always better to wait a little longer to ensure the mud is dry rather than take the sandpaper to it too early.
No matter how many coats of drywall compound you use, the final coat should always be sanded perfectly flat. Any imperfections on the drywall panels will show up under bright garage lighting.
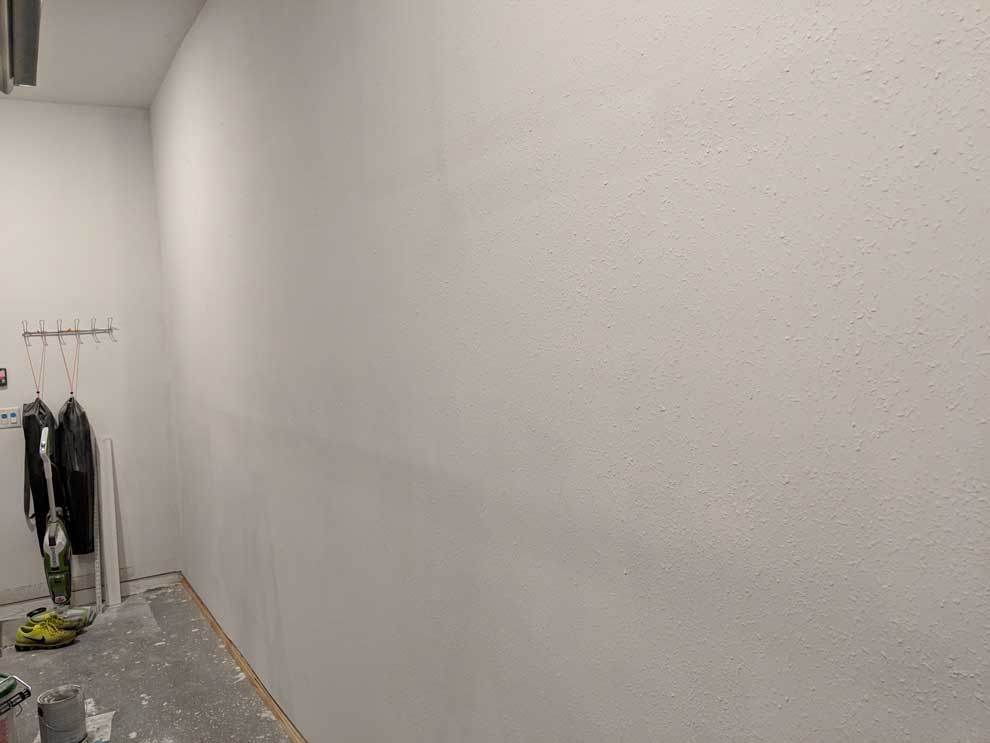
Finishing Garage Drywall: Priming & Painting
We’re almost done!
Finishing my garage drywall was the most challenging part of this project, and I was glad to have it over and done with.
All that’s left is adding texture, priming, and painting the wall.
That should take a few hours, including drying time.
Tools you’ll need
- Homax water-based drywall spray texture (optional)
- Latex primer
- Latex paint
- 3/4 inch paint rollers
- Painter’s tarp, plastic or old towels to protect against over-spray
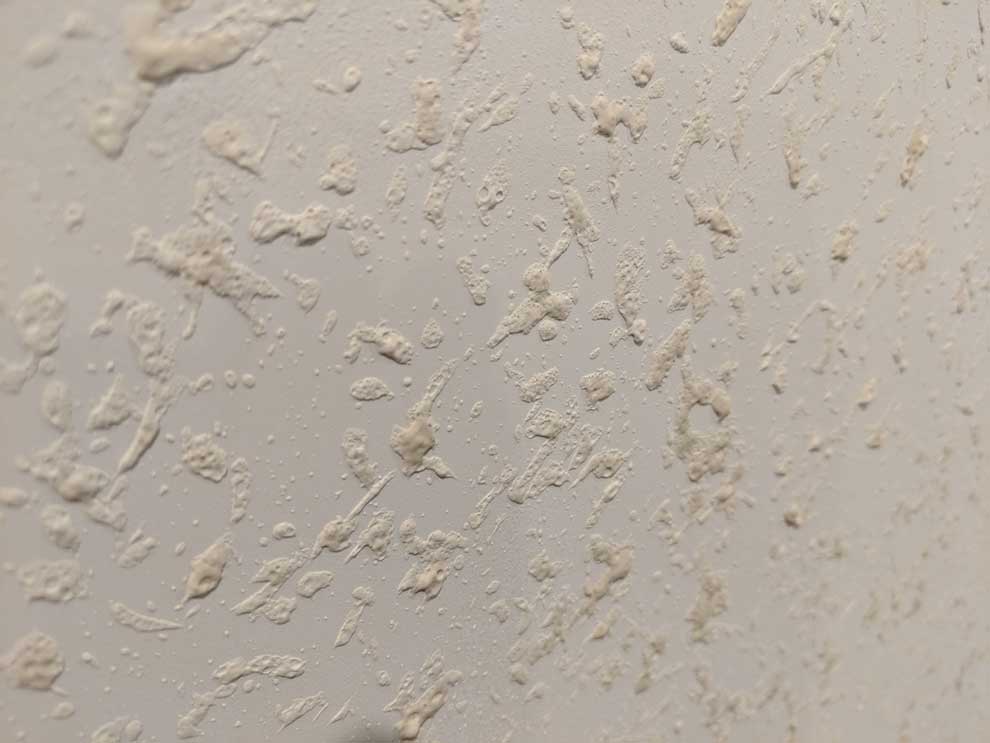
Here in Florida, homes have an ‘orange peel’ texture on every wall, including the garage. Initially, I didn’t want to use any texture on the garage walls.
A smooth wall has a sleek, cleaner appearance.
However, the wall between my garage and kitchen was already drywalled and textured. I’d either need to smooth out the existing wall or add a texture to the new walls.
To make things easier, I opted to add the texture to the new walls to match the old ones.
Your only decision is whether to use an oil-based texture or an acrylic (water-based) texture. If you’re using latex paint (which is more common), you’ll want to use a latex texture.

Step 1: Add the Texture
I like Homax spray texture because you can configure it with many settings to get a heavy or light texture. It’s designed for spot fixes like drywall patching, but you can use it for an entire wall.
Before starting, take a few minutes to lay down some plastic tarps or old towels to protect the floor against overspray.
Also, if you have cabinets or trim close to the area you spray, use painter’s tape and plastic to protect it.
I needed two full cans for my 10′ x 20′ wall. Each can is a little over $10, so adding the orange peel texture was around $30.
Grab a can of the texture and some scrap cardboard to test the settings and get used to how the spray comes out. Make your mistakes here without risking the finish on your brand-new wall.
Once you’ve got the settings to your liking, apply the texture to the wall. Like any spray paint, the secret is to blend the texture with the existing wall, so don’t worry about overspray on the other walls.
It’s common for the spray texture to be higher than the orange peel on your existing walls. That’s easy to fix after the primer coat, so I’ll touch on it in the next section.
After about 30 minutes, the texture will be dry enough to primer coat over it.
Step 2: Apply Primer
Once the texture is dry, it’s time to add the primer coat.
Even if you’re painting with a paint that includes primer, it’s good to use a dedicated primer on brand-new garage drywall.
I chose the Valspar Interior Multi-purpose water-based wall and ceiling primer that I picked up at Lowe’s.
There’s nothing special about it, so if you’re partial to a particular brand, then, by all means, use that. The gallon only cost $15, and I had plenty left over after the wall was done.
It’s essential to keep the primer consistent with your paint. If you’re using an oil-based paint, then use an oil-based primer. Use a water-based primer if using water-based (acrylic) paint.
Primer takes approximately 30 minutes to one hour to dry to the touch, but leave about three hours before you paint over it.
If you need to adjust your orange-peel texture, do it after your first coat of primer.
If you need to make adjustments, you can go over the texture lightly with either a 4″ drywall knife or some smooth 200-grit sandpaper.
Use a very light amount of pressure. You only want to take off the peaks in the texture, not huge chunks of it.
This process should only take a couple of minutes at most.
Step 3: Painting Garage Drywall
All you need to do now is paint the wall, and you’re all done!
Homeowners and Do-It-Yourselfers argue about whether to use interior or exterior paint for your garage.
I’ve written a longer article about choosing the best paint for garage walls, so I won’t get into that here. The short version is that you want to use interior paint (never exterior paint!) and a satin finish.
I recommend using two coats of paint on the wall to ensure a nice, even finish. Just let each cost fully dry before starting on the next coat.
Other Frequently Asked Questions:
Can You Drywall an Unheated Garage?
Yes. The biggest thing to worry about is moisture, not heat. If there are large swings in temperature, condensation could form inside your walls and develop mold or rot. I recommend waterproof drywall panels if you have an unheated garage.
A climate-controlled garage helps to minimize the risk of mold and rot. However, you can still add garage drywall and heating or air conditioning later if necessary.
Can You Drywall a Garage with No Insulation?
Yes, but it will only be for cosmetic effect. The drywall itself does very little to stop airflow.
Unless you live somewhere that is a constant (and comfortable) temperature year-round, I highly recommend adding insulation before you decide to drywall your garage.
What is the Building Code for Garage Drywall?
Most residential building codes only specify the wall between the garage and your living space. You’d need a ¾-inch thick drywall as a fire barrier on that wall.
Exterior-facing walls can use ½ inch drywall, but ¾ inch drywall is still recommended. As always, check with your local building codes to see if you need a permit to drywall your garage before starting.
What Type of Drywall Do You Use in a Garage?
According to the ICC Building Codes (2018), you need at least 1/2-inch drywall on the walls between the garage and any living spaces. You need at least 5/8 inch drywall on the ceiling if you have additional living space above the garage.
| Separation | Material |
| From the residence and attics | Not less then 1/2 inch gypsum board, or equivalent applied to the garage side |
| From habitable rooms above the garage | Not less than 5/8 inch Type-X gypsum board or equivalent |
| Structure(s) supporting floor/ceiling assemblies used for separation | Not less than 1/2 inch gypsum board or equivalent |
| Garages located less than 3 feet from a dwelling on the same lot | Not less than 1/2 inch gypsum board, or equivalent, applied to the interior side of exterior walls that are within this area. |
There’s no explicit requirement that the garage drywall sheets need to be mold-resistant. However, it is recommended unless your garage is climate-controlled.
Wrapping it Up
I’m not a handyman, but I’m really proud of this wall. This is the biggest project I’ve ever taken on at home. Sure, it had some rough spots and mistakes along the way, but I’m looking forward to starting on the other wall.
From here, my next steps are to mount my garage cabinets and then add some custom flooring. Once the flooring is in place, I’ll add baseboards between the drywall and the garage floor.
I hope you’ve enjoyed this series and got something valuable from it. If you’re considering putting drywall in your garage, I hope this made it less scary.
If you missed a step in my garage drywall project, you can check them out here:
- Waterproof your garage walls with Drylok
- Frame garage walls over concrete step-by-step
- Insulate garage walls step by step
- How much does it cost to drywall a garage?
If I can do it, so can you. Thanks for following along!